Roadmap to create a website
100 ChatGPT prompts for bloggers - FREE!
From how to create outlines to a perfect content-calendar.
you just need the right prompt.
Click Here

Interesting fact – Today websites can reach millions of people in less cost than TV can do, also with higher ROI
Having a website is essential for reaching a broader audience, making good income and establishing credibility”.
If you’ve been searching for creating a website but don’t know where to start, this roadmap is for you.
Table of Content
bloggers' - kit
Make beautiful blogs. Faster!
Instead of 1 post per week, make 2 high-quality posts per day.
Get it Today! 🙂
Get HereStep 1
In step 1 you will learn that: Only 4 things are sufficient in the beginning to set-up and launch your website online.
"Only 4 things" to launch your website
Yes, you will need only 4 things initially to launch your website. Now let’s take a look –
1. Domain name (1st thing)
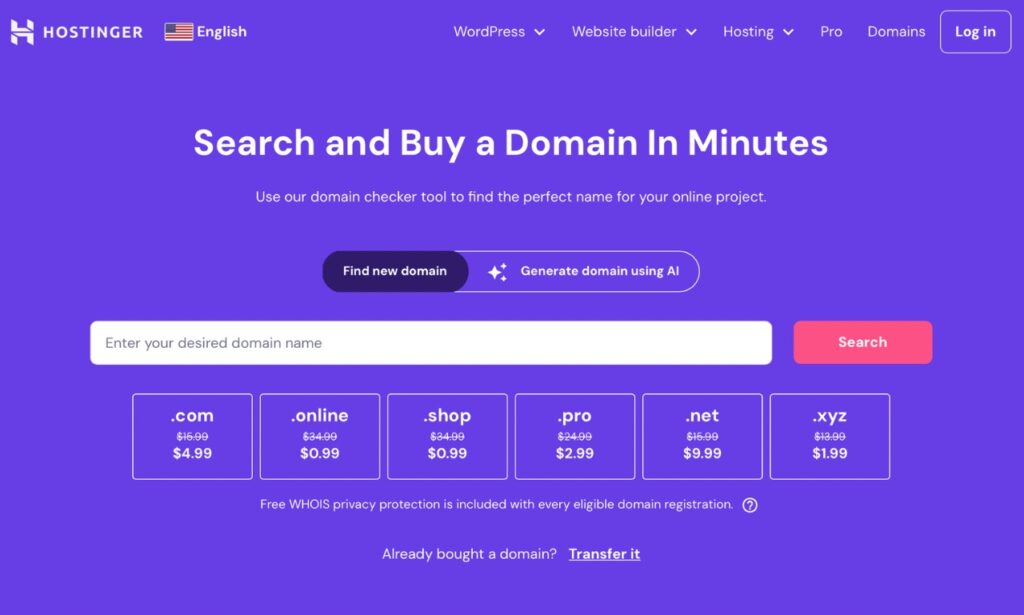
- A domain name is like your website's address on the internet. It's what people type into their browser to find your site, like www.example.com
- Just like a house needs an address so people can find it, your website needs a domain name - so visitors can find it online.
Process of Getting a Domain-Name:
If you have a domain idea, you can purchase a domain under $1 or for free if bought with hosting.
Now let’s look at the process:
- Choose a Domain Registrar: Go to a domain registrar like GoDaddy, Hostinger, or Namecheap. Remember, if you buy domain with hosting you can get domain for free, check here.
- Search for Your Desired Name: Type in the domain name you want to see if it’s available.
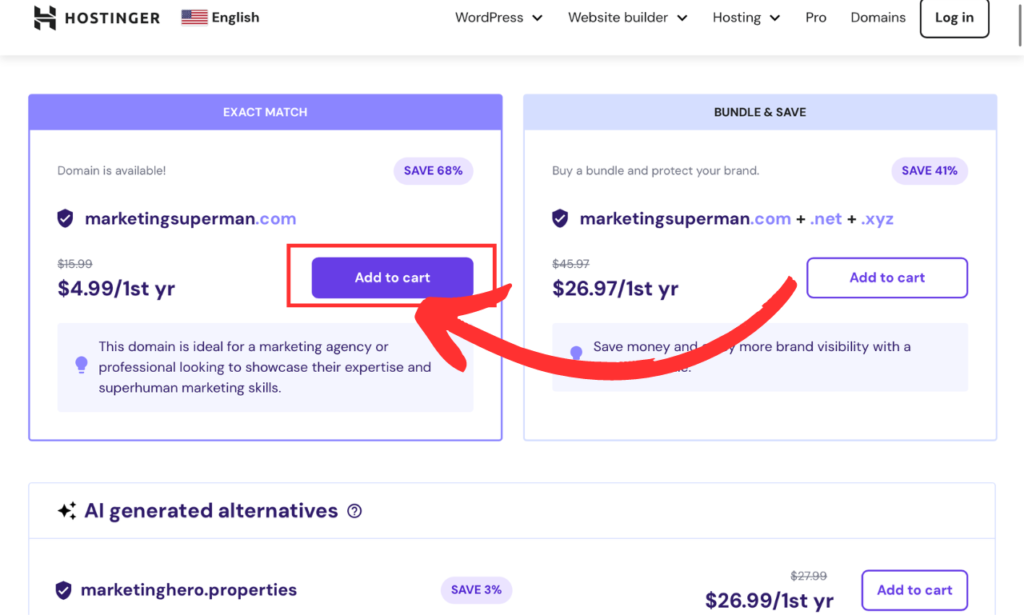
- Select Your Domain: If your desired name is available, add it to your cart.
If you have a domain idea, you can purchase a domain under $1 or for free if bought with hosting.
Now let’s look at the process:
Go to a domain registrar like GoDaddy, Hostinger, or Namecheap. Remember, if you buy domain with hosting you can get domain for free, check here.
2. Search for Your Desired Name:Type in the domain name you want to see if it’s available.
3. Select Your Domain:If your desired name is available, add it to your cart.
-
- Purchase the Domain: Follow the checkout process to buy your domain name. You’ll need to provide some basic information and payment details.
You can get addition discount by using our affiliate link here: hostinger.com
- Purchase the Domain: Follow the checkout process to buy your domain name. You’ll need to provide some basic information and payment details.
Follow the checkout process to buy your domain name. You’ll need to provide some basic information and payment details.
You can get addition discount by using our affiliate link here: hostinger.com
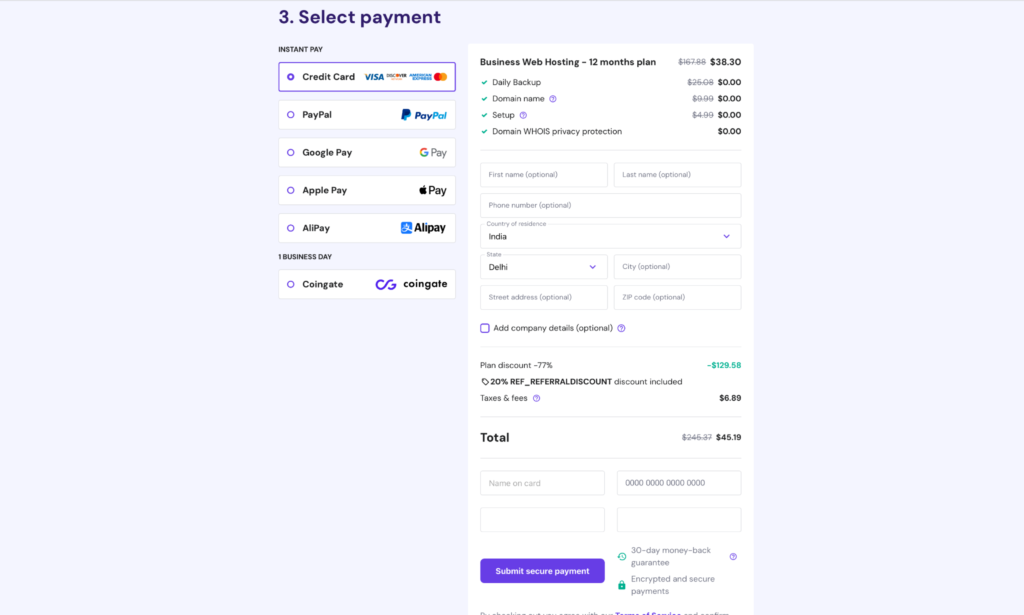
Table: "websites to get your domain-name, from any one
| Easy to use and provide free domain and also provide SSL certificate. | |
| BlueHost | Provide free domain |
What domain we use ?🤔 – We (marketingcourseguide.com) got this domain name from hostinger.com, you can also get from hostinger.
2. Hosting (2nd thing)
- Hosting is like renting space on the internet for your website. It's where all your website's files and data are stored.
- Just like a house needs land to sit on, your website needs hosting to exist and be accessible on the internet.
Process To Get Hosting:
You can get hosting from a hosting provider – under $2 per month if taken yearly plan, also you can get domain-name free with hosting – Check here.
For now lets find out how to get the hosting
- Choose a Hosting Provider: Go to a hosting provider like SiteGround, Bluehost, Hostinger or HostGator.
- Select a Hosting Plan: Choose a plan that fits your needs. For beginners, a shared hosting plan is usually sufficient. Choose according to Up-Time, SSD availability, SSL, CDN, if you don’t know what these are don’t worry, just look at the review about hosting and buy shared hosting.
Now be careful here, otherwise you may miss the “free-domain” with hosting. Check here for the plans.
You can get hosting from a hosting provider – under $2 per month if taken yearly plan, also you can get domain-name free with hosting – Check here.
For now lets find out how to get the hosting
1.Choose a Hosting Provider:
Go to a hosting provider like SiteGround, Bluehost, Hostinger or HostGator.
2. Select a Hosting Plan:
Choose a plan that fits your needs. For beginners, a shared hosting plan is usually sufficient. Choose according to Up-Time, SSD availability, SSL, CDN, if you don’t know what these are don’t worry, just look at the review about hosting and buy shared hosting.
Now be careful here, otherwise you may miss the “free-domain” with hosting. Check here for the plans.

- Register or Connect Your Domain: During the sign-up process, you can register a new domain or connect a domain you already own.
- Purchase Hosting: Complete the checkout process to purchase your hosting plan. You’ll need to provide payment details and set up your hosting account.
During the sign-up process, you can register a new domain or connect a domain you already own.
4. Purchase Hosting:Complete the checkout process to purchase your hosting plan. You’ll need to provide payment details and set up your hosting account.

Table: Buy hosting, select any one
| Easy to use and provide free domain and also provide SSL certificate. | |
| BlueHost | Provide free domain |
Which hosting we use?🤔 – Our website, which you are using right now, is hosted on hostinger.com, you too can get hosting from hostinger.
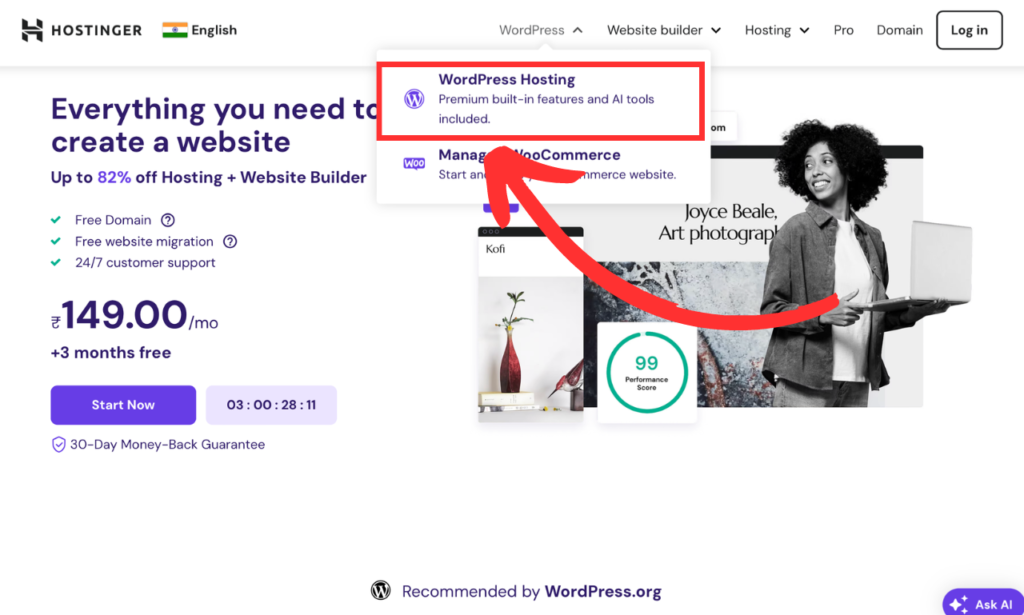
3. WordPress installation (3rd thing)
- WordPress is a tool that helps you build and manage your website without needing to know how to code.
- It's like using building blocks to create your house, making it easier and faster to design your website.
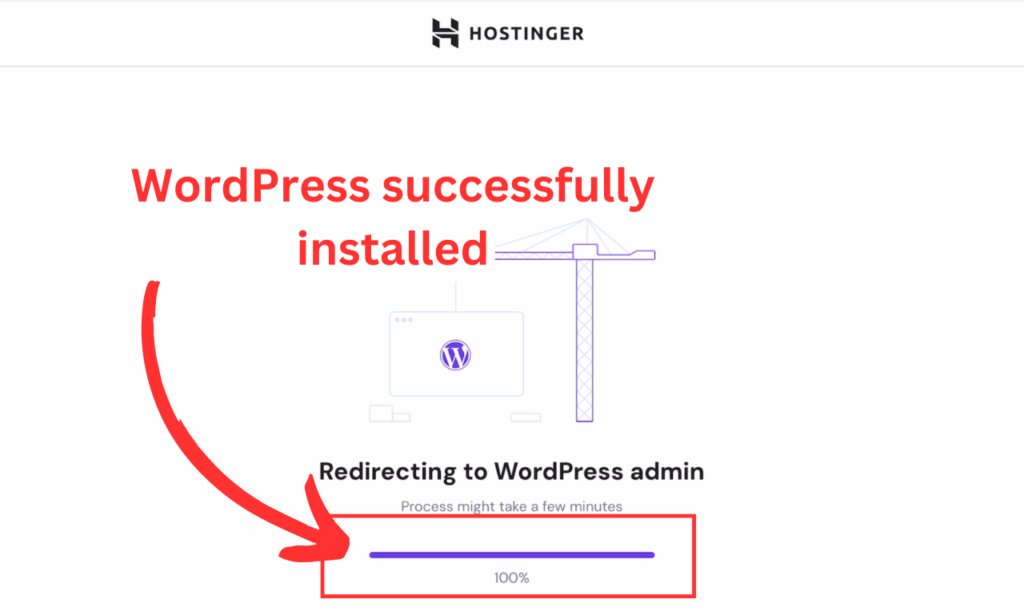
How To Install WordPress
You can Install WordPress for free on your hosting provider, the process could be different for you as process depends on the selection of Hosting provider:
Now let’s get into the typical process
- Log In to Your Hosting Account: Access the control panel (cPanel) of your hosting account.
- Find One-Click Install: Look for the WordPress icon or a section labeled “One-Click Installs” or “Softaculous.”
- Install WordPress: Click on the WordPress icon and follow the prompts to install WordPress. You’ll need to enter some basic information like your site name, username, and password.
- Access Your Site: Once WordPress is installed, you can log in to your new site by going to yourdomain.com/wp-admin and entering your username and password.
- One Click Process: In some cases like for “hostinger.com” you may only have to click once to install WordPress. See below images for reference.
Install this for free on your hosting provider by followilg the below process:
Now let’s get into the process
Access the control panel (cPanel) of your hosting account.
2. Find One-Click Install:Look for the WordPress icon or a section labeled “One-Click Installs” or “Softaculous.”
3. Install WordPress:Click on the WordPress icon and follow the prompts to install WordPress. You’ll need to enter some basic information like your site name, username, and password.
4. Access Your Site:Once WordPress is installed, you can log in to your new site by going to yourdomain.com/wp-admin and entering your username and password.
5. One-Click Process:In some cases like for “hostinger.com” you may only have to click once to install WordPress. See below images for reference.

What we use?🤔 – This website is managed using WordPress.org – currently for free.
4. Themes (4th thing)
- What It Is: A theme controls how your website looks and feels. It includes the design, layout, and colors.
- Why It Matters: Just like choosing the style of your house (modern, traditional, etc.), a theme makes your website look attractive and professional.
How To Install Theme
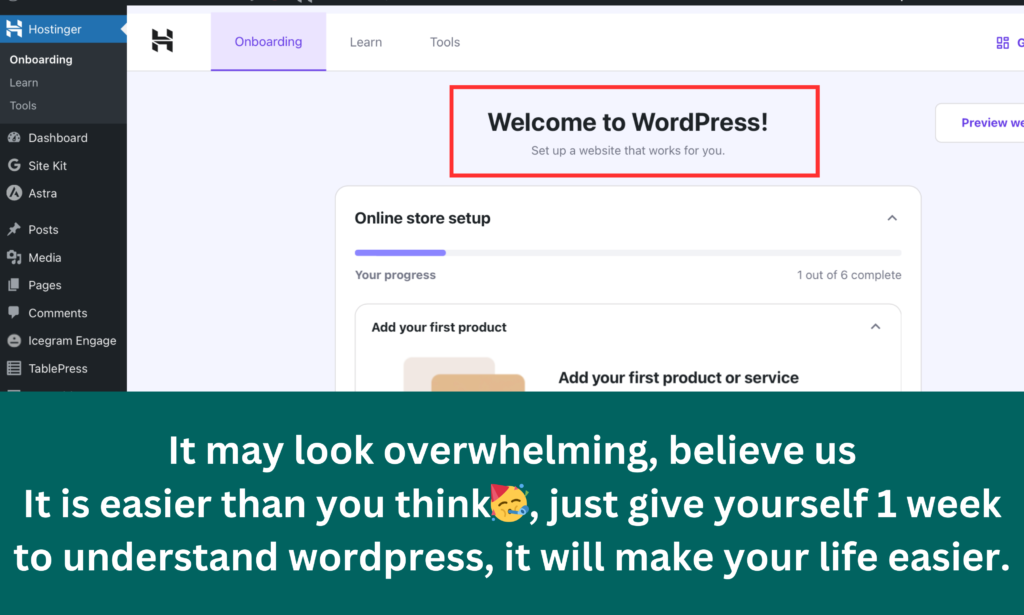
You can install any theme on you website by searching it in Appearance > Themes. Install any free or paid theme according to your budget, “Astra” theme could be a nice option.
Recommended: If your website have some data, please make Back-up of your data otherwise you may lose it🤦♂️.
Now let’s get into the typical process
- Log In to WordPress Admin:Go to yourdomain.com/wp-admin and log in with your username and password.
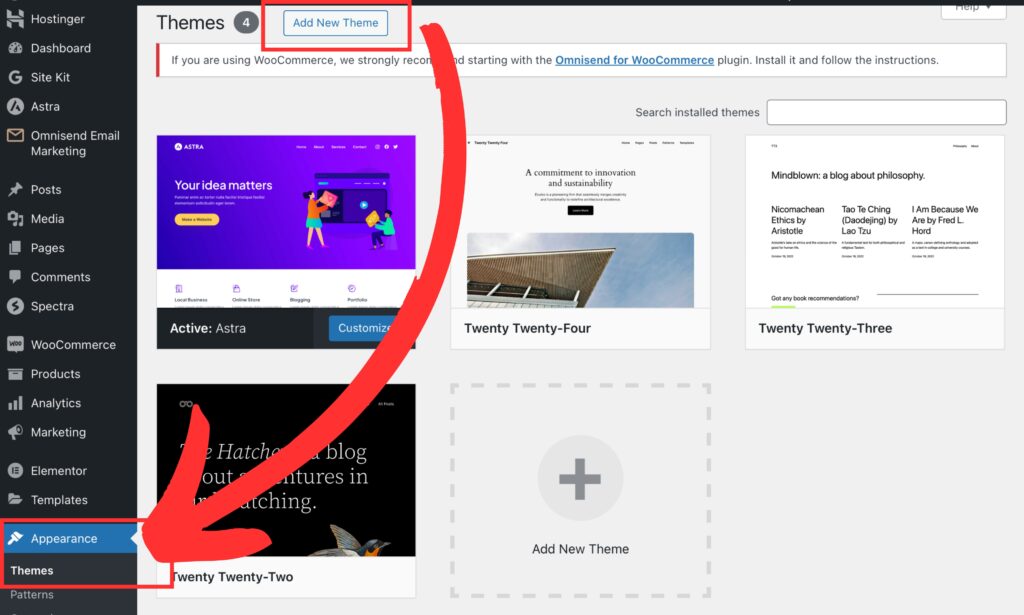
- Go to Themes: In the WordPress dashboard, go to “Appearance” and then “Themes.” like shown in below picture.Then Click “Add New Theme” to browse the WordPress theme repository. You can search for themes based on your style and functionality preferences.
Go to yourdomain.com/wp-admin and log in with your username and password.
2. Go to Themes:In the WordPress dashboard, go to “Appearance” and then “Themes.” like shown in below picture. Then Click “Add New Theme” to browse the WordPress theme repository. You can search for themes based on your style and functionality preferences.
- Add New Theme: After Clicking on “Add New Theme” you can install any theme you like, but We recommend to use “Astra” theme as we are currently using it and its working great.So type Astra in the search bar as shown the below image.
After Clicking on “Add New Theme” you can install any theme you like, but We recommend to use “Astra” theme as we are currently using it and its working great.So type Astra in the search bar as shown the below image.

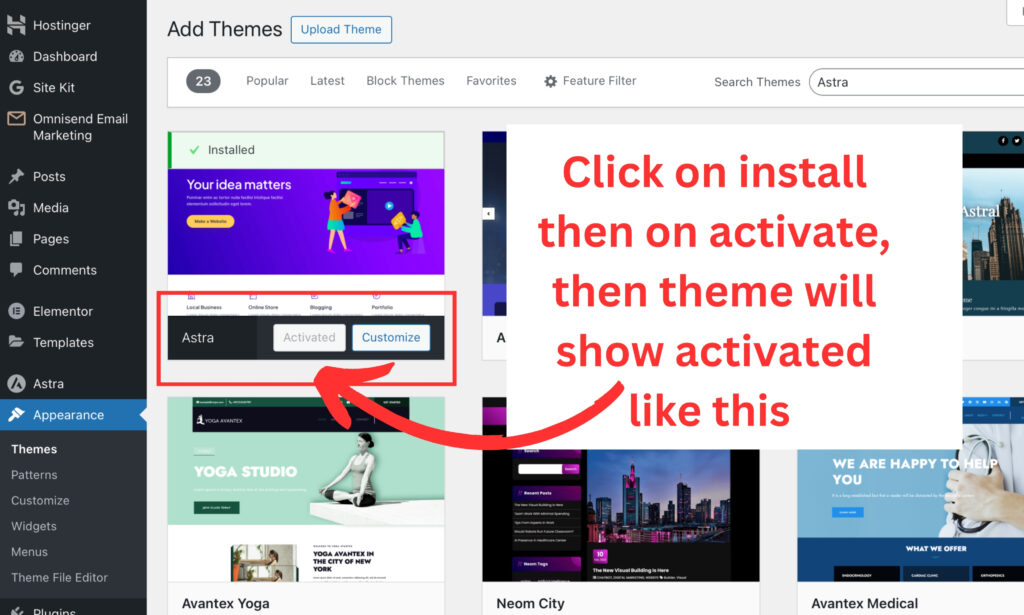
- Install and Activate: Once you find a theme you like, click “Install” and then “Activate” to apply the theme to your website, and the theme will show Activated as in below image.
Once you find a theme you like, click “Install” and then “Activate” to apply the theme to your website, and the theme will show Activated as in below image.
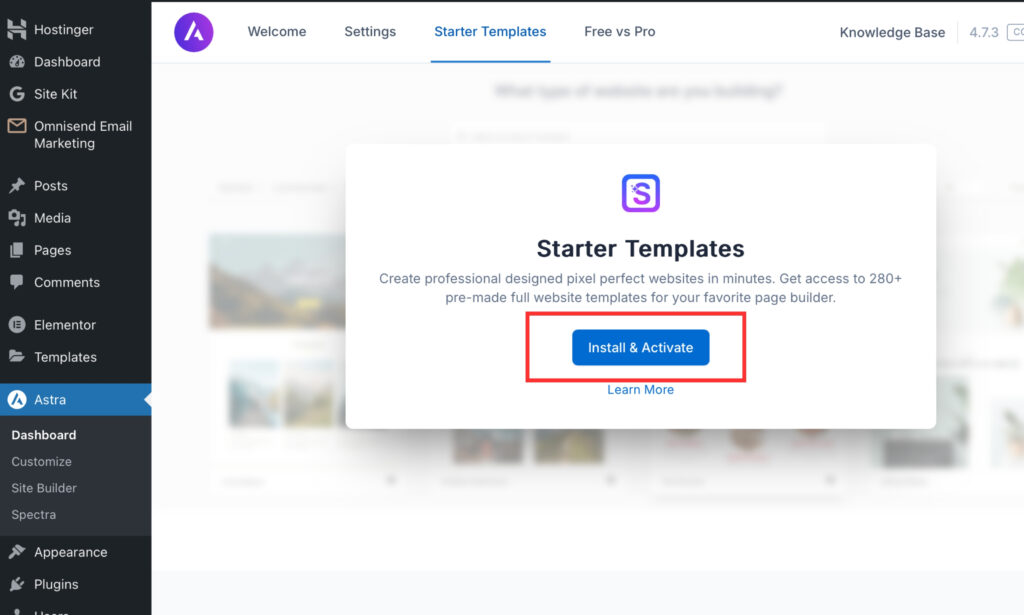
- Find best template: After installation, go onto refresh icon to refresh this page, then on left side search for “Astra” as in picture below, then click on “Starter Templates” again as shown in picture.
Then click on “Install and Activate”.
5. Find best template:
After installation, go onto refresh icon to refresh this page, then on left side search for “Astra” as in picture below, then click on “Starter Templates” again as shown in picture.Then click on “Install and Activate”.
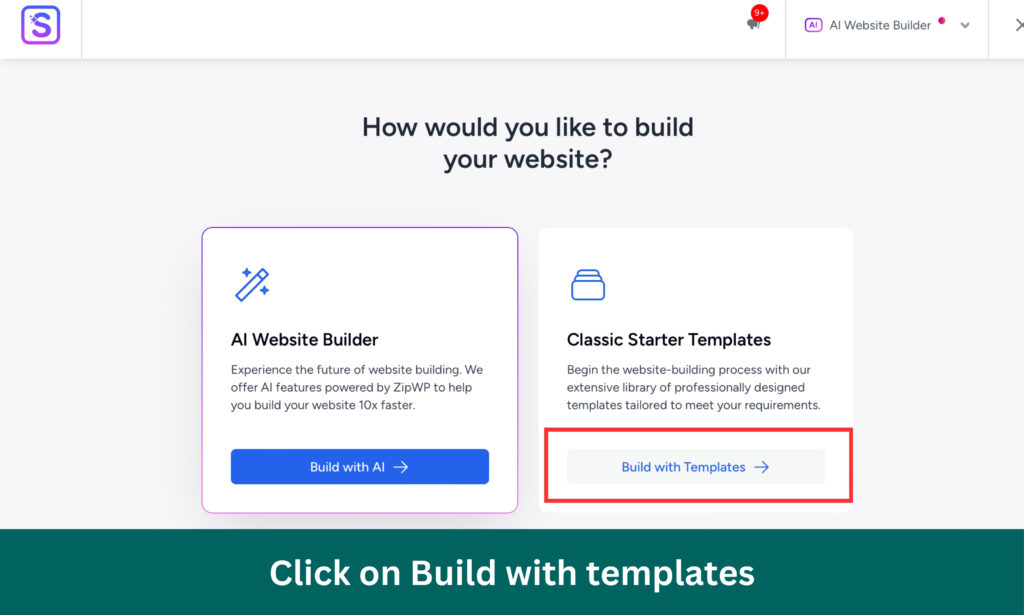
- Template: You will be redirected to next page, here click on “Build with templates”, you can choose Built with AI but AI is in initial phase we don’t recommend for professional blog.Choose as shown in picture.
You will be redirected to next page, here click on “Build with templates”, you can choose Built with AI but AI is in initial phase we don’t recommend for professional blog.Choose as shown in picture.
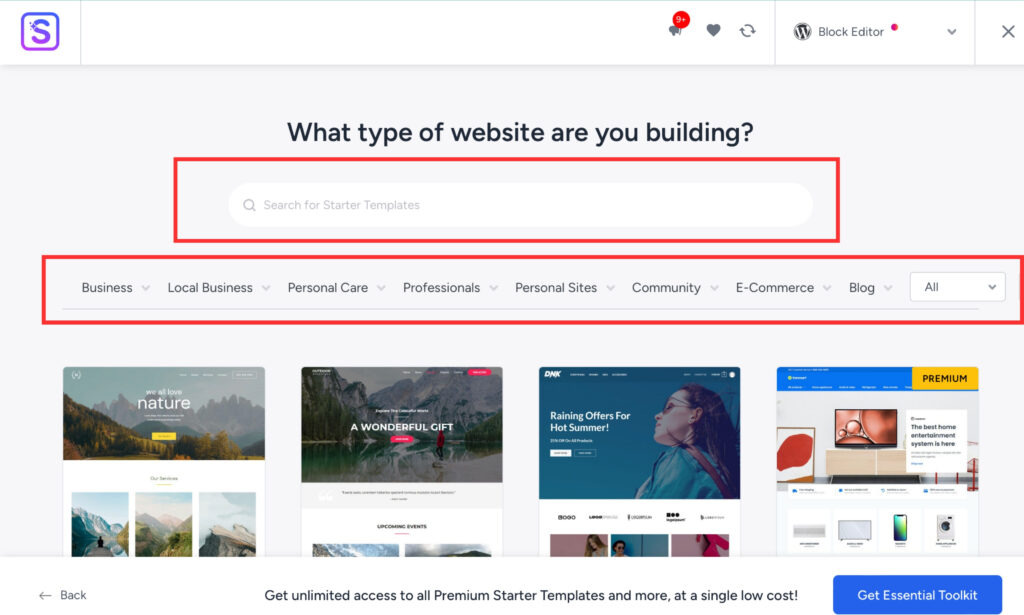
- Select Template: Select the type of template from menu, or type in search bar eg – “Blog”. Or simply scroll until you find theme visually correct for your blog or website type.
Select the type of template from menu, or type in search bar eg – “Blog”. Or simply scroll until you find theme visually correct for your blog or website type.
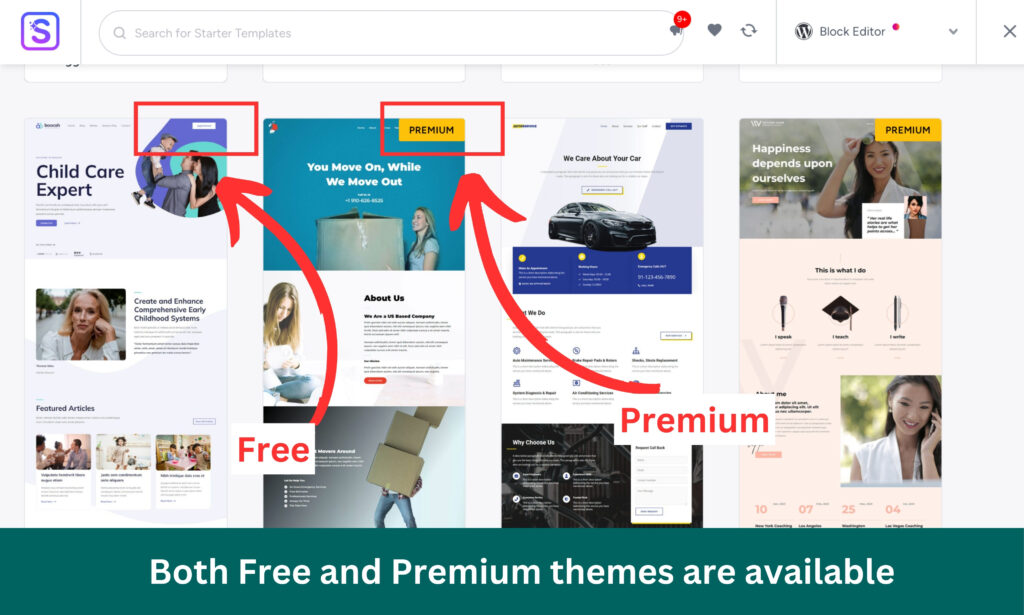
- Free & Premium:
Like in below picture, if you look closely you will find that there are both “FREE” & “Premium” theme options
So, if you don’t to to purchase but wants to use free, then there are tons of free versions available & when you start earning you can upgrade to premium if you want.
Like in below picture, if you look closely you will find that there are both “FREE” & “Premium” theme options
So, if you don’t to to purchase but wants to use free, then there are tons of free versions available & when you start earning you can upgrade to premium if you want.
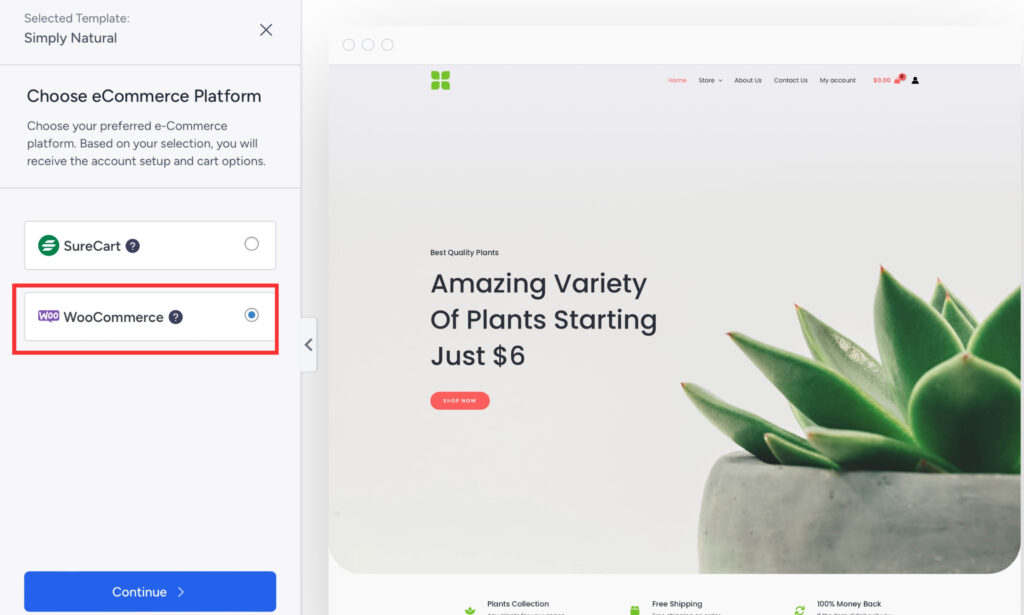
- Select ecommerce:
Select eCommerce platform, you may get many options, if you want our advice then select “WooCommerce” as it is popular and many integrations are available with this.
Select eCommerce platform, you may get many options, if you want our advice then select “WooCommerce” as it is popular and many integrations are available with this.
- Colours: Options for different theme-colours are available, try different colours just by selecting different colour palettes, see below image for reference, after selection click continue.
Options for different theme-colours are available, try different colours just by selecting different colour palettes, see below image for reference, after selection click continue.

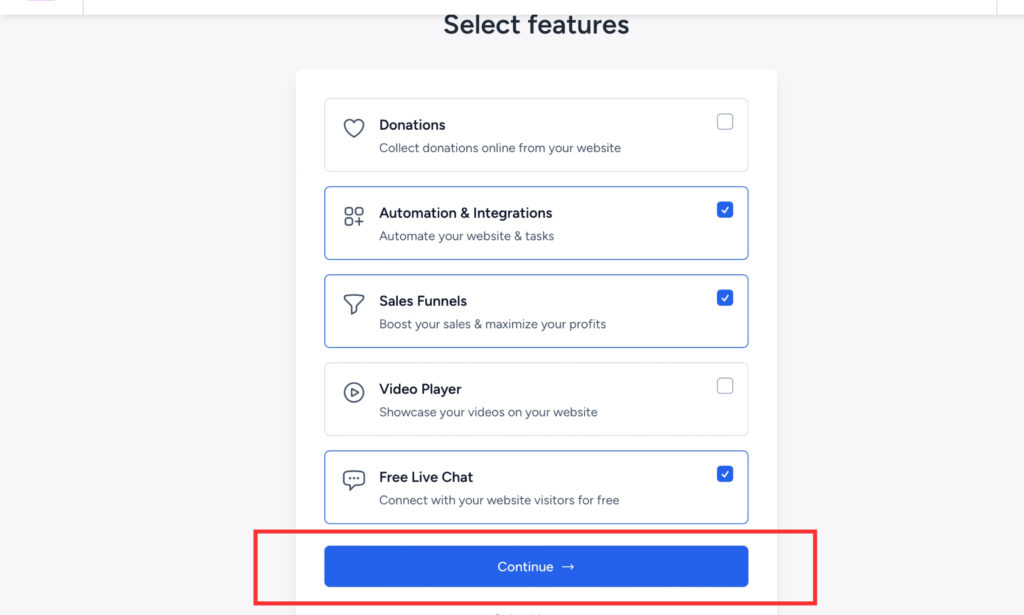
- Select Features: Select features according to your needs & then click continue.
11. Select Features:
Select features according to your needs & then click continue.
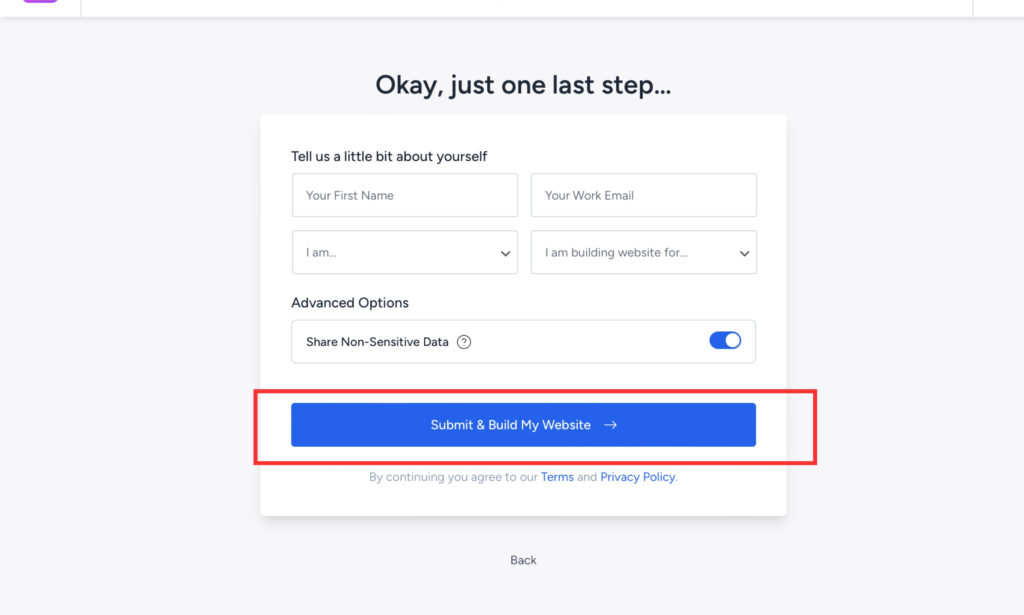
- Fill use informationIn the last step of theme & template installation fill your “Name”, “Email”, select from drop down, on or OFF the advanced option, Recommended OFF.Than click on “Submit & build my website” as shown in picture below.
12. Fill use information:
In the last step of theme & template installation fill your “Name”, “Email”, select from drop down, on or OFF the advanced option, Recommended OFF.
Than click on “Submit & build my website” as shown in picture below.
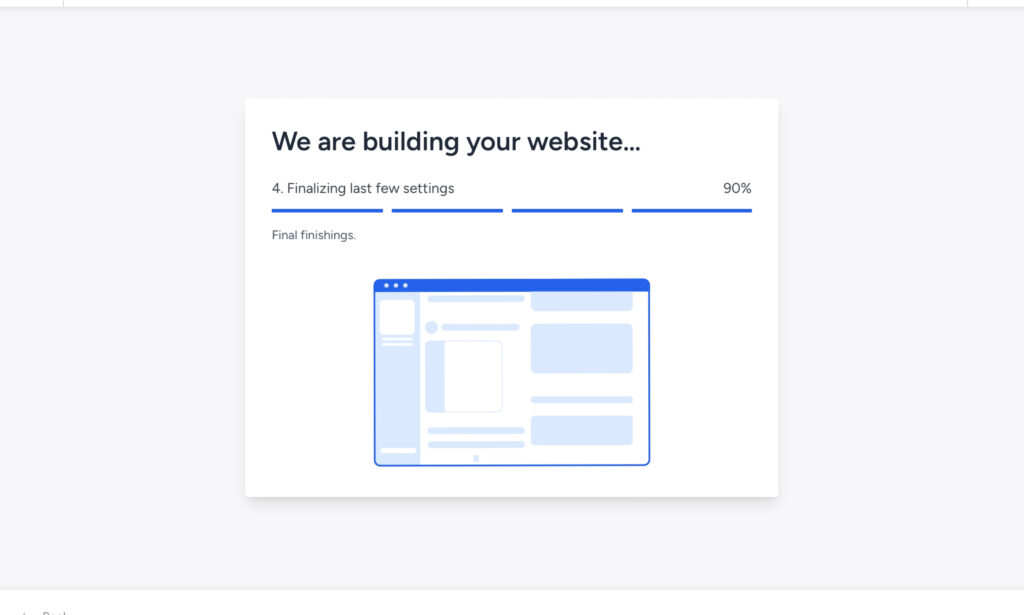
- Wait: It may take around 3 minutes to install your themes & templates on your website.
13. Wait:
It may take around 3 minutes to install your themes & templates on your website.
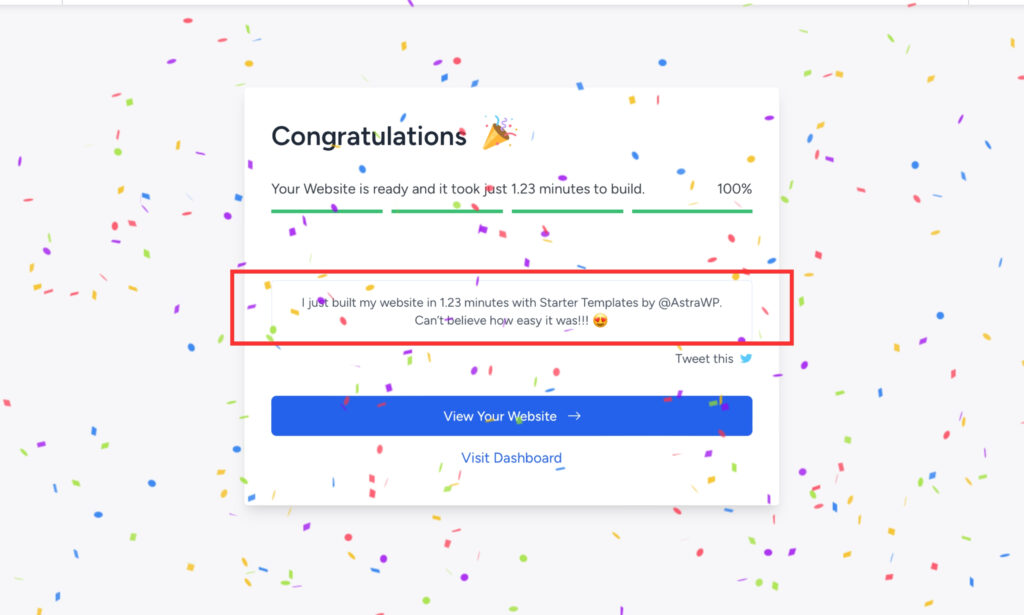
- Installed successfully: You just created a website the basic support, as shown in the below picture it took only 1.23 minutes which could have taken days.In todays time its easier then ever, if you have not created yet you are missing.
14. Installed successfully:
You just created a website the basic support, as shown in the below picture it took only 1.23 minutes which could have taken days.
In todays time its easier then ever, if you have not created yet you are missing.
- Look at the website: Take a brief detailed look if you have created, or look at the below picture to see how the website is looking we created by above process.
15. Look at the website:
Take a brief detailed look if you have created, or look at the below picture to see how the website is looking we created by above process.
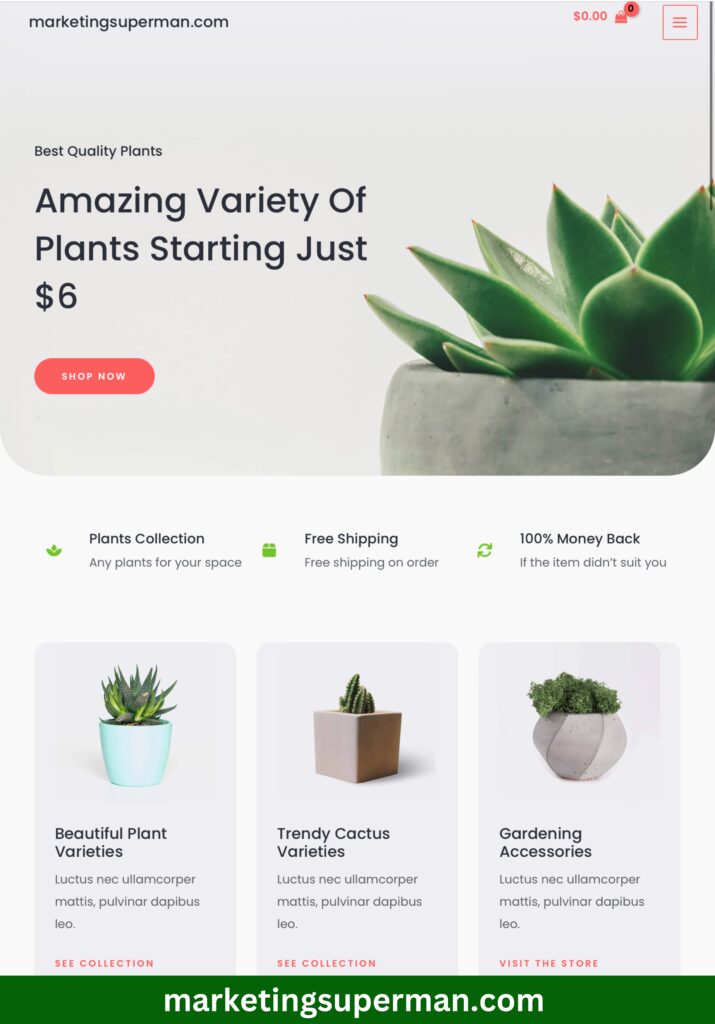

Note: You might also have noticed this template of “Astra” theme is not matching with website’s name “marketingsuperman”😀
and that’s the point of templates and themes, that we can change it within few minutes (but once we have content on your website we don’t recommend changing themes, if you do then create a proper backup, may be consult some expert one on one),
we have made this website’s base within 3 minutes and you can do this again & again until you find the best, just go back and follow same procedure again & again to try 10 or more different templates provided within Astra, and finalise the best.
What we use?🤔- Let us tell you what we use so that you can get a better idea – We are currently using the Astra theme. When you use it on your website you will be able to change theme colours, style, design and other settings.
bloggers' - kit
Make beautiful blogs. Faster!
Instead of 1 post per week, make 2 high-quality posts per day.
Get it Today! 🙂
Get Here
bloggers' - kit
Make beautiful blogs. Faster!
Instead of 1 post per week, make 2 high-quality posts per day.
Get it Today! 🙂
Get HereStep 2
In step 2 you will learn: How to find out the first 10-blog topics to write and post on your Blog.
"Find first 10 topics" to write on your website
Invest your time on finding 1st 10 blog topics, from there you will know how to find more correct topics.
1.Audience and Competition
Understand Your Audience
- Identify: Identify your target audience’s demographics, interests, and behaviors. Like, are you are writing for students or the corporate employees. You can just brainstorm about your audience.
Competitive Analysis
- Analyze competitors’ websites: Look at their design, content, and features.
- Identify gaps and opportunities: Find areas where you can offer something better or different.
2. Identify Your Niche
Finding a niche is the first and most crucial step in your blogging journey. Your niche should align with your interests and expertise to ensure you can produce high-quality, engaging content consistently.
3. Leverage Social Media Insights
Social media platforms are treasure troves of data about user interests, demographics, and behaviors. Here are a few ways to utilize them:
- Facebook Audience Insights: Use Facebook’s Audience Insights tool to analyze the demographics, interests, and behaviors of people who follow pages similar to your niche.
- Twitter Analytics: Explore Twitter Analytics to see what topics are trending and what your target audience is discussing.
- Instagram Insights: If you have an Instagram account, you can check out the demographics and interests of your followers through Instagram Insights.
4. Use Forums and Communities
Online forums and communities are great places to gather information about your potential audience.
- Reddit: Identify subreddits related to your niche and observe the discussions. Pay attention to the questions people ask and the problems they face.
- Quora: Search for topics related to your niche and see what questions are being asked frequently. This will give you an idea of what your potential audience is interested in.
5. Analyze Competitor Content
Look at what your competitors are writing about and how their audience is engaging with their content.
- BuzzSumo: Find the most shared content in your niche and analyze what topics are resonating with the audience.
- Social Media Analysis: Observe your competitors’ social media channels to see what type of content gets the most engagement.
Step 3
In step 3 you will learn: How to write and publish your first 10-blog post live on the internet.
"Write and publish" first 10 blogs, LIVE!
It’s crucial how you write your blog and publish timely. You will learn to outline and then write according to niche.
1. Creating an outline
An outline helps you structure your blog and ensure a logical flow. Start with your main points and break them down into subpoints. This makes writing more manageable and keeps your content focused.
Example Outline for “Healthy Eating Tips”:
- Introduction
- Benefits of Healthy Eating
- Tips for Planning Meals
- Easy Healthy Recipes
- Conclusion
Writing a Compelling Introduction
Your introduction should grab the reader’s attention and make them want to read more. Use an interesting fact, a question, or a bold statement to draw them in.
Example: “Did you know that eating a balanced diet can improve your mood and energy levels? In this blog, we’ll explore simple yet effective tips to help you eat healthier every day.”
Using Engaging Subheadings
Subheadings break up the text and make it easier to read. They also help with SEO by including relevant keywords.
Example Subheadings:
- Benefits of Healthy Eating
- Tips for Planning Meals
- Easy Healthy Recipes
Incorporating Images and Tables
Visual elements like images and tables make your blog more attractive and easier to digest. They also help illustrate your points and can improve SEO.
Example Table for a Fitness Blog:
| Exercise | Reps | Sets | Muscle Group |
| Push-ups | 15 | 3 | Chest, Triceps |
| Squats | 20 | 3 | Legs, Glutes |
| Plank | 60 sec | 3 | Core |
Step 4
In step 4 you will learn: How to now make your blog go up in SERP i.e. on top of google search by using SEO techniques.
"Rank your blog Post" on google search
There are many SEO techniques, we will tell you to start from Keyword Research, although step 3 and this step 4 is interchangable, but we reccommend you to write your post first, when you have some experience you will know what suits you better.
1. Keyword research
Before writing, start with keyword research to understand what terms people are searching for related to your blog topic. Tools like Google Keyword Planner, Ahrefs, and Ubersuggest can help you find popular keywords.
Example Table of Keywords:
| Keyword | Monthly Searches | Competition | Difficulty |
| Blog SEO tips | 1,200 | Low | Easy |
| How to SEO a blog | 950 | Medium | Moderate |
| Simple SEO guide | 700 | Low | Easy |
On-Page SEO
On-page SEO involves optimizing individual pages to rank higher. Key areas include:
Title Tags
Your title tag is the first thing search engines and users see. It should be compelling and include your main keyword.
Example:
- SEO Optimized Title: How to Do Simple SEO for Your Blog: A Beginner’s Guide
- Non-SEO Title: Tips for Blogging
Meta Descriptions
Meta descriptions provide a summary of your page. Write a clear, concise description that includes your primary keyword.
Example:
- SEO Optimized Meta Description: Learn the basics of SEO for your blog and start driving more traffic today. This guide covers keyword research, on-page SEO, content optimization, and more.
Header Tags
Use header tags (H1, H2, H3) to structure your content. They help search engines understand the hierarchy and main topics of your page.
Example:
- H1: How to Do Simple SEO for Your Blog
- H2: Keyword Research
- H3: Finding Relevant Keywords
Using Keywords Naturally
Integrate keywords naturally within your content. Avoid keyword stuffing, which can harm your ranking.
Example:
- SEO-Optimized: When you start with keyword research, you lay a strong foundation for your blog’s SEO strategy.
- Non-SEO: Keyword research is important for SEO. SEO is vital for your blog.
Technical SEO
Technical SEO refers to the backend aspects of your site that affect your ranking.
Site Speed
A fast-loading site enhances user experience and ranks better. Use tools like Google PageSpeed Insights to test and improve your site speed.
Example Table for Site Speed Improvements:
| Improvement | Tool/Method | Result |
| Compressing images | Use TinyPNG or JPEGoptim | Faster load times |
| Reducing server response time | Upgrade hosting | Improved performance |
| Minifying CSS and JavaScript | Use tools like Minify or Gulp | Decreased file sizes |
Mobile-Friendliness
Ensure your blog is mobile-friendly, as more users access content on mobile devices. Use Google’s Mobile-Friendly Test to check your site’s responsiveness.
Link Building
Link building is the process of acquiring backlinks from other websites. High-quality backlinks can significantly improve your search engine ranking.
Example Table of Link Building Techniques:
| Technique | Description | Difficulty |
| Guest Blogging | Write articles for other blogs and include a link to your site | Moderate |
| Broken Link Building | Find broken links on other sites and suggest your content | Hard |
| Creating Shareable Content | Produce content that others want to link to and share | Easy |
Step 5
In step you will learn: How and where to share your blog for better traffic on the post.
"Share your blog Post" for traffic
There are many places to share, but some work better one niche other for other niche, but as a beginner there are some popular ways to do this.
1. Facebook
Facebook remains one of the most powerful platforms for sharing content. Here’s how to make the most of it:
Sharing Process
- Craft a Compelling Headline: Your headline should grab attention and make users want to click.
- Include Visuals: Posts with images or videos receive higher engagement.
- Optimal Posting Times: Research shows that posting during peak times can increase visibility. Aim for early morning or late evening.
Engagement Strategies
- Engage with Comments: Respond to comments on your posts to foster a sense of community.
- Join Relevant Groups: Share your blog in groups where your target audience is active.
- Use Facebook Ads: Boost your posts or create targeted ads to reach a broader audience.
| Tip | Benefit |
| Post with images | Increases engagement and shares. |
| Use Facebook Ads | Expands reach beyond your immediate network. |
| Join groups | Accesses a more targeted audience. |
Twitter is all about real-time engagement. Here’s how to share effectively:
Sharing Process
- Multiple Tweets: Share your blog multiple times with different headlines and hashtags to reach different audiences.
- Hashtags: Use relevant hashtags to increase discoverability.
- Tag Influencers: If your blog mentions influencers, tag them to increase the chances of a retweet.
Engagement Strategies
- Retweets and Replies: Engage with users who retweet or reply to your post.
- Twitter Chats: Participate in Twitter chats related to your blog’s topic to gain visibility.
LinkedIn is a professional network, making it ideal for sharing industry-related content.
Sharing Process
- Profile and Page Sharing: Share your blog on both your personal profile and company page.
- Compelling Intro: Write a brief, compelling introduction to draw readers in.
- LinkedIn Pulse: Consider republishing your blog on LinkedIn Pulse for added visibility.
Engagement Strategies
- Industry Groups: Share your blog in relevant LinkedIn groups to reach a more targeted audience.
- Professional Networking: Engage with comments and messages to build professional relationships.
Instagram’s visual nature requires a different approach.
Sharing Process
- Stories and Posts: Share your blog link in your bio and promote it through stories and posts.
- Relevant Hashtags: Use hashtags relevant to your blog’s topic.
- Eye-catching Visuals: Create visually appealing images or graphics to accompany your post.
Engagement Strategies
- Comments and DMs: Engage with your followers through comments and direct messages.
- Influencer Collaborations: Partner with influencers to reach a broader audience.
| Platform | Strategy | Outcome |
| Instagram Stories | Share blog snippets, use swipe-up feature (if available). | Higher engagement and traffic. |
| IGTV | Create a video summarizing your blog. | Appeals to visual and auditory learners. |
| Hashtags | Use niche-specific hashtags. | Increases discoverability. |