How To Blog And Make Money:
7 Easy Steps To Become A Blogger
(with free resources)
Stop overthinking! and Let’s start blogging today. And within 7 days you will have blog up and running, then you can use some of these steps again and again to research and write your blog posts.
Time estimation: 1 week
Estimated investment to build: Under $50 (₹4000 INR)
Earning Potential: From $500 to $2000 Per Month (According to millennial money)
Team members: Generally an individual.
Theory: (skip to practical steps)
Picking a perfect blog topic is more important than you think!
The right topic sets the stage for everything you’ll create in the future.
Imagine deciding on “gadgets” as your focus—you’ll need to stick to it consistently, without wandering off into unrelated topics like cooking, travel, etc.
Choosing the right niche can make or break your blogging journey, as it will form the foundation of all your future work.
Pro tip: As a beginner, it’s wise to avoid broad niches.
In blogging, your blog topic is called your "niche."
A niche is a specific segment of the broad topic that is interesting to a specific audience.
Instead of trying to reach everyone, it is usually better to focus on smaller group with specific interests or needs. Once you start seeing some results you can grow from there.
eg: For example, if your blog is about technology, then technology is your niche. If your blog is about education, then education is your niche.
Instead of choosing a broad niche like technology, pick something more specific like “home gadgets” or “office tech accessories.” These smaller niches make it easier to focus your content and rank better on Google.
Technology is a niche, but it’s too broad—it includes everything from washing machines to missiles—which makes it hard to rank and might confuse your audience about what your blog is really about. Picking a specific niche makes things clearer and helps you stand out.
If you’re not sure which specific niche to choose, you can start with a broad topic like technology. Then, use tools like Amazon.com to find smaller, more specific parts of that topic. We’ll show you exactly how to do this in the “Practical Section” below.
Table1.1 Comparison Table for Top 10 Niches
Niche | Audience Size | Monetization Potential | Competition |
| Personal Finance | Large | High | High |
| Health and Wellness | Large | Very High | High |
| Technology & Gadgets | Large | High | High |
| Digital Marketing | Medium | Very High | High |
| E-Learning & Courses | Medium | High | Medium |
| Sustainable Living | Medium | Medium | Medium |
| Travel & Adventure | Large | High | High |
| Parenting & Family | Large | Medium | Medium |
| Fitness & Weight Loss | Very Large | Very High | Very High |
| Food & Recipes | Very Large | Medium | High |
- Substep a): Select a broad niches,
- Substep b): Narrow down your niche,
- Substep c): Find what’s trending in your niche,
- Substep d): Validate your niche,
- Substep e): Analyse Monetisation potential in your niche.
STEP - 0
Select Your Niche
We will use 3 tools for niche selection:
- Amazon.com,
- GooGle Trends,
- KW Finder.
Substep a): Select a broad niche
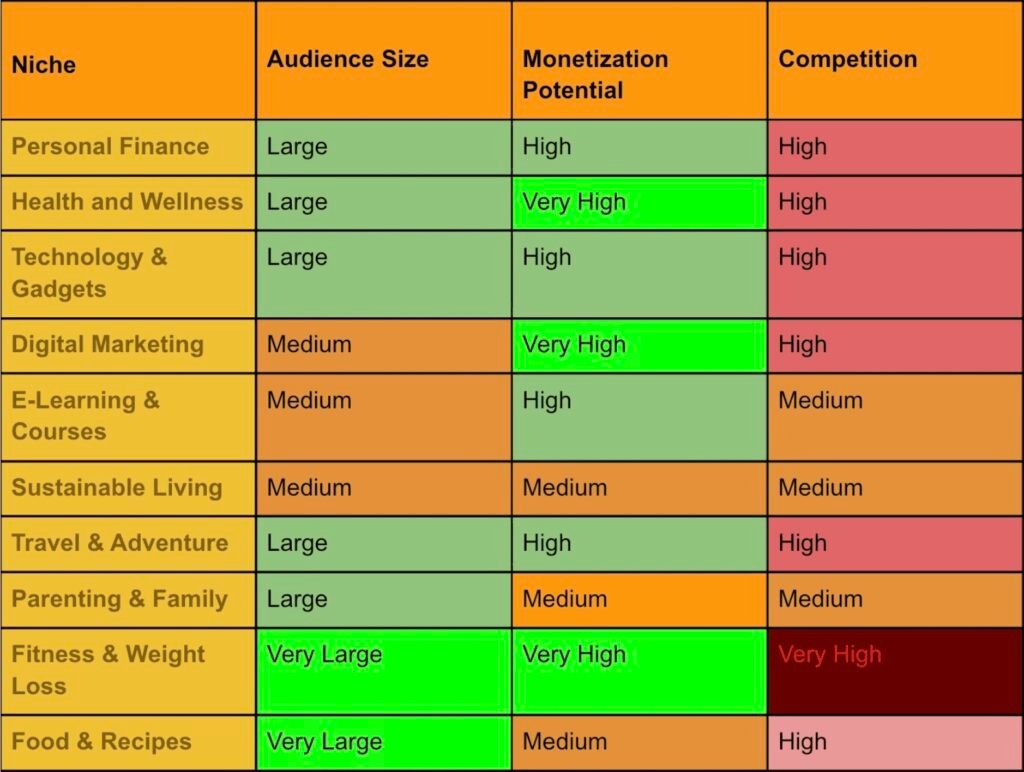
Because your brain🧠 is the best tool on Earth, start by thinking about what interests you. If you’re passionate about something, you’ll do it better. It could be fashion, technology, nature, travel, AI, fitness—anything that excites you.
The key is to pick something that makes you curious and enthusiastic.
Use Table 1.1 to help you pick a broad niche. Once you do, we’ll help you narrow it down.
Imagine you're interested in fitness.
That's a pretty big niche.
But if you make it more specific, like "fitness for busy moms" or "yoga for beginners over 50," you've found a smaller niche that speaks directly to a certain group of people.
Being specific helps you create content that really connects with your audience and makes it easier to market your blog.
We’re going to take “Travel” as an example to show you how to narrow down your niche.
If you’ve chosen a different niche, don’t worry—the process is pretty much the same for every niche.
Substep b): Narrow down your niche
So let’s narrow down the selected niche “Travel”,
for that let’s Go to Amazon.com ( if you have selected another niche, remember the process is almost the same for every niche.)
Now, click on Best Sellers option, look the image below for reference. If you don’t find this option simply search on google.

Search “amazon.con best sellers” in google and click the 1st non sponsored link.

To find travel-related products, go to the Best Sellers section on Amazon.com.
This section shows the most popular products in each category.
On the left side, you’ll see a list of different categories. Pick the ones that match what your blog is about.
For travel, you could pick categories like Automotive or Sports & Outdoors.
You can also choose more categories or do a direct search to get better results. For now, let’s click on the “Automotive” category.

After you click on Automotive, you’ll see the most popular items in this category.
On the left side, there’s a list of subcategories, like Car Care, Oils and Fluids, and more. Start by looking at what’s popular in the overall Automotivecategory.
For example, as shown in the picture below, lots of people are buying car phone holders that have high ratings.
Other popular items include wiper blades, motor oil, and tire inflators. These are products that people often need.
What does this mean for you?
If you want to write a blog about travel, there could be some good ideas here, but you will need to do more research to find the best approach.
Next, click on any of the subcategories on the left. Let’s choose Oils and Fluids.

In the Oils and Fluids category, a lot of people are buying products that we could talk about in our blog.
If we add affiliate links, we could make money when someone clicks on our links and buys something on Amazon. This is called affiliate marketing, and you will learn more about it later in this course.
In simple terms
Affiliate marketing is like recommending a product to a friend, and then getting paid if your friend decides to buy it.
Imagine you love a new video game, and you tell your friends about it. If the game company gives you a special link to share, and your friends use that link to buy the game, the company would pay you a small reward. This reward is called a "commission."
So, in affiliate marketing, you’re promoting a product, and every time someone buys it because of you, you earn money. It’s like being a salesperson, but you do it online by sharing links, without keeping any products in stock yourself.
Professional definition
Affiliate marketing is a performance-based marketing strategy where individuals (affiliates) earn commissions by promoting other people's or companies' products or services.
Affiliates use unique tracking links to drive traffic or sales to the merchant's website, and they get rewarded when users take specific actions, such as making a purchase or signing up for a service. Essentially, affiliates act as promoters, helping businesses reach a wider audience in exchange for a share of the revenue generated from referred customers.
But this information isn’t enough.
We should also search for travel-related keywords using the Amazon.com search bar to find more useful products.

Now, go ahead and search for “travel accessories” or any other item you think might resonate with your audience.
If you’ve chosen fashion as your blog niche, you could try searching for something trendy like a “brown overcoat.”
Let’s start with “travel accessories” for now. Make sure to change the drop-down list from “Featured” to “Best Sellers” to get the most popular results. Refer to the image below for guidance.
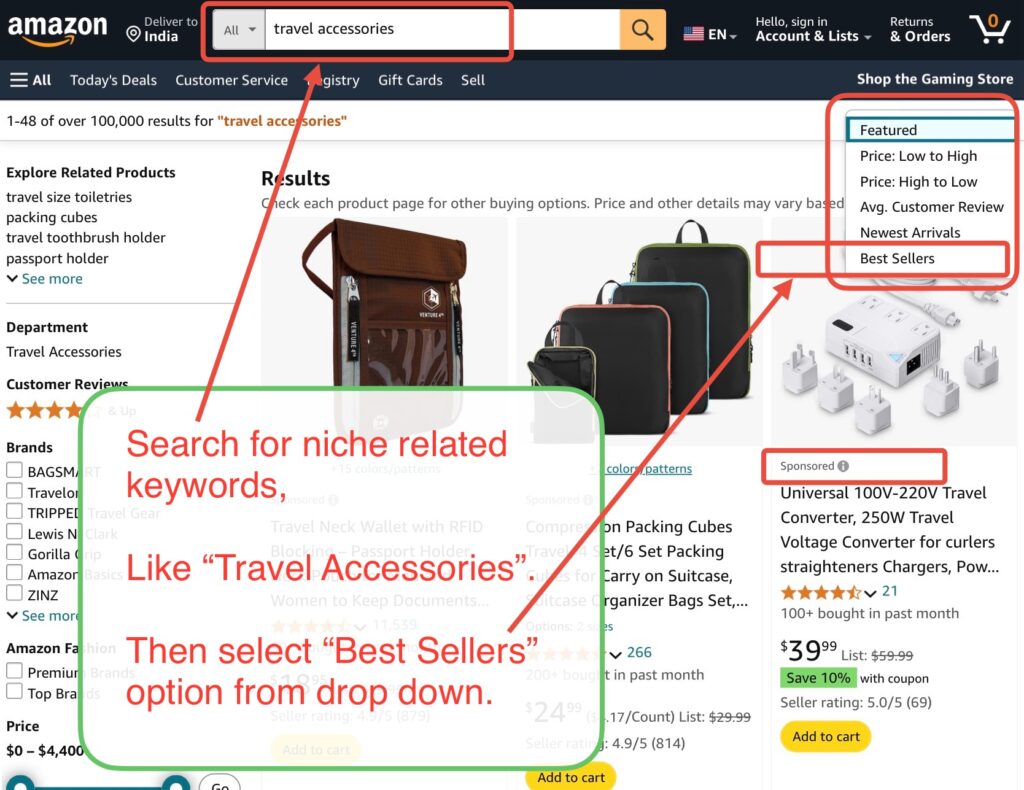
Now, take a look at the items again and see if there are products that many people are buying and have good ratings (generally more than 4 stars).
If you find these items, it means they are popular, and you could promote or write about them in your blog.
For example, you could write a post like “Best Travel Bags for Forest Areas.”

So far, we have found that the travel niche is good for blogging, and people are interested in travel accessories like care products, oils, and bags.
But don’t stop here!
If you really want to make a successful blog, you should repeat this research process several times.
Try exploring different sub-niches in travel and look for more specific items. For example, let’s look into “Hiking Shoes.”

We found out that people are interested in hiking shoes too. This is great because it means we can write a blog about travel, and it has a good chance of being profitable in the future.
You should make notes on the best-selling items on Amazon.com or take a screenshot so that you can look back at your research later and get ideas for what to write about.
Now, let’s search for one more thing.
When we searched for travel accessories and selected ‘Best Sellers’ from the dropdown, we found that travel bags were among the best-selling items.
So, search for “Travel Bags” and select ‘Best Sellers.’ You can also adjust the prices using the slider on the left side, as shown in the image below.

Travel bags are very popular right now. For example, a travel laptop bag has been rated by 99,775 people, with most giving it more than 4 stars. The same goes for other types of travel bags.
You should click on these products and read the reviews to see what people are saying.
You can also explore similar products to get more ideas.
Take your time and do this research for your niche.
Look at as many products as you can because this will be the foundation for your blogging website.
You don’t need to do anything extra—just repeat this process for different sub-niches.
Substep c): Find what’s trending in your niche.
Let’s find what’s trending in your niche, for that we are going to use a popular tool called google trends.
Open google trends website, use url: trends.google.com.

Click on explore option from the sidebar, as in image below.

Start by typing in a keyword related to your niche.
For travel niche This could be something like “Travel Camera,” “Trekking Pole,” “Travel Gadgets,” or “Travel Accessories.” You can choose any keyword that fits your interests.

After entering your keywords, decide if you want to look at data for a specific country or worldwide.
Then, pick a time range like the past 12 months or more to see how the keyword trends over time.
You can always look pictures below for reference.

Look at the “Interest Over Time” graph.
Find keywords that are becoming more popular.
Try not to pick something too specific, like “travel charger,” because it might not have a lot of earning potential.
Also, avoid very broad topics like “travel news,” as it can be harder to rank without a big team.
Instead, choose something in the middle, like “travel accessories,” which gives you enough room to write about different things while still being focused.

Check the breakdown by region to see which countries are most interested in your keyword. This will help you understand where your audience is and which places you should target.
For each keyword, like “Travel Camera,” look at the related queries section.
Use the dropdown on the right and change it from “rising” to “top.”
Note down the related queries or take screenshots. There are usually 25 queries—make sure to check them all.
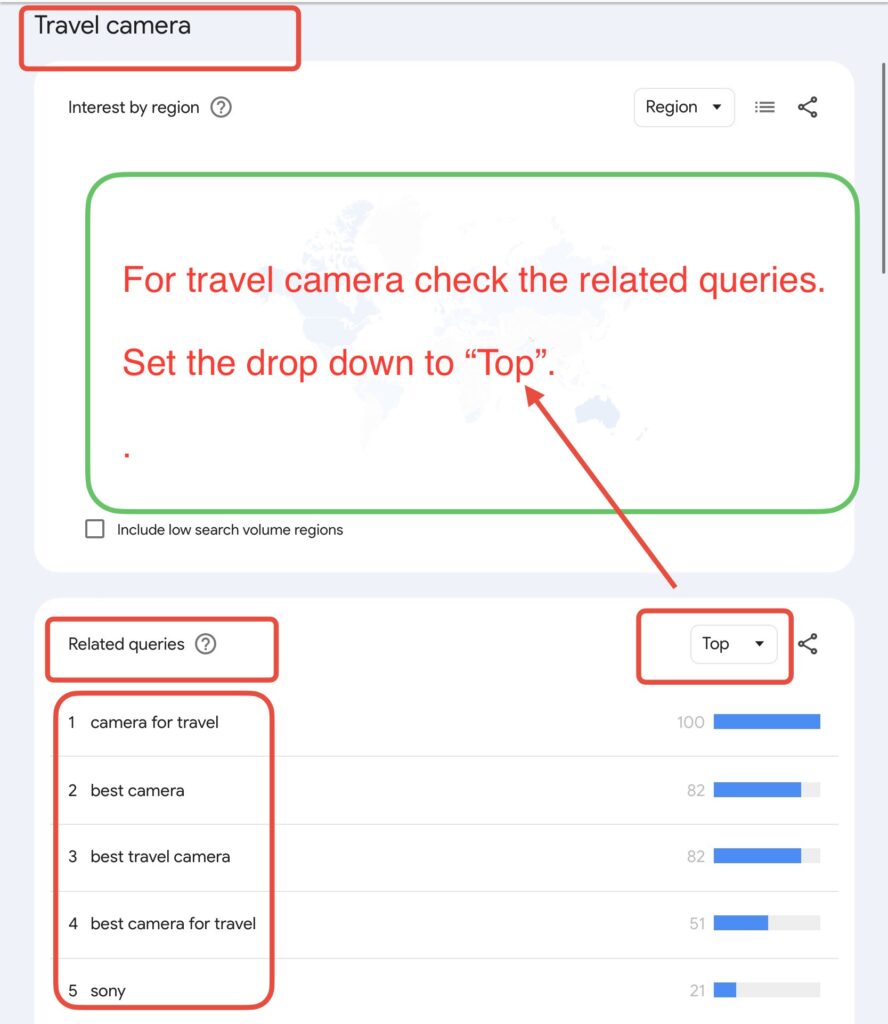
Do the same analysis for other keywords, like “Trekking Pole.” Look at the top related searches and regional interest.
You don’t have to do anything new, just repeat the same steps for different keywords.
If you see a lot of related searches that are similar, it means the niche could be a good choice.
The last keyword “Travel Pack” has related queries with high ratings—the top 5 queries all have ratings above 85.
This is a great sign that there’s a lot of interest.
Also, if you look at the map, you can see that Australia has the most people searching for this keyword. This means you could target people in Australia when writing your blog.

Here are some keywords we’ve searched for:
- Travel Camera
- Trekking Pole
- Travel Bags
- Travel Shoes
- Travel Packs
Now what should we choose as our niche (or blog topic)?
The above keywords are great but they are very specific, they can limit our blog.
For example, if we choose “Travel Camera” as our niche, we won’t be able to write about other things like Travel Shoes, Travel Bags, or Trekking Poles. The same problem happens with the other keywords.
Instead, we should choose a niche that is a bit broader, but not too broad or too specific. This way, we can cover all of the topics above. We could pick something like “Travel Pack,” “Travel Guide,” or “Travel Accessories.”
Let’s go with “Travel Accessories.”
We are choosing “Travel Accessories” as our niche, because it is not too broad, like “Travel,” and not too specific, like “Travel Camera.”
If your niche is too broad, it can be hard to rank well on Google, and you may not get enough authority in that niche. You might even need a big team to handle a broad niche like that.
On the other hand, if your niche is too specific, you may not be able to earn much money through affiliate links.
So, it’s best to choose a medium-sized niche.
Substep d): Validate Your Niche.
Now, let’s move on to the next tool called Mangools. Mangools has a sub-tool called KW Finder, which we will be using to validate our niche.
This is an important step to find and validate your niche and make sure it can be profitable.
Mangools helps us determine how popular a blog niche or keyword is by showing how many people search for it every month.
It also tells us how hard it is to rank for that keyword. In other words, it shows how competitive your topic might be.
There are many features in Mangools tool, but for now, as beginners, you should focus on these two things:
- Keyword Volume: How many people are searching for your keyword each month.
- Keyword Difficulty: How hard it is to rank for that keyword.
Mangools allows you to do five keyword searches for free every day. So, log in and let’s get started! You can sign up here Mangools free sign up.
Enter your blog niche or keywords in mangools search box —you can use the same keywords you entered in Google Trends.
Then click on “Find Keywords.” You can also choose a location and language, but for now, just leave it set to the default (anywhere and any language). See the image below for reference.
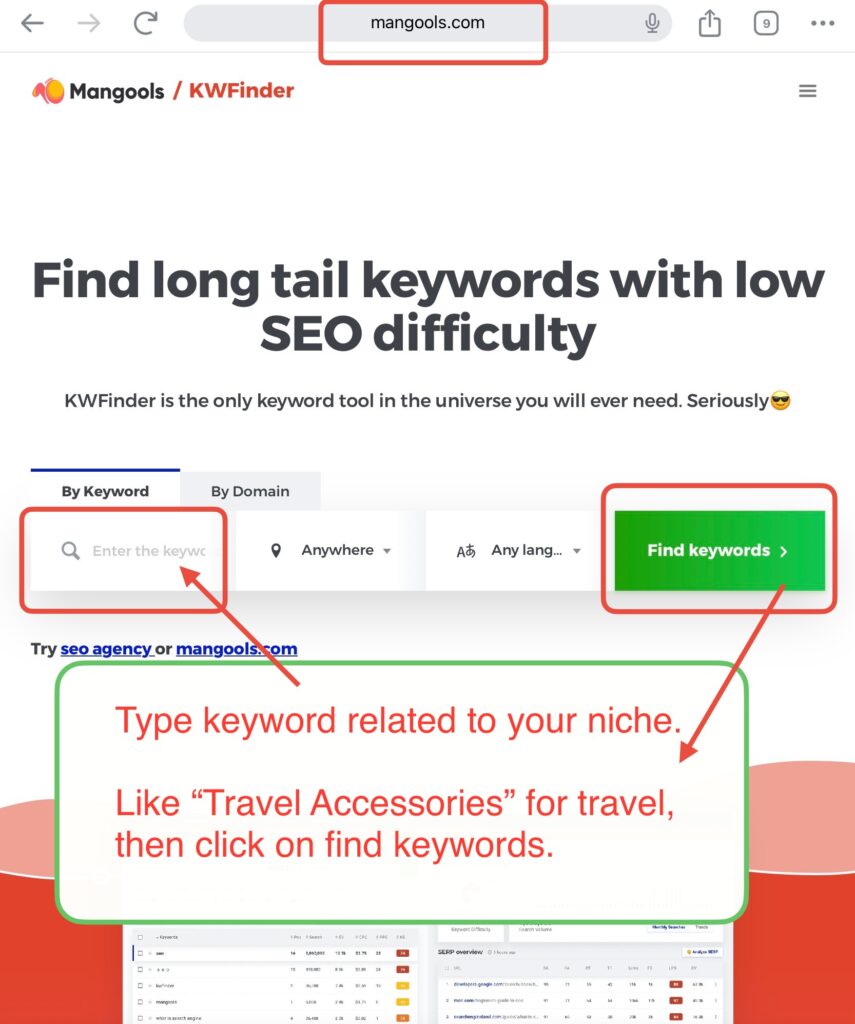
First, let’s enter the keyword “Travel Accessories.”
After you press enter, you will see something like the image shown below (Tip: You should try doing this yourself).
At the top of the page, pay attention to two things:
- Search Volume: This tells you how many people are searching for this keyword every month.
- Average Keyword Difficulty (Avg. KD): This shows how hard it will be to rank for this keyword.
For “Travel Accessories,” we have a total search volume of 807,500 per month. That’s a lot of people searching, which is great! The KD (keyword difficulty) is 32, which is below 50, meaning it’s easier to rank on Google.

Next, let’s look at all the related keywords one by one to find:
- High Volume Keywords: For beginners, look for keywords with more than 5,000 searches per month.
- Low Keyword Difficulty: Aim for a difficulty of less than 50.
- Long Tail Keywords: These are longer phrases that are usually easier to rank for.
When we look at keywords individually, we can see that the keyword “Travel Accessory” has a monthly search volume of 32,400 with a KD of 41. This means it’s a great keyword to use for our blog topic, and it will be easier to rank on the Search Engine Results Page (SERP).
Look at image below, there is keyword “Travel Pillow”, This keyword has a search volume of 106,000 per month with a KD of 38, making it another great keyword to use.
Remember, if you have a blog page about the “best travel pillow” then your page can rank for keyword travel pillow and with this keyword it can also rank on google for other keywords like travel accessories, because google knows these are related keywords.
Make sure to also check other related keywords and see if they fit your criteria.

Look at the trend graph, like the one shown in the image below.
If the trend is stable or going up, it’s a good sign that your blog topic is a good choice.
In our case, the trend has been growing since 2020, and it looks like it will stay stable or keep growing.

Upcoming Final Step: Analysis Monetisation Potential For Your Niche.
For our last step in picking a niche, we need to do some competition research.
We will search the potential blog on Google.com and see what kind of content is already out there for your chosen topic. And find out what are their source of monetisation.
Substep e) Analyse monetisation potential in your niche.
Go to Google.com and search for blogs about travel accessories that match your chosen niche.
Look at the results. For example, we found websites like packhacker.com and others. Start by analyzing the first two results.
You should do the same for at least 10 different blogs to see what other bloggers in your niche are writing about. It’s not hard, it’s only time taking. Be sure to take screenshots for future reference.
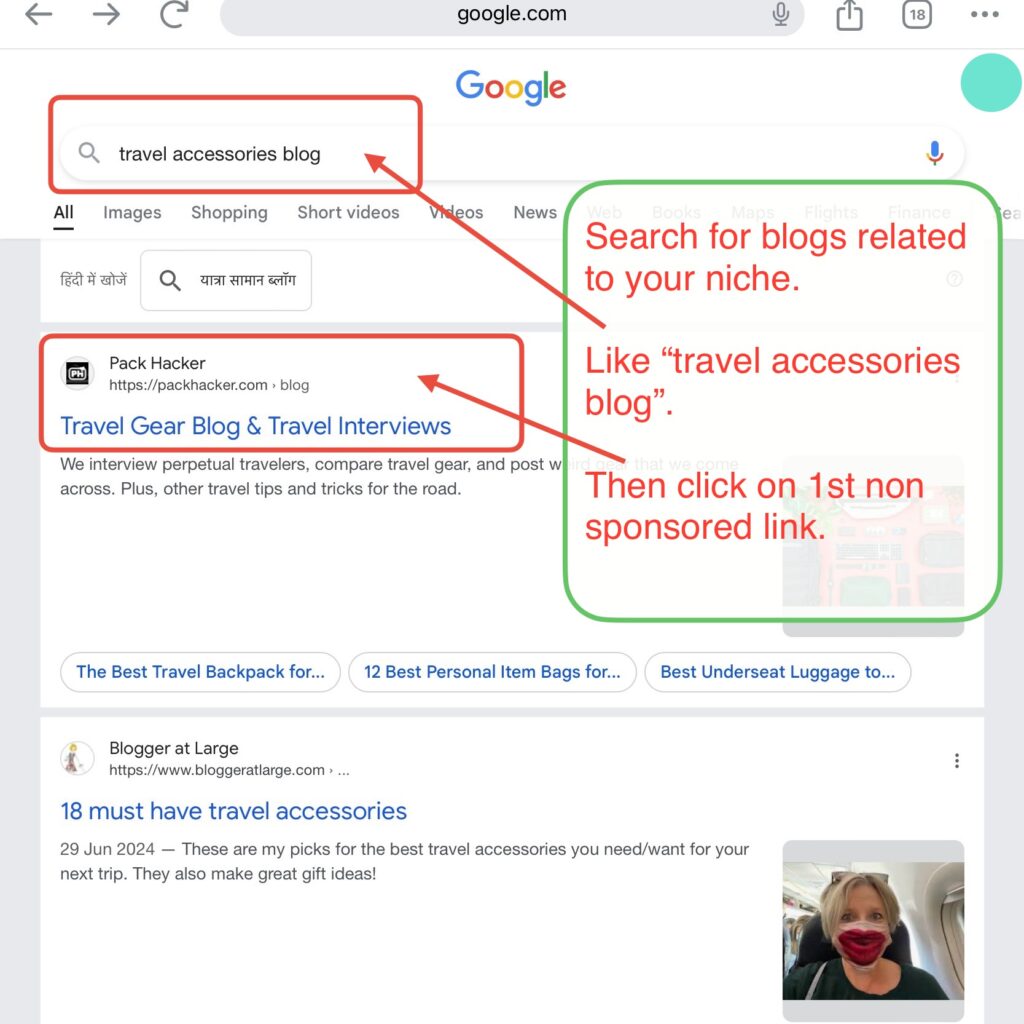
After clicking on packhacker.com, you will find many blog posts. Click on any of them. Let’s click on a blog about water bottles (see the reference image below).
After scrolling, you will see that they have written about different water bottles and included affiliate links to Amazon for each bottle.
For example, in the image below, they wrote about the Vapour Eclipse Water Bottle, and then they added button “View on Amazon.”
What does this mean? It means that if someone clicks the “View on Amazon” button they will be taken to Amazon. If that person buys the bottle, the blog owner will earn a commission.

Scroll further down for next section where they talk about water bottles.
They have an affiliate link button there. This link is for the CamelBak Quick Stow Flask.
Click on it to see more details.

After clicking on the button, we end up on Amazon.com with the same water bottle they talked about.
If someone buys this bottle within 24 hours (according to Amazon affiliate rules), then the blog owner will earn a small commission.
When you create your blog, you can also add affiliate product links. You can write your thoughts or reviews about the products, or use other methods to promote them. This is called affiliate marketing.

Now let’s move on to the second blog we found on Google, just like before. Click on it, and you’ll be taken to a blog called ’18 Must-Have Travel Accessories,’ as shown in the image.
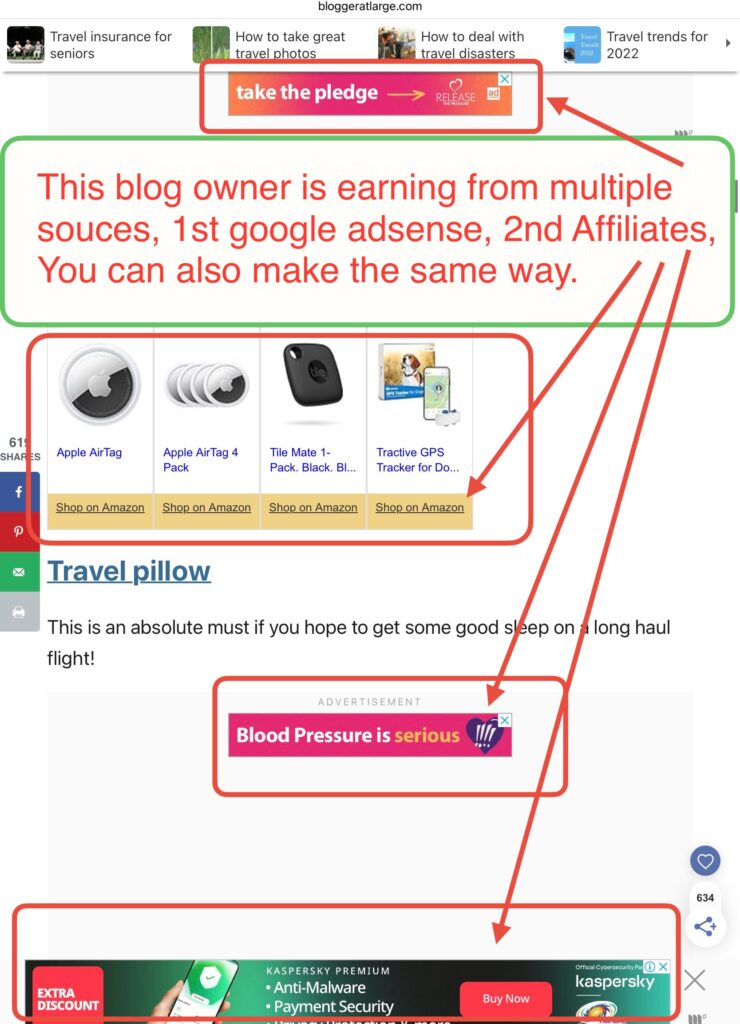
Now we can see that they are using Google AdSense to make money from their blog. We’ll explain more about this in the monetization section.
Take a look at the image below. This blog post shows three Google advertisements and one affiliate link with four different products.
Arrow 1 points to Google ads, while Arrow 2 points to a “Shop on Amazon” link that has four products in one affiliate link. Arrows 3 and 4 also point to Google ads. This means the blog is making money in different ways.
What does this mean for you? It shows that the topic of Travel Accessories can be profitable, but you will need to compete with other blogs to succeed.
Now lets finally scroll then click on their one of affiliate links called Cabeau Travel Pillow.

After clicking, you can see in the image below that it takes you to Amazon with the same product, the Travel Pillow. This is not a difficult task, you can do the same thing on your blog.
Now talk about our point here, we have done all this to find out is our niche “Travel Accessories” profitable or not, and we found out yes Travel Accessories is a good choice as a niche,
so we are finalising it. We are choosing “Travel Accessories” as our niche.

What’s Next?
Now your next step is going to be fun, as you will get a name(domain name) and space(hosting) for your blog.
STEP - 1
Select Your Blog Name And Hosting
Table of content:
c): Find what’s trending in your niche
e): Analyse monetization potential in your niche,
Step 1: Select your blog name & hosting
a): Search for domain name for your blog,
b): Select hosting with free domain,
c): Get free domain name and verify using email
Step 2: Make your website live!
a): Install WordPress and theme
Step 3: Find first 10 topics to write on
a):Find topic using keyword research,
b): Find topic popularity using Amazon tool
Step 4: Publish your 1st blog post live
a):Create outline detail for your blog post,
b): Curate post content from Amazon,
c): Use the ChatGPT Prompt to write content from curated contents,
d): Use WordPress to edit and make your content live!
Step 5: Rank your blog on google
a): Setup focus keyword for your blog post,
b):Edit post’s keyword for SERP Ranking,
d): Guest blogging short introduction
Step 6: Bring traffic on your blog
Step 7: Monetize your blog with 2 methods
a): Create privacy policy page for your blog,
In this step you will get guidance of how to get hosting(space) and a free domain(name for your blog) from hostinger.com.
Here are substeps for that:
Substep a): Search for domain name for your blog
First, let’s decide on a name for your blog, which will also be your domain name.
Go to the Hostinger website. If you are using a phone or tablet, tap on the menu icon (called the “burger menu”) then select “Domain”,
if you are on Laptop simply click on “Domain” from top, as shown in the image below.

Now let’s start by choosing a name for your blog.
Just type a name that matches your blog topic or niche. Since we chose Travel Accessories as our niche, we’ll pick something related to that.

We tried searching for “travelaccessories.com,” but it looks like someone else is already using that name for their blog.
Hostinger is showing some alternative domain name you can choose from them.


As you can see in the images below, it says “travelgears.com is already registered.” This means we can’t use this domain name because someone else is already using it for their blog.
If your blog name is already taken, you can add something like “a,” “the,” or “my” to make it unique.
For example: “atravelgears.com,” “thetravelgears.com,” or “yourtravelgears.com.”
If you scroll down a bit, you’ll see some auto-suggestions from AI. One option is “travelgears.io,” which is available, but it has two problems:
1) It doesn’t use the common “.com” extension, and
2) it’s expensive, costing around $40 or ₹3,309, which isn’t ideal for beginners.
Another option is “travelgearsworld.com.” This could work well, though it might be a bit hard for some people to remember. Still, it’s a good name because it has the word “travel” in it, which helps Google understand what your blog is about. Including a keyword in your domain name isn’t required, but it can be helpful.
We have a detailed checklist below to help you pick the perfect domain name. If you want a great name, download it and use it to choose your domain name. Click here to scroll down to the checklist.

Now let’s type domain “travelsuperman.com”.

Great news! It says “Domain is available!”
So, we can finalize this domain name.
But wait! Don’t buy it yet,
We are going to show you how you can get this domain for free.
Yes, if you choose the right option and get hosting space first, you can get the domain name for free.

Substep b): Select hosting with free domain
To get this domain for free, you need to choose the right hosting plan.
To start, visit the Hostinger website from this link: Hostinger discounts (you’ll get an extra 20% discount using it).
Once there, simply scroll down to see the hosting options available.
You will see something like the image below (it may vary slightly depending on your country, but the general idea is the same).
You need to look for a “Free Domain” highlighted in red in the image.
When comparing plans, here are three key things to consider:
- Multiple Website Hosting: Will you be able to create more than one website on a single hosting plan? If yes, that’s a great feature for future growth.
- SSD Storage: Make sure the SSD storage is enough for your needs. Usually, 100 GB SSD storage will be sufficient for a new blog or website.
- Free Domain: Does the plan include a free domain?
For instance, in some hosting providers you’ll notice that they provide “Single” plan that doesn’t offer multiple website hosting, only includes 50 GB of storage, lacks the option for a free domain, which is a downside, you better look for free domain as beginner.
Now, let’s look at options in hostinger.com which is also a hosting provider. Look picture below for reference now.
The most popular “Premium” plan stands out because it allows you to host up to 100 websites on a single hosting account, Plus, it provides 100GBmstorage, along with a free domain, making it a better value for the cost.
The “Business” and “Cloud Startup” plans are also available, but we don’t recommend them for beginners since they are pricier.
As a beginner, it’s better to invest in an affordable plan while you’re still learning.
In conclusion, we recommend the “Premium” plan because it’s affordable, supports up to 100 websites, includes a free domain, and offers other beneficial features for beginners.
However, the choice is ultimately yours, and you should choose the plan that best fits your situation.
Once you’ve decided on a plan, click the “Choose Plan” button. We will proceed with the Premium plan in this guide.

After clicking on “Choose Plan,” you will go to the cart page, like in the image below.
Look for these three things:
The Time Period: Make sure you choose how long you want your hosting plan.
The Offers: Check if there are any special offers, like a free domain.
Dual Discount: If you’re on a mobile or tablet, you might need to click the small arrow (^) as shown in the image to see both discounts.
Click on the small arrow to see more details and make sure you’re getting all the discounts.

As we can see everything is fine, we are getting our free domain with dual discount (plan discount with referral discount),
if your referral discount is not showing you might be not using referral link given by us (you can click here hostinger.com discount to get it).
You can switch time period from 24 months to 12 months using drop down as shown in picture below.
Then click continue.

Next, you’ll be taken to the sign-up page.
You can click on the Google logo to select your email for quick login, or you can enter your email address and create a new password, then click “Continue.”

Next, you’ll be taken to the billing page.
Fill in your details and check the order summary, like in the image below.
Make sure the domain name shows $0, which means it’s free. Also, check that both discounts are applied and look at the final price (without tax).
After that, click the “Continue” button.

Now it’s time to pick a payment method. There are a lot of options, so choose the one that works best for you.
After making sure everything looks right, click “Pay Now.”
You might need to enter an OTP (One-Time Password) to finish the payment.
Once the payment goes through, you’ll get a confirmation email.

You will get an email that looks like this. Take screenshots of your email and save them somewhere safe, like on Google Drive.
Next, there’s an important step: registering your free domain name.
In our example, it’s “Travelsuperman.com.” It will be free—let’s find out how to do this.

Substep c): Get free domain and verify using email.
Registering your domain name after buying hosting is easy. The steps might look a little different because websites update their designs often, but the general process stays the same.
There could be 2 methods:
Method 1: First, log in to your account and check notifications from there click on claim your free domain.

If there are any unpaid dues, Go to the “Account Actions” section like shown in the image below. If you can’t find it there, you can also check the notifications in your account.

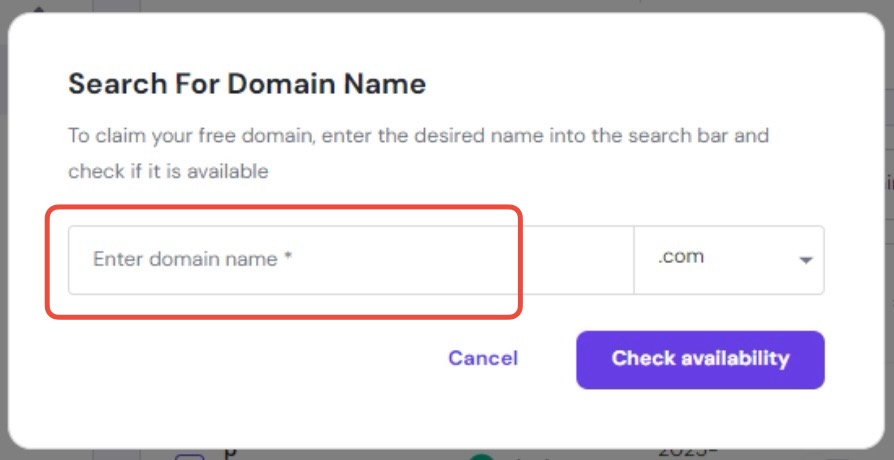
Now, click on “Claim Domain.” A popup might appear where you need to enter your domain name. In our example, it’s “Travelsuperman.com.” Click “Check Availability.” If the domain is available, confirm it.
If you can’t find this option, there’s another way:
Method 2: Check picture given below, Click on “Domain Portfolio.” and then click on “Add new domain” claim your domain from there.

You will see a pop-up like the one shown in the image below that says “Claim your free domain.” Just click on it.
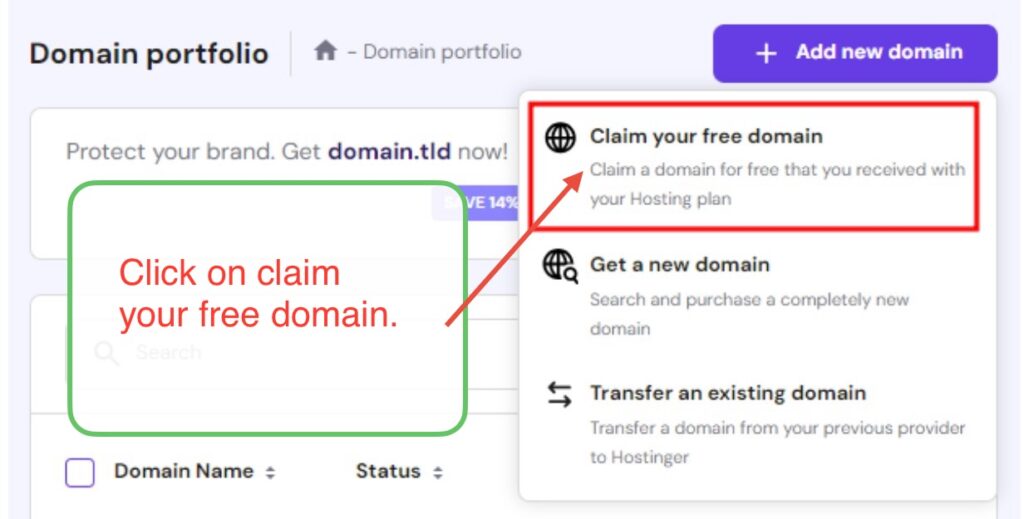
Next, enter your domain name. For example, we are using “Travelsuperman.com.” Click on “Check Availability,” and if it’s available, confirm your choice.
You will get an email—make sure to verify it by clicking the link.
After registering your domain name, you will receive another important email. This email will say something like, “Verify your domain. If you don’t do this within 15 days, your domain name will be deactivated.”
This is very important, so check your email and click the confirmation link right away, like in the image below.
Once you’ve verified your domain, you’re all set!

What’s Next?
You will now learn how can you make your website live! So that anybody can access your website through their browser.
STEP - 2
Make Your Website Live
In this step we will be installing WordPress CMS (Content Management System) to manage our overall blog website.
We will also install theme for our blog, which can be done either separately or with WordPress installation.
We will teach you how can you install theme with WordPress installation through hostinger hosting.
Substep a): Install WordPress and theme
Now go to hostinger.com and log in with your credentials, like your email and password.
Go to the Website section by clicking on “Websites” in the panel, then click on the “Add Website” button as shown in the image below.
This will open a dropdown menu with several options. Choose WordPress option.

You will now see the WordPress login page like in the image below. Enter your email and password, then click the “Next” button.
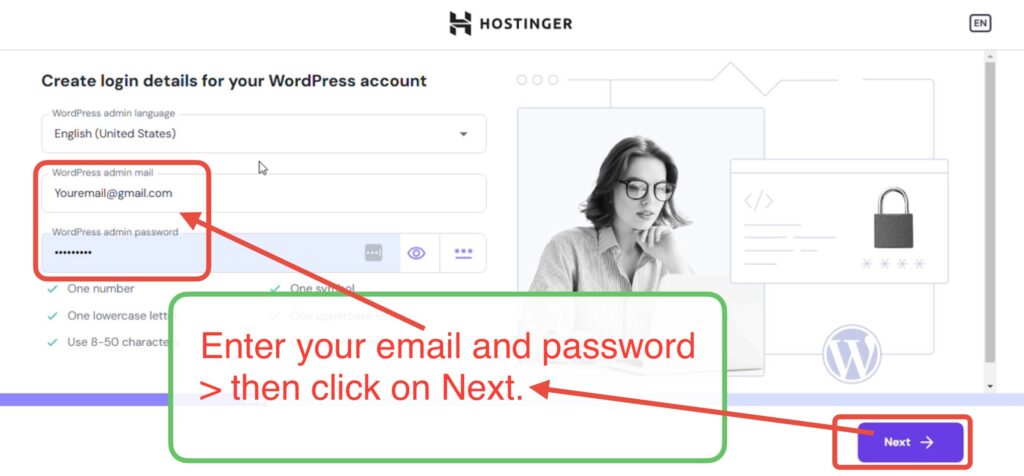
Next, you will be asked what type of website you want to build.
We are making a blog, so select the “Blog” option and click on “Next”.

Choose any theme design you like, you will be able to change it later.
After selecting the theme, click “Next” as shown in the image below.
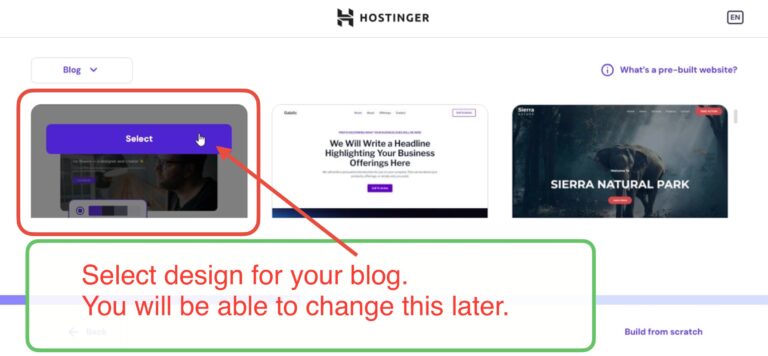
Now you will see the theme page for setting up page layout and colour, choose colour according to your choice as you will be able to change whole theme when you want.

Now you will see the plugins page.
You can remove any plugins you don’t want by clicking the “X” next to them, we recommend you remove them all for now, then click “Next”.

Enter the domain name you claimed for free in previous step, select it, and click “Next”.

You will see a page saying “Installing WordPress”. Let it finish installing.
When WordPress is installed, it will automatically redirect you to the WordPress Admin Page, if not you might be asked to visit WordPress or visit website, click on visit website to see your website.

Awesome job! Your website is now live!
You can visit your blog by typing in your blog’s URL (for example, travelsuperman.com).
Check out the image below to see what our blog looks like.
If you followed these steps along with us, you should now have a similar blog of your own. If you haven’t followed along yet, it’s a great time to start and create your blog!

We created a responsive website in just 15 minutes without any coding. It’s amazing what technology can do!
Now that your website is live, it’s time to start adding content.
There are some important steps to follow: first, find the right topics to write about, then use the best methods to write and upload content. You also need to make your content SEO-friendly so people can find it, and share it on different platforms to get more visitors.
What’s Next?
In the next step, we will show you how to find your first 10 topiscs to write about for your blog. Let’s move on to the next step!
STEP - 3
Find First 10 Topics To Write On
In this step you are going to learn how can you find your first 10 blog post topic to write on.
You will use Mangools and Amazon for topic search.
Substep a): Find topics using keyword research
Let’s find the first 10 topics to write about for your blog.
Tools You Will Need:
Mangools (KW Finder)
Amazon.com
Step 1: Use Mangools (KW Finder)
Go to Mangools (KW Finder) and search for keywords related to your niche. In this example, our niche is Travel Accessories, so type “Travel Accessories” in the Mangools search box.
Look at the image below for an example. You will see different keywords (like “travel pillow”) on the left side. These are words that people are searching for on Google.
In the middle, you’ll see the search volume, which shows how many people are searching for that keyword each month. For example, “travel pillow” has a monthly search volume of 106,000.
On the right side, you will see KD, which stands for Keyword Difficulty. It ranges from 0 to 100, with 0 being the easiest and 100 being the hardest to rank for on Google.
Tips for Choosing Keywords:
The keywords should match your blog topic.
Look for a search volume of at least 500 to start.
For beginners, choose keywords with a Keyword Difficulty below 50.
You can break these rules if you want, like targeting a KD above 50, but you need to have enough resources to compete with other websites.

Now it’s time to pick the keywords for your blog.
Look for keywords that have a high search volume but low Keyword Difficulty (KD). These are the best ones to use.
Check out the image below. We’ve highlighted the keywords we are choosing for our blog topics.
We didn’t pick “mens travel bag” instead we picked “male travel bag” because both have similar search volume but “male travel bag” has low KD it means it will be easier to rank on SERP(Search Engine Ranking Page).
Next, let’s come up with headlines based on these keywords.

Here are some ideas for turning the keywords from the Mangools Keyword Research into more eye-catching titles:
(There are tools to create catchy headlines, but since you’re just starting out, we don’t want to overwhelm you. Adding these tools now could make the process feel too long.
For more help, check out “100x Free Resources for Blogging” to speed up your blog creation. This resource includes step-by-step instructions for generating headlines using different tools.)
Here are the keywords rewritten as headings:
- TOP 7 Most Comfortable Travel-Pillows For You (5th one is colourful).
- Don’t Go Out Without These Toiletry Kit Bags (Choose from top 5).
- Male Travel Bag To Look Tough and Handsome.
- Make Your Passport Safe Using Any Of these 5 Passport Covers.
- Travel Bags For Women To Look Trendy and Stylish (5th one is pink;))

- TOP 8 Multipurpose Travel Adapter You Can Trust On Long Journey.
- Lightweight Shoe Bags Will Make Your Journey Comfortable.
- Slim and Waterproof Travel Wallet You Can’t Resist.

- Use These Custom Luggage Covers For Long Journey.
- Become Tension Free With These Inflatable Foot Rest For Planes.
Before you start writing on these topics, let’s check if they are popular on Amazon.
If the products have good reviews, you should write about them and include Amazon Associates affiliate links. If they don’t, it’s better to skip them and find another topic.
Let’s use the sixth heading as an example (the process will be the same for any topic).
Substep b): Find topic popularity using Amazon tool
So, let’s check the topic: [TOP 8 Multipurpose Travel Adapters You Can Trust On Your Long Journey.]
Go to Amazon.com, type in “Travel Adapter,” and then select “Best Sellers” from the dropdown menu, as shown in the image below.

Make notes in a Google document or take screenshots of all the travel adapters with a high number of ratings.
For example, in the image below, we selected products with 5,124 ratings, 31,447 ratings, 8,965 ratings, and 12,644 ratings.
Do the same for products that match your blog niche.

Select at least 8 as we are going to write on 8 Travel Adapters.

Click on any one travel adapter that you have selected, like we are going to select first one with 5,124 numbers the reviews, click on it to see more information about this product.

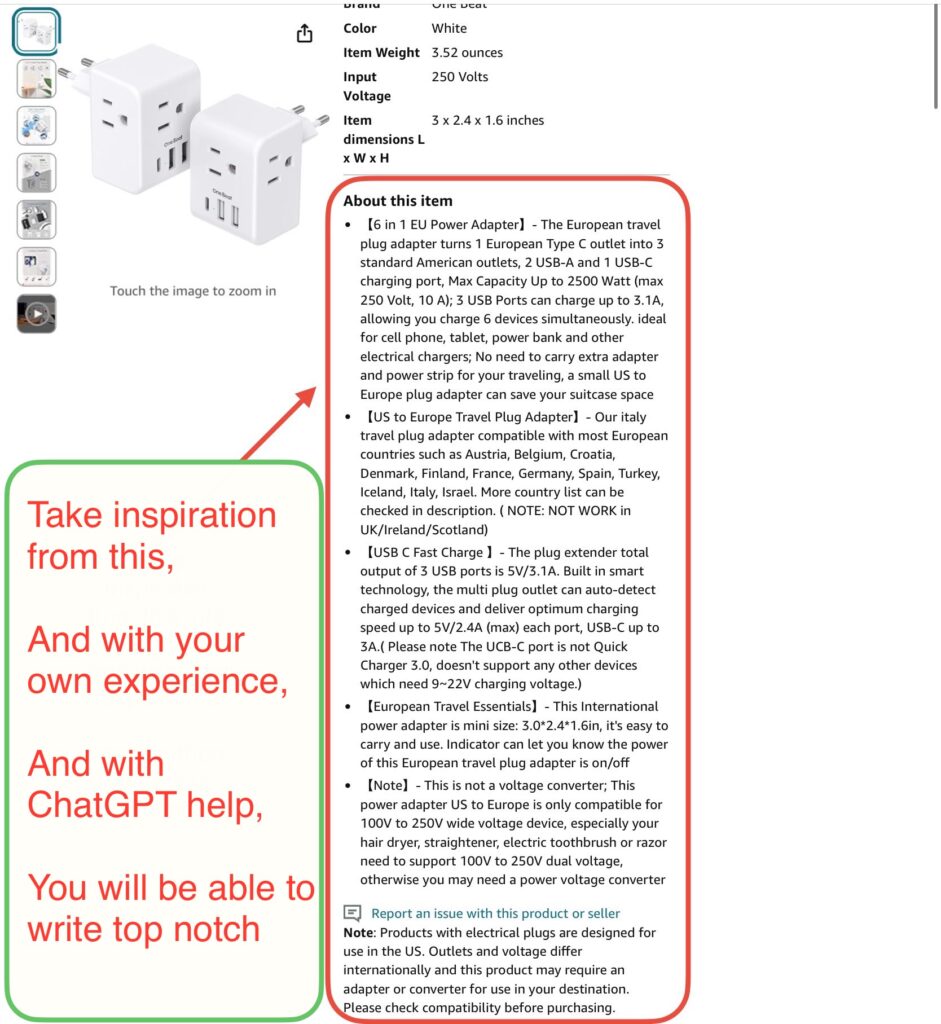
Scroll down then find About this item section,
Ask question now this – is this product relevant for your topic? If yes note it down.
Check out the reviews for the product. If you haven’t used it yourself, you can learn about the quality by reading what others have said.
If most of the reviews are positive, it means the product is likely good, and you can write about it in your blog post. People might be interested in buying it through your blog.
If the reviews are mostly negative, it’s better to skip that product and find something else to write about.

If you scroll down, you’ll see that there are many images included with this product. This is a good sign because it means the product owner is putting effort into selling it properly.
You can use these images in your blog post to promote the product.
Make sure to use these images only for promotion purposes and don’t misuse them.

What’s Next?
In next step you will have opportunity to learn how to write your first blog post in WordPress CMS and Publish it live on the internet.
STEP - 4
Publish Your First Blog Post Live!
Let’s write our first blog post and publish it!
You will need two tools:
Google Docs (optional but makes things a lot easier)
ChatGPT
Substep a): Create outline details for your blog post
First, open Google Docs (or a similar tool like MS Word) on your computer. You can also install the Google Docs app on your tablet or phone, whichever you prefer.
Click on “Blank Document” to create a new file for writing your blog post.

You can minimize it for now, as we’ll use it in just a minute.
The first thing you need to do before writing your blog post is to create a blog post outline. Once you have the outline, you can write the full blog post based on it.
Now, open ChatGPT.com and copy and paste the prompt below.
(You can also download our 100x Free Resource pack, which includes 120+ ChatGPT Prompts).
Copy the prompt below:
Prompt: “Create a detailed, professional-level outline for a blog/article on [insert topic]. The outline should include a strong introduction, key sections with subheadings, examples where necessary, and a persuasive conclusion. Each section should clearly define its purpose, flow logically, and provide a comprehensive roadmap for writing the article. Please make sure the outline is well-structured and covers all relevant points that would be expected in a high-quality piece.”
Important Note: Remember to replace the highlighted area [insert topic] with your own topic in the prompt above. Like as we told in steps 3 above, for us topic is [Top 8 Multipurpose Travel Adapters You Can Trust On Your Long Journey], so we will put it in place of [insert topic]
After copying the prompt, go to ChatGPT and paste it there.
ChatGPT will generate an outline, like the one shown in the image below.

You can change the prompt a bit to fit your topic. For example, if your topic is about comparisons of two producrs, you can add the word “include Comparison” after the introduction in the prompt.
Substep b): Curate post content from Amazon
Next, go to amazon.com and look for the products you want to write about.
For example, type “Travel Adapter” in the search bar and choose one that has good reviews, like we did in Step 2.

Now it’s time to gather information about the product:
Collect Product Images: Save images of the products to use in your blog.
Record Star Ratings: Write down the star rating and the number of people who have rated the product.
Price Information: Note the maximum price, current price, and any discounts available for customers.
Style and Attributes: Record details like style, color, or any other special features.
Features: Write down key features such as voltage, USB slots, total power, etc.
Benefits: Note the benefits, like how the product can be used for multiple purposes.
Important Details: Copy important information from the “About the item” section, as shown in the image below.
Note Section: Write down any important notes provided in the “Note” section.

When you scroll down on Amazon, you might find a product comparison table like the one shown below. This can make your job easier if you want to compare the features of 8 products in your blog.

Reviews are really important because people love to read them. So make sure not to skip this step.
If you haven’t used the product yourself, carefully read the reviews. You can then write about them in your own words or say something like, “Here’s what other people are saying about this product.”

We have enough content to move forward now.
Write the curated content based on your travel experience. If travel is your chosen topic, make sure you have some experience in it.
The same goes for other topics like fashion, technology, or coding. You need to have experience, and you can find content ideas from books, Amazon, the internet, or tools like ChatGPT.
Tips:
Once you have some ideas and experience, you can create new content that is helpful to people.
Try to give as much value as possible so that people will be interested in your blog.
After writing your content in Google Docs or another tool, check for errors. You might also need to rewrite some parts to make it sound more professional using ChatGPT.
Substep c): Now use chatgpt prompts to create content from curated content
Now let’s go back to ChatGPT:
Its time to look back on the “outline” generated by ChatGPT above.
Let’s write based on the outline that ChatGPT created. The outline says to start with a hook. Below, we have made a prompt for you to use:
Copy the prompt, change the highlighted parts to fit your topic, and paste it into ChatGPT.
Hook Prompt
Prompt: Create an engaging and relatable hook for an article on [insert topic], tailored for [insert audience type]. The hook should grab the reader’s attention right away, make them curious, and set the tone for the rest of the content. It should appeal to [insert audience type], making the topic feel interesting and encouraging them to keep reading.

These are some headings we should include in our blog post. ChatGPT prompts are given with headings.
Hook: We have already provided ChatGPT prompt above.
Why This Article Matters: You can copy the curated content and paste into ChatGPT, then use below prompt for writing.
Prompt:
Purpose of Blog Extraction Prompt: “Write a section detailing the purpose of this blog post about [Product Name or Topic]. Explain what readers can expect to learn, and how this blog aims to provide valuable insights for [Target Audience or User Group]. Include key aspects such as [Features, Benefits, User Reviews, etc.] drawn from Amazon reviews and product descriptions to help potential buyers make informed decisions.”
Overview: Paste the content curated into ChatGPT and use below prompt.
Prompt:
Overview Extraction Prompt: “Using the available product content from Amazon, including descriptions, user reviews, and star ratings, write an engaging overview of [Product Name]. The overview should summarize [Product Name]‘s main characteristics, intended use, and what makes it stand out. Focus on capturing the essence of the product in a concise and compelling way to appeal to [Target Audience or User Group].”
Features to Look for in a Travel Adapter: Use here this prompt to extract feature and benefit from the given contents.
Prompts:
- Features Extraction Prompt: “Extract and list the key features of [Product Name] available on Amazon. Utilize information from the product description, bullet points, and user reviews. Highlight specific technical details, unique features, and specifications that are most important for [Target Audience or User Group] to know. Aim for a length of [Desired Length, e.g., 100-150 words].”
- Benefits Extraction Prompt: “Based on user reviews and product descriptions from Amazon, outline the main benefits of using [Product Name]. Explain how these features translate into advantages for [Target Audience or User Group], including practical uses, positive experiences, and improvements that customers have highlighted in their reviews. Aim for a length of [Desired Length, e.g., 150-200 words].”
Main Content: For main content paste the content in ChatGPT then use the prompt below.
Main Content Writing Prompt:
“Based on the provided content about [Product/Topic Name], write the main body of the article, focusing on engaging and informative sections. Extract key information such as [Features, Benefits, User Reviews, Technical Details, etc.]. Make sure to address [Target Audience or User Group] and maintain a tone that is [Conversational, Professional, Informative, etc.]. Include relevant details to support each point, and ensure the content is easy to read and well-organized. Aim for a length of [Desired Length, e.g., 500-700 words] for the main content, and structure it with [Headings, Subheadings, Bullet Points, etc.] to improve readability.”
Products detail:
For specific details like details of Adapter 1 to 8: [Brand/Model Name], you should write by your own, but still you can paste the curated content in ChatGPT and use the Prompt below.
Prompt:
Specific Product Detail Extraction Prompt:
“From the provided content, extract the details for [Product Name]. Include specific information such as [Features, Benefits, Importance, Star Ratings, User Reviews, etc.]. Summarize the product information in a way that clearly communicates the value to [Target Audience or User Group]. Maintain a tone that is [Conversational, Professional, Informative, etc.]. Aim for a length of [Desired Length, e.g., 200-300 words] for each product, ensuring each detail is highlighted effectively for the reader’s understanding.”
- Conclusion: Wrap up the article by summarizing why these adapters are useful and how they can make travel easier.
- Frequently Asked Questions: Include some common questions people have about travel adapters and their answers.
Tips for Writing
- These contents will generated by ChatGPT, but remember, you’re human. Use your experience to add a personal touch. You can skip or add headings as needed.
- Make sure to complete the content for each heading with plenty of detail. Use screenshots of travel adapters from Amazon.com, and aim for at least 2,000 words. Include images and videos from YouTube if they help explain things better.
- Rich content is important because when you apply for Google AdSense to make money, they will manually check if your content is detailed and valuable. Google is strict, so if your content is too thin, they might reject your application. Always aim to create rich, useful content.
Writing Faster with Tools and Templates:
There are ways to make writing faster, like using templates, ChatGPT prompts, or voice tools. You can also use different writing frameworks to add emotions or use the PAS (Problem-Agitate-Solution) framework to hook your audience. (You can check here some of our blogging Resource)
Substep d): Now use WordPress to edit and make your post live.
Now let’s move towards the step of Publishing Your Blog
Now it’s time to upload your content to your blog and make it live.
Open your hosting provider (like Hostinger.com).
Click on “Websites” on the left side panel.
Find your website and click on “Admin Panel” on the right side.

After clicking Admin Panel WordPress will open somewhat similar to image below.
Alternatively, you can type this in your browser “yourwebsite.com/wp-admin”, replace yourwebsite.com with your domain name, like for us “travelsuperman.com/wp-admin”. Then, Log in to your WordPress dashboard.
After the above steps your wordpress site will open.
On the left-hand sidebar, find the Plugins option and click on it.
then, Click on the Add New Plugin button.
You can now search for the plugin “Elementor” as shown in image below.
Once you find it, click Install Now and then Activate to activate the plugin, it will show “Active” label.

Next, find the Posts option on the sidebar and click on it. Then, choose Add New Post. You can look at the image below for reference.

You will see a new page editor with a button that says Edit with Elementor at the top, like in the picture below. Click on this button.
This button you find “Edit with Elementor” only available after you install “Elementor” plugin.

This action will open the page in the Elementor editor.
Here, you can find lots of options to edit your page or post and make it look better and more responsive with less time and effort.
Now, click on the Post Setting icon like in the image below. This will open the post settings, where you can change things like the title, featured image, and more.

Scroll down on left side bar, you can change the page layout. This is optional change it according to your design need.

Now click on the Add a Container icon as shown in the image below.
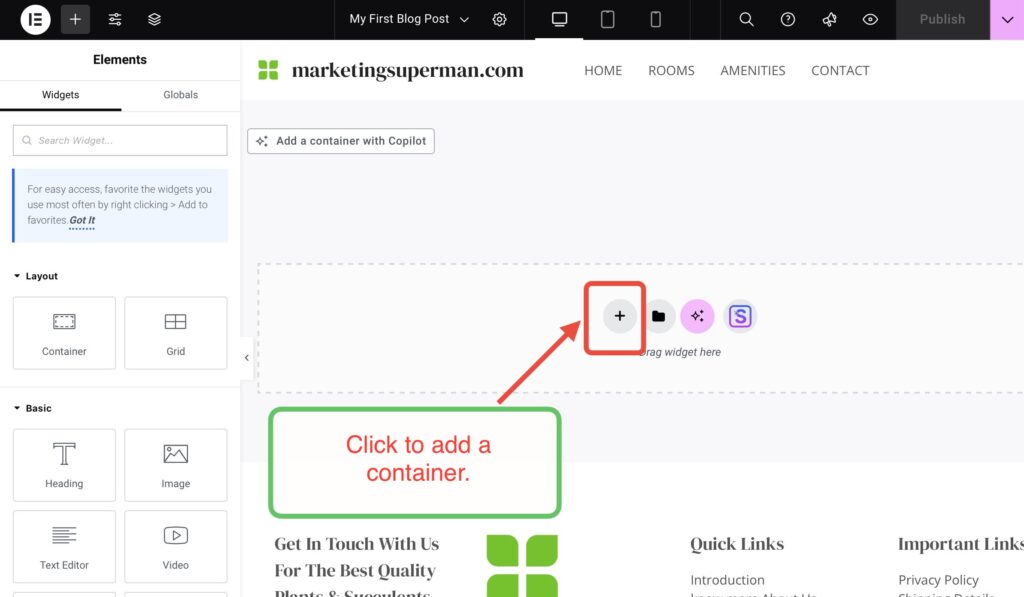
Then choose the flexbox option.

Select the structure. For now, click on the first option.

You will see that a container has been added. Now, drag and drop Text Editor from the left tool panel to the container, like in the image below.

Now you will see a text editor has been added, and a new box will appear on the left side for editing that says Visual. Remove the text from it and paste the content you have created in Google Docs.

Is your post looking boring? Don’t worry, we will fix that.

After pasting the content, press enter and then click on the Post Setting icon like in the image below.
Change the title of the blog post by editing the title. This is the title for your blog, and Google will use this information to understand what your blog is about, so make sure to write it properly.
We will talk more about titles in the next section. For now, you can write “My First Blog Page” or something like “Top 8 Multipurpose Travel Adapters That You Can Trust On Your Long Journey.”
It’s just the beginning, so don’t worry too much.
Then click on the Publish button at the top (the button location might change because WordPress updates frequently, so if you don’t see it at the top, check the bottom).
This will make your post live!

Now click on the arrow beside Publish, and from the dropdown, click on View Page to see your post.

This is what your first blog post may look like.
If you think it’s boring, you might be right 🥲, but guess what? This is just the beginning.
You can make it look amazing by spending a little more time.
For example, if you have a template, you can replace the template content with your own content in just a few minutes, like we are going to do next.

Download template from here: WordPress Templates.
Then Click on little arrow near publish, then click on Save as Template, as in image below.

Then click the Library option on top left.

Click on My Templates, then click on little up arrow called upload. See image.

Click on Select File.

Choose the template from the downloads.

Click on the continue button.
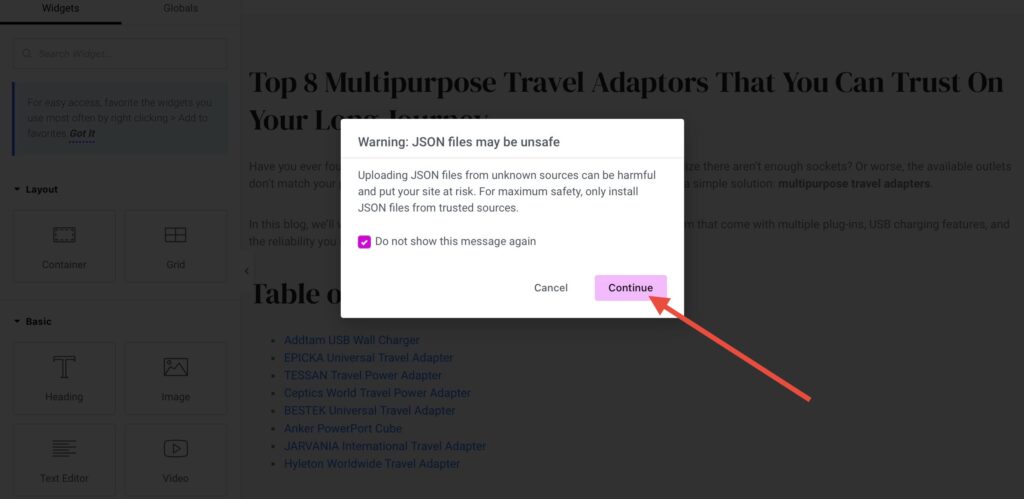
Now your template is uploaded successfully, click on Insert button to apply template on the current page or post.

Click on the apply button.

Now replace the content of the templates, like text, images, title, table of contents, etc.
After that your blog post will look something like the image below.
If you are following these steps with us, then you must have posted your first blog post live. If you are not following yet then don’t delay you can start today.
Now there are some work still left like adding affiliate links from amazon we will do that in monetization section.

What’s Next?
Next we are going to rank your blog post on Search Engine Ranking Page or in short SERP, in other words you can say we are going to rank your blog on google as google has most of the audiences.
STEP - 5
Rank Your Blog On Google
Let’s work on getting your blog post to rank on Google search engine results pages (SERP).
Tools you will need:
Yoast
Mangools
Excel or a similar tool like Google Sheets
Substep a): Setup focus keyword for your post
Open WordPress again. You can do this by going to hostinger.com like we did before, or by typing yourwebsite.com/wp-admin/ and logging in. Either way works.
On the left side, click on Plugins and then Add New Plugin. In the search bar, type “Yoast” and then look for Yoast SEO plugin then click on the Install Now button and after installation click on “Activate” button.
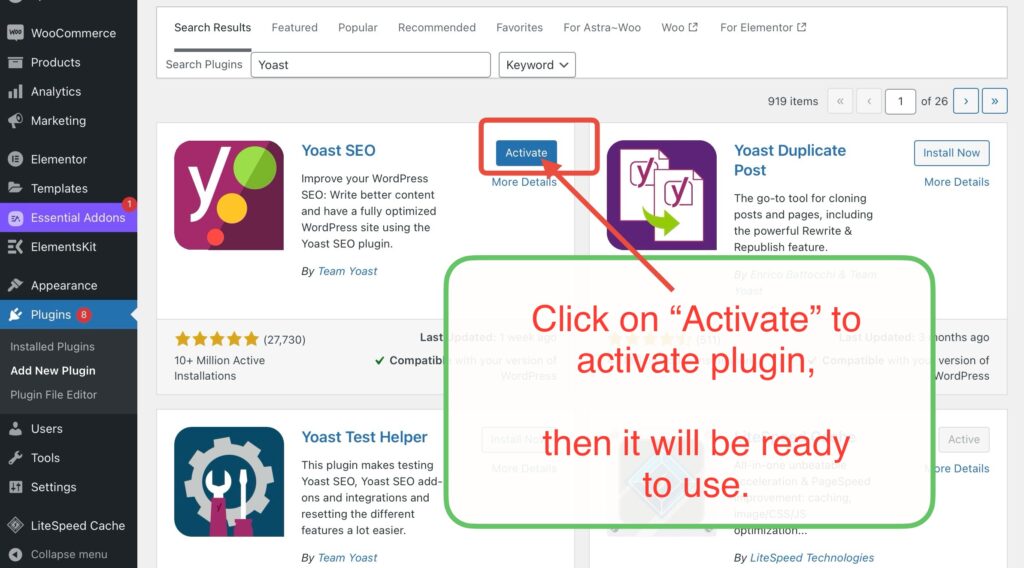
In WordPress, open the post you want to rank on Google or SERP. To do this, click on Posts, then select All Posts.

Next, find the post you want to rank on Google search results. Click on the Edit button, like in the image below.

Now the post will open, but don’t click on anything yet. Just scroll down to the Yoast SEO tool.

Here you will find the Yoast SEO tool, which helps you do an SEO audit on your post so it can rank better on Google.
Simple Explanation:
An SEO audit is a process where you check your website to see how well it's performing in search engines like Google. It's like a health check for your site, helping you find out what works well and what needs improvement to rank higher and get more traffic.
Professional Definition:
An SEO audit is a comprehensive analysis of a website to evaluate its optimization for search engines, focusing on technical infrastructure, on-page elements, and off-page factors. The goal is to identify strengths, weaknesses, and opportunities to enhance the site's visibility, organic traffic, and ranking potential in search engine results pages (SERPs).
You will see four tabs, but for now, let’s focus on the first tab called “SEO.”
It might show an angry red emoji, which means there are some issues to fix. Our goal is to turn it into a happy green emoji. Let’s work on that now!

Below, you will see options for “mobile” and “desktop” previews. This means you can see how your page will look when someone searches for it on Google.
Scroll down further, and you’ll find the “SEO Title” section. It might show some automatically generated text. Delete this by pressing backspace, and we will write our own SEO title.
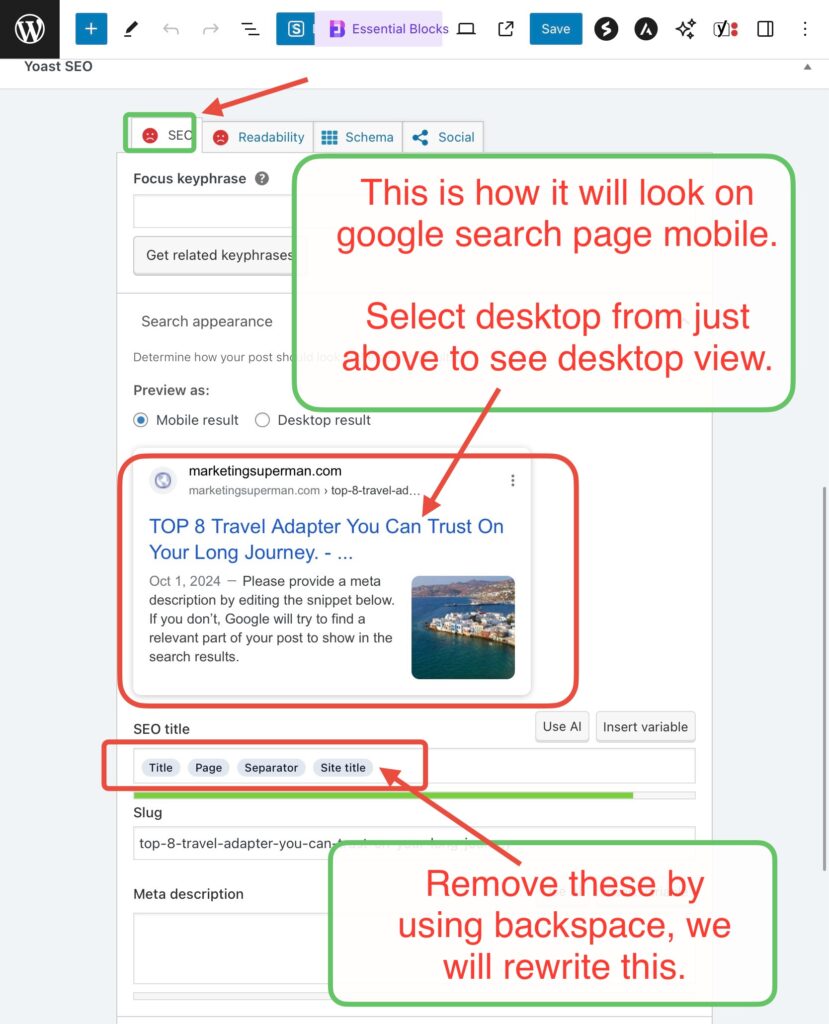
Now let’s write a great title that grabs people’s attention. Remember, it shouldn’t be too short or too long. If your title is too long, the bar below it will turn red, which means it will get cut off in Google search results, as shown in the preview.
Let’s try again, but this time make sure the title is the right length.
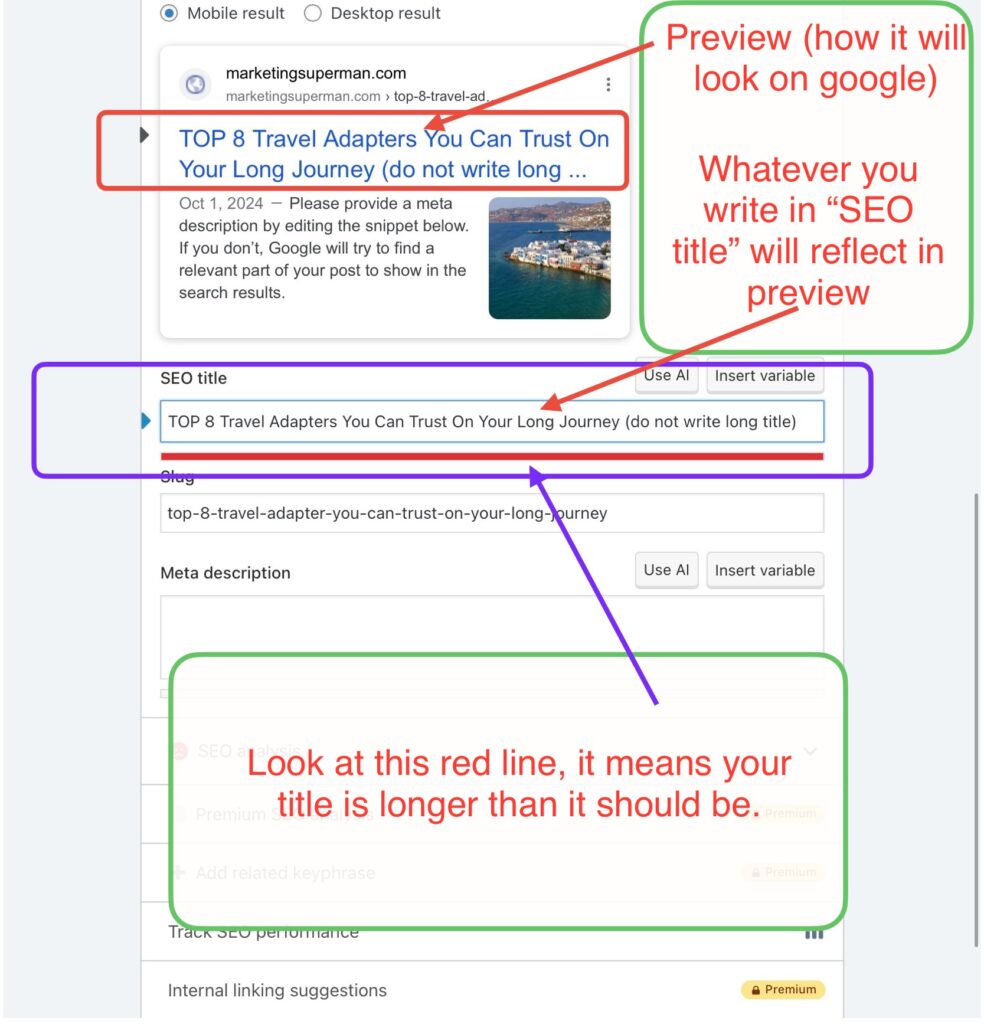
Now we’ve written the title as “TOP 8 Travel Adapters You Can Trust On Your Long Journey.” The green bar below it means the title is the right length.
Look at the preview and ask yourself: if you saw this title, would you click on it? It should be interesting and catchy.
(There are some ways to write a catchy title, and we’ve included them in our resources here: 100x Free Resources for Blogging.)

Our slug is already a good length, and it will show up in the URL for users to see.
Simple Explanation:
A slug is the part of a web page's URL that comes after the main website address. It usually describes the content of that specific page, making it easy for people and search engines to understand what the page is about. For example, in the URL "www.example.com/blog/seo-tips," the slug is "seo-tips."
Professional Definition:
A slug is the URL-friendly, customizable part of a web address used to identify a particular page on a website. It follows the domain name and is designed to be concise and descriptive, often containing keywords that improve SEO by making the page content more accessible to both users and search engines. Slugs play a crucial role in improving the clarity and relevance of URLs, contributing to better search engine rankings and user experience.

If the meta description is blank, you should write a good one because it shows up in search results when someone searches for your post.
Think about whether you would click on it if you saw this meta description. Look at the preview and write something that makes people want to click, like the example in the image below.
The meta description should be the right length. If it’s too short, people won’t get enough information. If it’s too long, it will get cut off.
Check the green bar below the meta description. If it’s orange or red, fix the length of your meta description. Look at the image below to understand better, but make sure you practice doing this yourself.
Simple Explanation:
A meta description is a short summary of a web page that shows up in search results. It helps people understand what the page is about before they click on it.
Professional Definition:
A meta description is an HTML attribute that provides a brief, 150-160 character summary of a webpage's content. It appears below the page title in search engine results and serves as a concise preview to inform users about the page’s content, ultimately encouraging click-throughs. While meta descriptions do not directly impact search rankings, they play a significant role in influencing user engagement and improving organic click-through rates (CTR).

Scroll down a little more until you see the “SEO analysis” section. Click on the arrow on the side (as shown in the image below) to see more options. Here, you will find a list of Problems and Good Results.
Look at the problems that need fixing. For example, you might see issues like “No internal links appear on this page” or “No focus key phrase was set for this page.”
We are going to fix these problems to make the emoji change from “angry” to “neutral” 😐.

Now our goal is to make emoji from angry to neutral for that make internal links in your blog post you have just created,
for now just make internal link to your home page, then write focus keyword as shown in image below.

Here It looks like After adding the focus keyword in Yoast SEO we got more problems, but look at the emoji in the top left corner. It has turned orange, which means it’s now neutral instead of angry. This shows we’re on the right track.
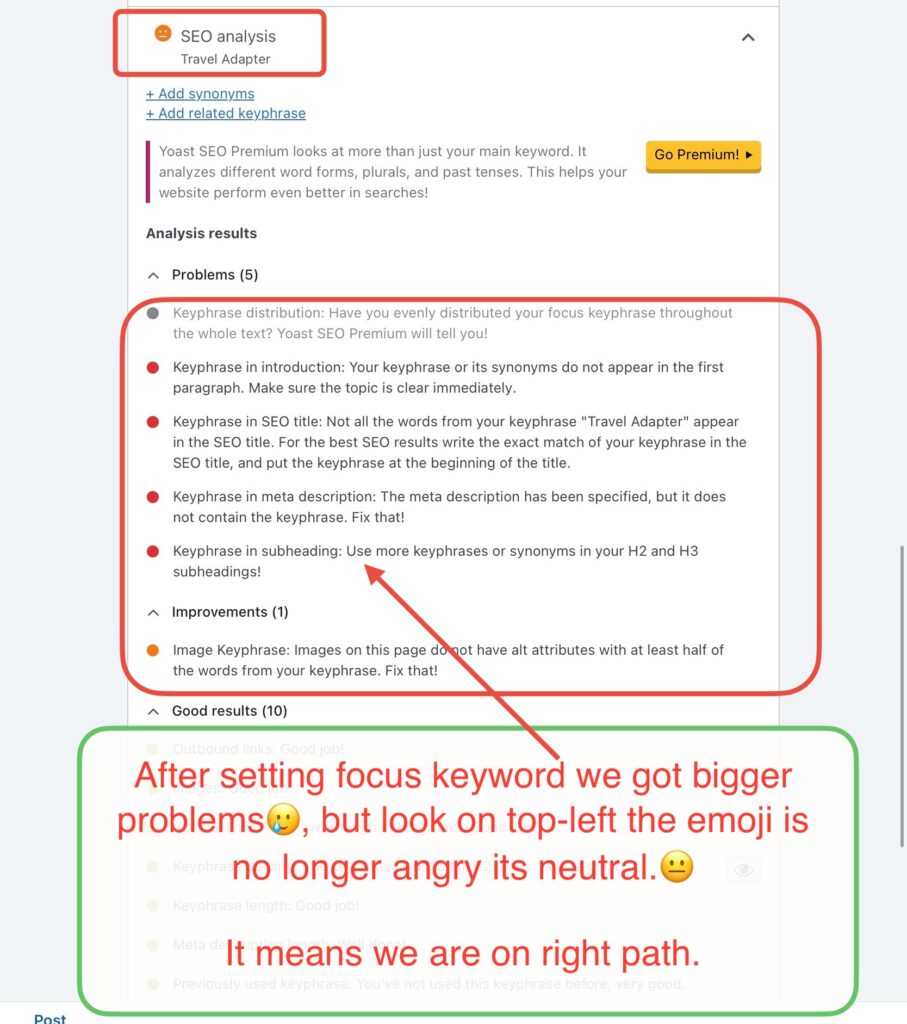
Now our goal is to turn the neutral face emoji into a happy face emoji. To do this, we need to do three things:
Add the focus keyword (Travel Adapter) at the beginning of the SEO title.
Put the focus keyword in the slug.
Include the focus keyword in the meta description.
After doing these steps, check the emoji in the top-right corner. It should turn into a green happy face emoji.

Substep b): Edit post keywords foe SERP Ranking
Now, let’s move on to the second part: ranking on Google.
Go to Mangools keyword research tool, and in the search box, type your blog post keyword. For our example, it’s “Travel Adapter.” Then hit search.
You will see many keywords along with their search volume and keyword difficulty (KD), as shown in the image below.
Select the keywords now that are related to your blog post, good in search volume (above 100 generally), low in KD (Keyword difficulty less than 50)
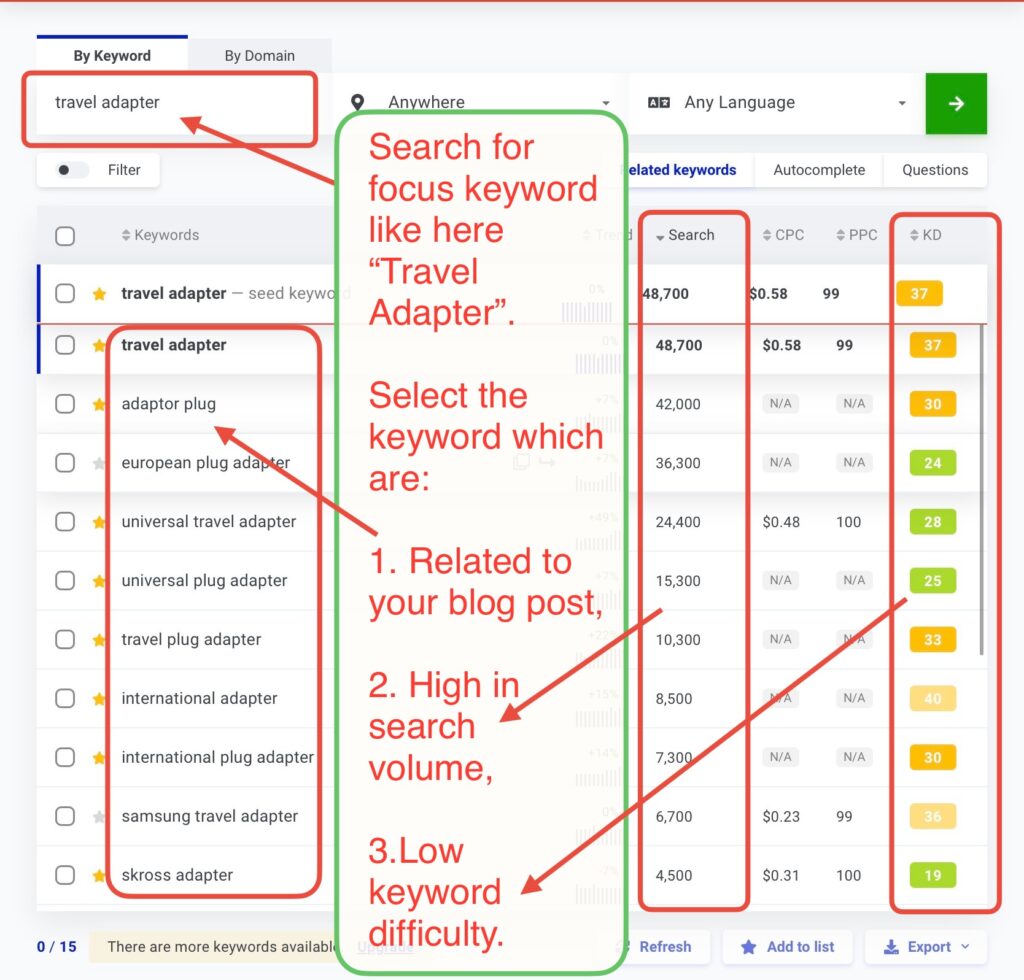
From here, pick the keywords that are relevant to your blog post and have low difficulty but decent search volume. These will be your secondary keywords.
They don’t need to have a high volume; even 100 searches is good enough since they are secondary(not focus keyword).
For example, we chose “Type C Travel Adapter” because it is closely related to our blog topic and has low keyword difficulty (KD) and good search volume.

Now copy the keyword above and open your blog post editor. Replace any similar keyword in your post with the selected keyword.
In our example, we’ll replace the term “USB-C” with “Type C Travel Adapter,” as shown in the image below.
After making the changes, click on the Publish button to save and publish your updates.

Look in image below we have replaced USB-C by Type c travel adapter. Don’t forget to save your changes by publishing or saving in draft.
By doing this step we will be able to tell google that our blog is about type c travel adapter, and when anyone search on google for travel adapter type our blog post may rank higher.

Let’s look at another example.
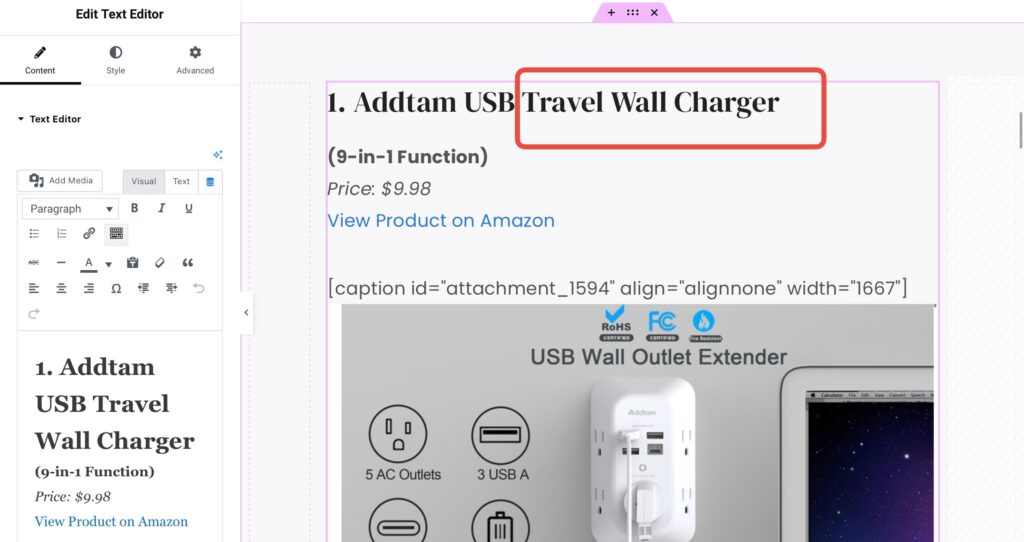
We have picked a keyword from our list called “Travel Wall Charger.” It only has 70 searches per month, but that’s okay because we already chose “Travel Adapter” as our primary keyword. Now we are looking for a secondary keyword, and it doesn’t need to have a high search volume.

Now go back to your post, and we will replace any word that is similar to our selected keyword. In this example, we will replace the word “Wall Charger” with “Travel Wall Charger.”

Look below image we replaced the word wall charger with “Travel Wall Charger”.
Again we are doing this to make our blog post relevant for keyword related to Primary Keyword Travel Adapter, so if somebody search on google for travel adapter of travel charger or something similar google will get to know that our blog post is about travel adapter and travel charger and about similar thing.
Click on publish to save and publish changes now.
Substep c): Create sitemap for your blog.
Now let’s move on to the third part of ranking on Google.
Let’s connect some Google tools:
GSC (Google Search Console)
GTM (Google Tag Manager)
To do this, we need to first install a plugin called GTM4WP.
Go to your WordPress dashboard, click on Plugins, then Add New Plugin like we did before (as shown in the image below). In the search box, type “GTM4WP” and click Install Now. After it’s installed, click Activate. Once activated, this plugin will be ready to use.

Now open google tag manager click on this tagmanager.google.com. Then login with your gmail id.
Than a page similar to below will open. We have some websites already connected but you might be seeing a blank page with create account. Click on create account button as shown in image below.

After that fill your website’s details as shown. Then click on create.

After that you read terms of service agreement if you want🥲 then tick below on checkbox, then click “Yes”.

A code will show up in front of you.
There are several ways to connect GTM to your website. You can copy this code and paste it into the head and body sections of your website.
But there’s an easier way! Just close the code window and find the GTM ID.

At the top, you will see an ID that looks like GTM-XXXXXX (your unique ID). Check the image below to see where to find it. Copy this ID and go back to WordPress.

In WordPress, click on Settings and then select Google Tag Manager from the sidebar, look at image below.
Enter your Google Tag Manager ID in the provided field. Then, click on the On radio button next to “Container code On or Off.” After that, click Save Changes. Make sure to double-check that the radio button is still set to On, and then click Save Changes again.

Now that the connection process for your website with GTM is done, let’s confirm it.
Go to the GTM website and select Overview from the left panel. At the top, you will see a button called Preview. Click on it.

Enter your website address when asked, then click on Connect.
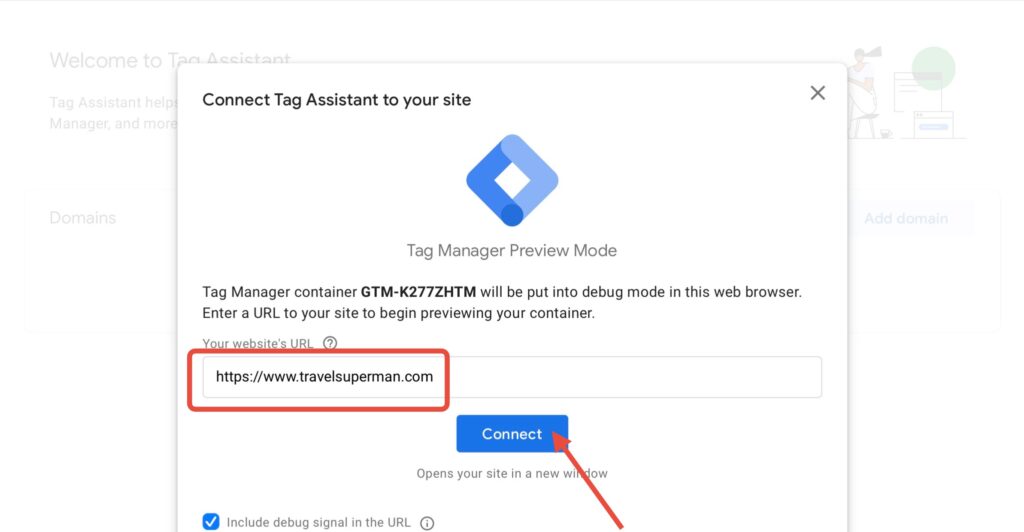
You website will automatically opens in new tab and you will see popup from below as shown below image. If it says Tag Assistant Connected green tick, means your website is connected successfully.

Now let’s connect Google Search Console (GSC) with your website and upload a sitemap.
Go to WordPress and click on Yoast SEO as shown in the image below. Then, click on Settings.

Scroll down to APIs, click on “View the XML sitemap”

It will open a site with sitemap of your website, copy this URL.

Now open Google Search Console (GSC) and sign up with your Google account.
You will see a dropdown with an option to Add Property. Click on it.
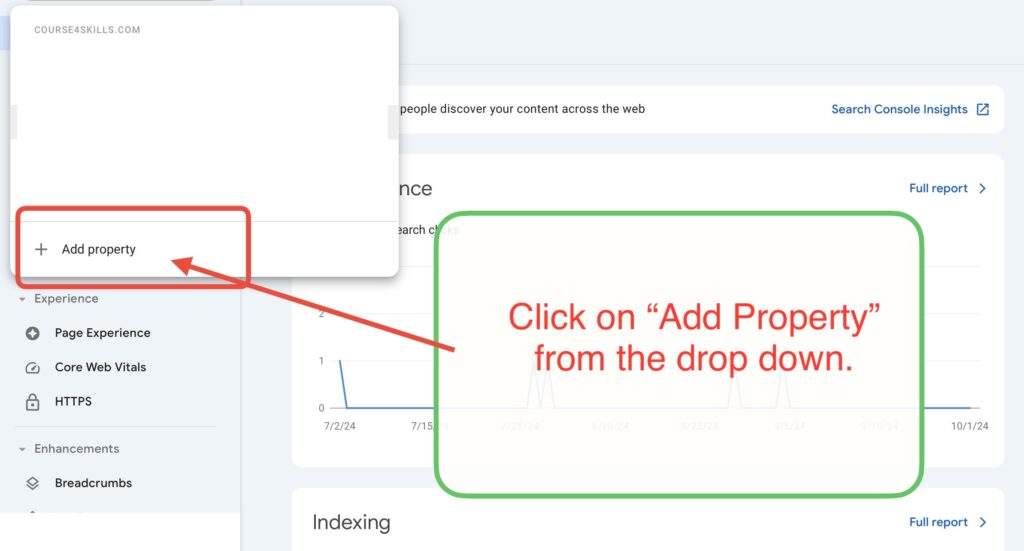
A pop-up will appear with some options. Type your website’s URL in the input area in “URL Prefix” and click on Continue.

Your GSC will be connected to your website saying Ownership Verified.

Now click on sitemap on left panel then paste the “slug” only of the copied sitemap URL, click on “Submit” button.
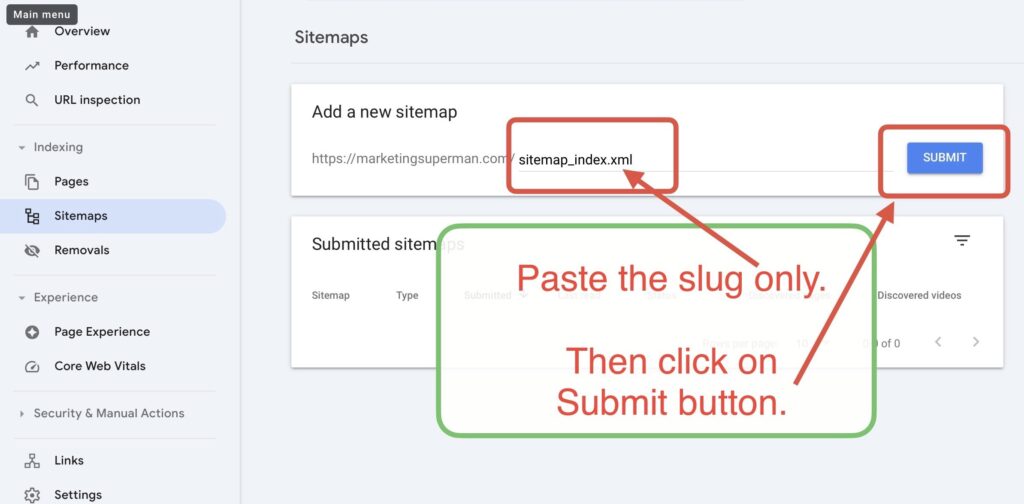
It will then say that your sitemap was submitted successfully. This makes it easier for Google to find your web pages automatically.
If you add more posts or pages, Google will be able to access them automatically.

Substep d): Guest blogging short introduction
Now let’s move on to the fourth part of ranking on Google.
We need to get backlinks from other websites, and one way to do this is by guest posting. To start, search for your blog topic along with the words “guest post.” For example, type “Travel blog guest post.” Click on any link that looks related to your blog topic.

After that, look for their contact information on their page. You can then ask if they would be willing to give you a backlink in exchange for a free blog post.
You may also have to write a post for them on their website to get a backlink or you can submit graphics to them ask for give credit to your website and that’s how you can get backlinks. In the beginning it could be harder for a blog to get backlink because it need some content. So first focus in creating content rich blog post.

What’s Next?
In Next step you are going to learn how can you bring traffic on your website.
STEP - 6
Bring Traffic On Your Blog
In this step we are going to bring traffic from:
- LinkedIn,
- Substack, and
- Quora.
You can use the same process for various other platforms.
Substep a):Write post on LinkedIn
Now, open linkedin.com.
Log in or sign up using your Gmail account. Once you’re logged in, click on Write Article as shown in the image below.

You will see an article editor. Click on Upload from Computer to add an image related to your blog topic.
For example, we have a post on our website travelsuperman.com called “TOP 8 Multipurpose Travel Adapters That You Can Trust On Your Long Journey.” On LinkedIn, we should make a post on a similar topic.
We will write about “Why Travel Adapters Are in Demand for Long Journeys.” After that, we will add a link from this LinkedIn post to our website’s blog post. This way, we can get more traffic to our website.

If you are not doing it yourself, it’s time.

Now write your article in the linkedin editor,
for now we are pasting the same blog post from our website but remember you should write unique article here otherwise when you send someone from linkedin post to your blog post on website and they find same post they will leave your website immediately. So write a new article and post on linkedin here.

Next, highlight the text like “read our full review on the top 8 travel adapters” and click on the link icon above, as shown in the image below. Then paste the link to your website’s blog post and click on apply.

After that, you will see a blue link in your LinkedIn article. When you click Next to publish, people will be able to read your article, and those who are interested will click on the link to visit your website. This is how you can bring more traffic to your website.
Click the Next button at the top to publish your article on LinkedIn. Make sure to share it with your friends so your post gets more views.

Substep b): Write post on Substack
Now let’s move on to the next tool called Substack.com. Log in or sign up here.
You will see a box that says “What’s on your mind.” You can write a new promotional article related to your website’s blog topic, or you can paste the same one that you posted on LinkedIn.
After pasting or writing your article, click on the Post button to publish it.

Just like on LinkedIn, you should highlight some text from your Substack post and add a link to your blog post.
You can also put the full URL of your blog post at the top, or include an image or infographic with a link to your blog.
If people find your article helpful on Substack, they may share it, and the more people who see it, the more visits your blog will get. Just make sure to provide helpful and useful information.

Substep c): Write answer on Quora
Now let’s talk about another important tool called
Now let’s talk about another important tool called Quora. Quora is a website where people ask questions, and you can find people asking questions related to your blog topic. You can then answer those questions and include a link to your blog.
To start, simply search for your blog topic on Google along with the word “Quora.” For example, you can type “Quora Travel Adapters.” You will find lots of questions that people are asking. Choose the questions that are related to your blog post.
For example, we found a question called “What is the best travel adapter?” Look at image below. Click on that question to answer it.

First, make sure you’re logged in with your Gmail account.
Next, click on the Answer icon, like in the image below.

Now, the post editor will open in front of you. Here, you can write your answer to the question.

You can paste part of your blog post or write a new one, because if a reader sees the exact same article on your blog, they might leave. So it’s better not to copy the entire post here. Instead, write something unique or summarize it.
Now it’s time to add a link to your blog post.
Select the text “8 travel adapters you can trust on your long journey,” then click on the link icon and paste the link to your blog post.
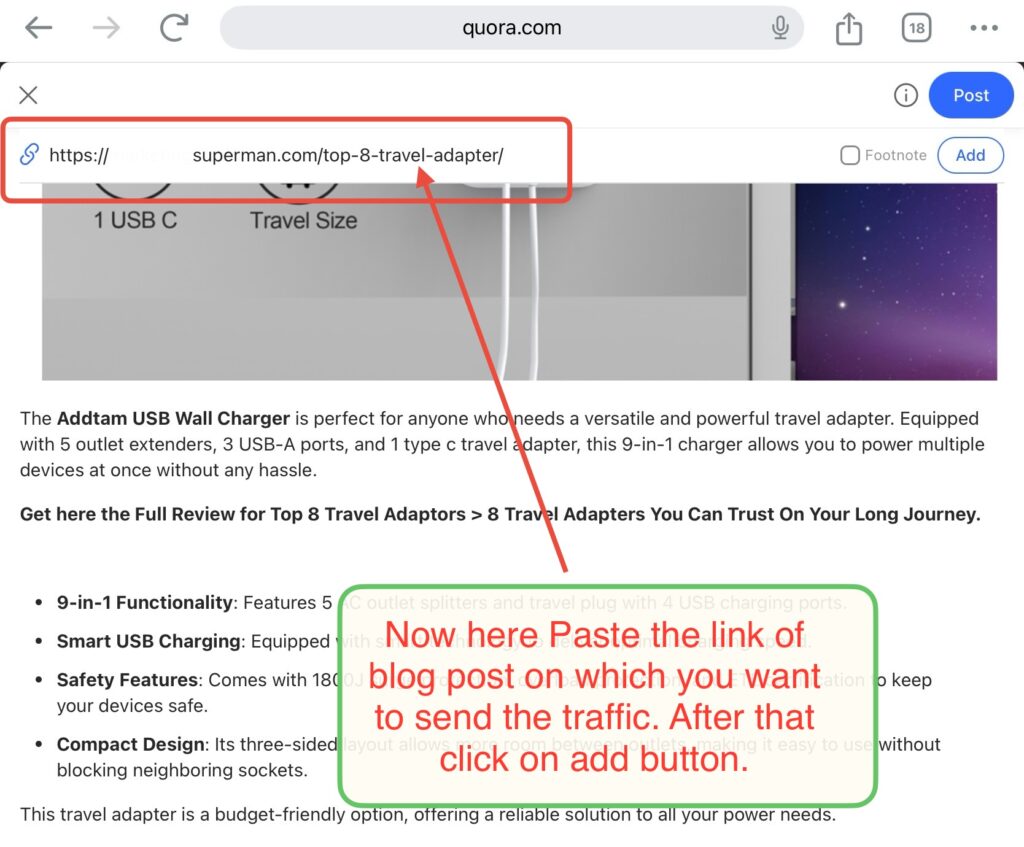
Now your Quora answer can also have images, quotes, lists, and mentions. Use these features to make your answer more interesting. Add only a few links, like the one we inserted here with the blue link. This makes your answer look nice, and people who like it may click to read the full review.
Quora is also an important website because sometimes Quora questions appear at the top of Google search results. This can help bring a lot of traffic to your blog.

Now select your credential, then click on Done.
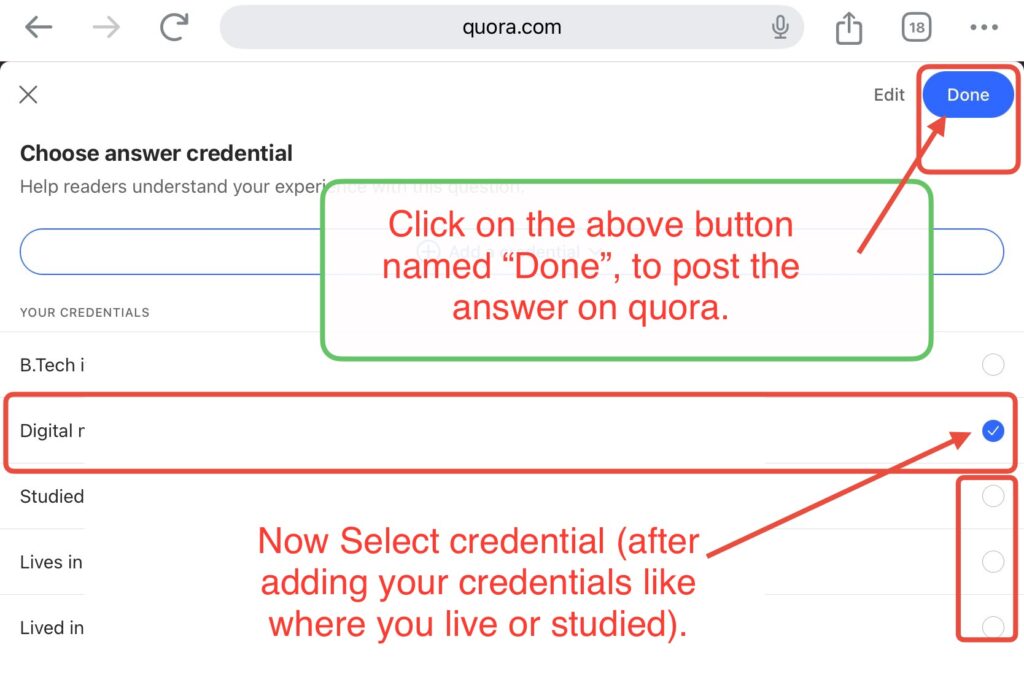
Look below to see how our answer includes an image to attract viewers’ attention, along with one or two links so interested people can quickly find where to read the full review.

What’s Next?
In next step now we going tell you the process of monetising your blog with two methods.
STEP - 7
Monetize Your Blog Using 2 Methods
In this step, you’ll learn how to make money from your blog using:
Google AdSense
Affiliate marketing
To start monetizing, we’ll simplify it into three easy steps:
- Create pages for Privacy Policy, Terms, and Conditions.
- Activate Google AdSense.
- Activate the Amazon Affiliates Program
It is necessary now to create Privacy Policy and Term and Conditions page for your blog otherwise google may reject your monetisation appeal by google adsense.
Substep a): Create privacy policy page for your blog
For creating a Privacy Policy page, it’s a good idea to get legal advice, especially if your blog deals with sensitive topics, high-value products, or important information. This way, you can be sure everything is covered legally.
For beginners, we will show an easier way to create a Privacy Policy, which you can edit if you have some knowledge.
There are many websites that offer both free and premium options to generate a Privacy Policy. One such website is www.privacypolicygenerator.info.
- Go to the website.
- Check the box for your website, as shown in the image.
- Click on Continue and then Generate Privacy Policy to create your blog’s Privacy Policy.

Fill in your website and personal details as shown in the image below. The entity type should match your website type. If you are a registered company with employees, choose I am a business. If you are blogging as an individual, select I am an individual.
After completing the form, click on the Next Step button.

Check the options that you think relate to your blog. It’s usually best to select all of them because you might not know what kind of personal information you’ll collect in the future. By selecting all, you’ll be covered if you decide to collect social media information or other data later on without needing to update your privacy policy.
Once you’ve made your selections, click the Next Step button.

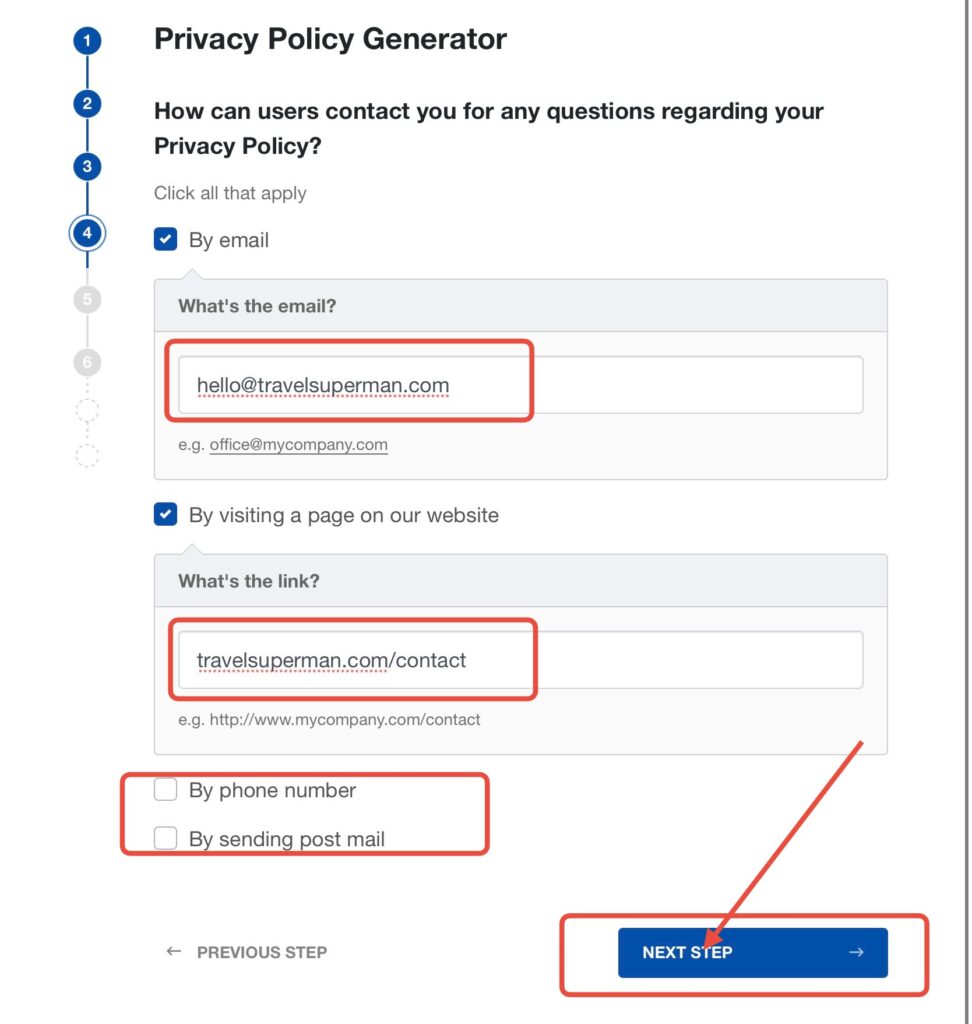
Next, you need to enter the contact details for your website. Don’t use your personal information here. Instead, enter a business email address associated with your hosting and website. If you haven’t created one yet, you can use something like hello@yourwebsite.com or contact@yourwebsite.com. Just replace ‘yourwebsite’ with your actual website name, and then you can create that email address through your hosting provider.
After you’ve filled in the details, click Next Step.
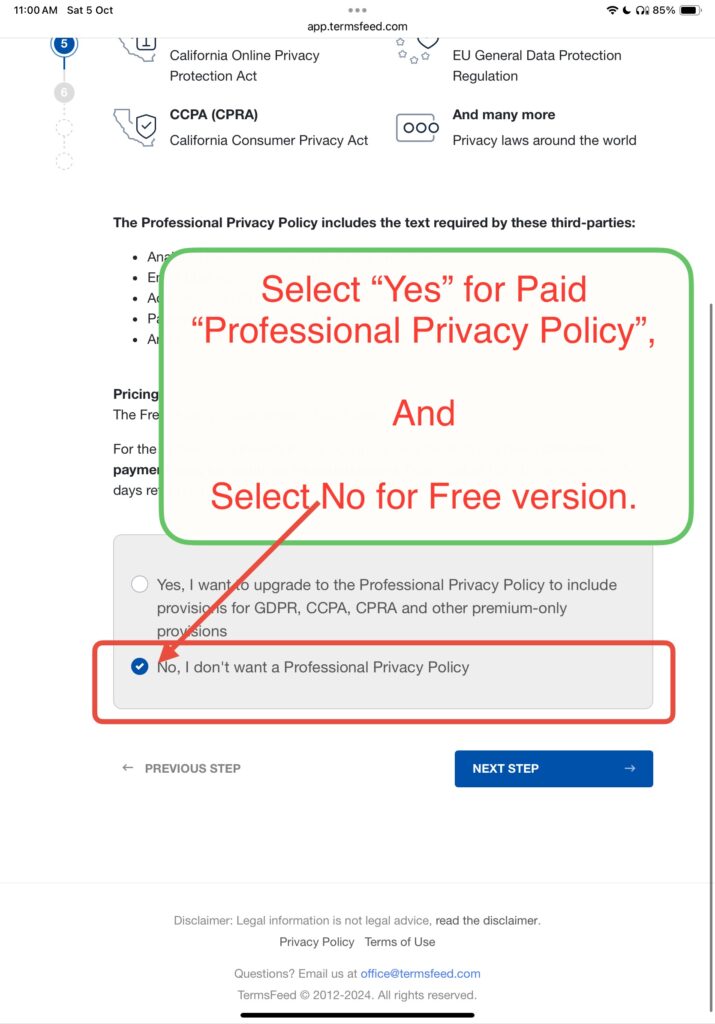
Here you have to select what you want, a paid privacy policy or free version. We will select free version by selecting, No. Select according to your need.
Then Click on “Next Step” button.
Enter your email address where you want to receive the link for the generated privacy policy.
After that, click on the Generate button.

Open your email, and you will see a message with a link to your generated privacy policy. Click on the link to read or download it.

You can also view it directly on the website, where you will see different options:
You can copy the link to the privacy policy where it is hosted.
You can copy the HTML code and paste it on your website page.

- Scroll down, and you’ll see options to download the privacy policy in different formats like HTML, DOCX, or TXT. You can then add it to your website.

Save the above document.
Substep b): Create term and conditions page for your blog
Now let’s create “Terms and Conditions” for your website.
Go to https://www.termsandconditionsgenerator.com/ and select the website option. Then click on “Continue and generate terms and conditions.”

Enter your website details and personal information. If you are managing everything by yourself and don’t have any employees, select Individual. If you have a company, select Business.
After that, click on the Next Step button.

Next, choose the type of terms and conditions you need.
We are selecting the free option since, in the beginning, many of these features may not apply.
Read through everything carefully, and if something applies to your blog, select Yes.
For example, if users can create an account on your website, choose Yes. Do the same for the other options.

Scroll down to find the privacy policy section. Do not use your personal email here; instead, use your business email.
After filling out the form, click the Next Step button.

Put your email id where you want terms and conditions link and click on Generate.

Open your email to download your “Terms and Conditions” file.

On the website, you will find several options:
You can copy the link to the Terms and Conditions where it is hosted.
You can copy the HTML code and paste it on your website page.

Scroll down to see options for downloading the Terms and Conditions in HTML, DOCX, TXT, and other formats that you can put on your website.

Substep c): Apply for google adsense monetisation
Search for “Google AdSense” on Google. Click on the official Google AdSense link,
Ignore any sponsored results that may appear above it.
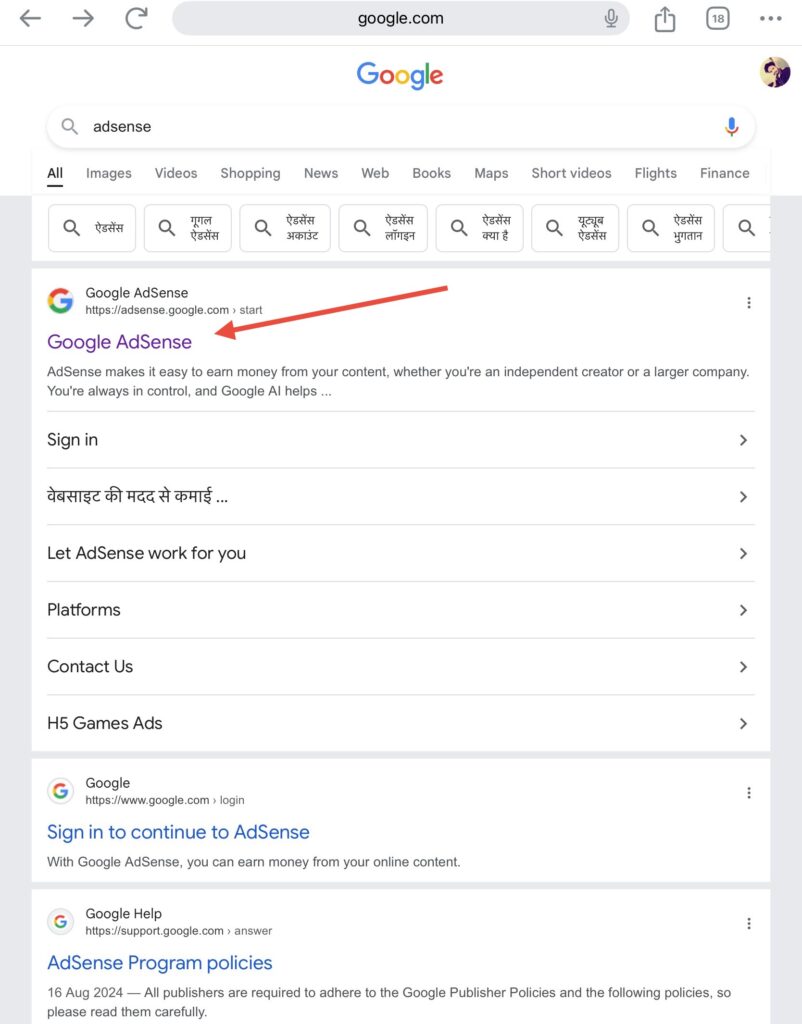
Sign up with google account by clicking on google sign up button now.
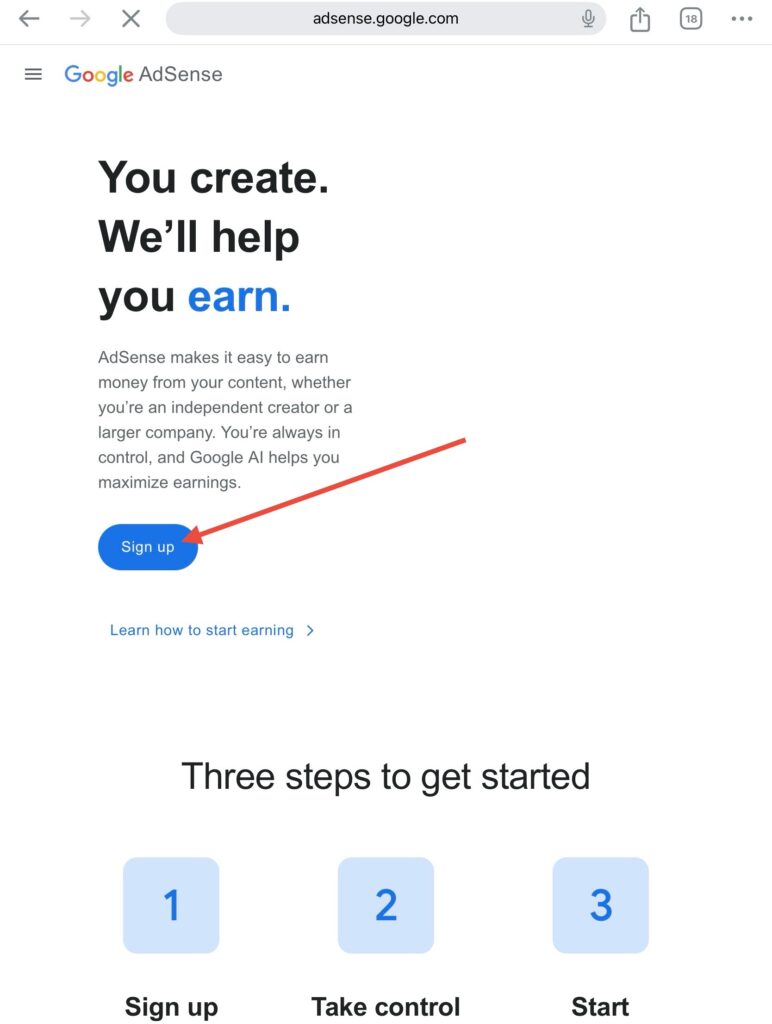
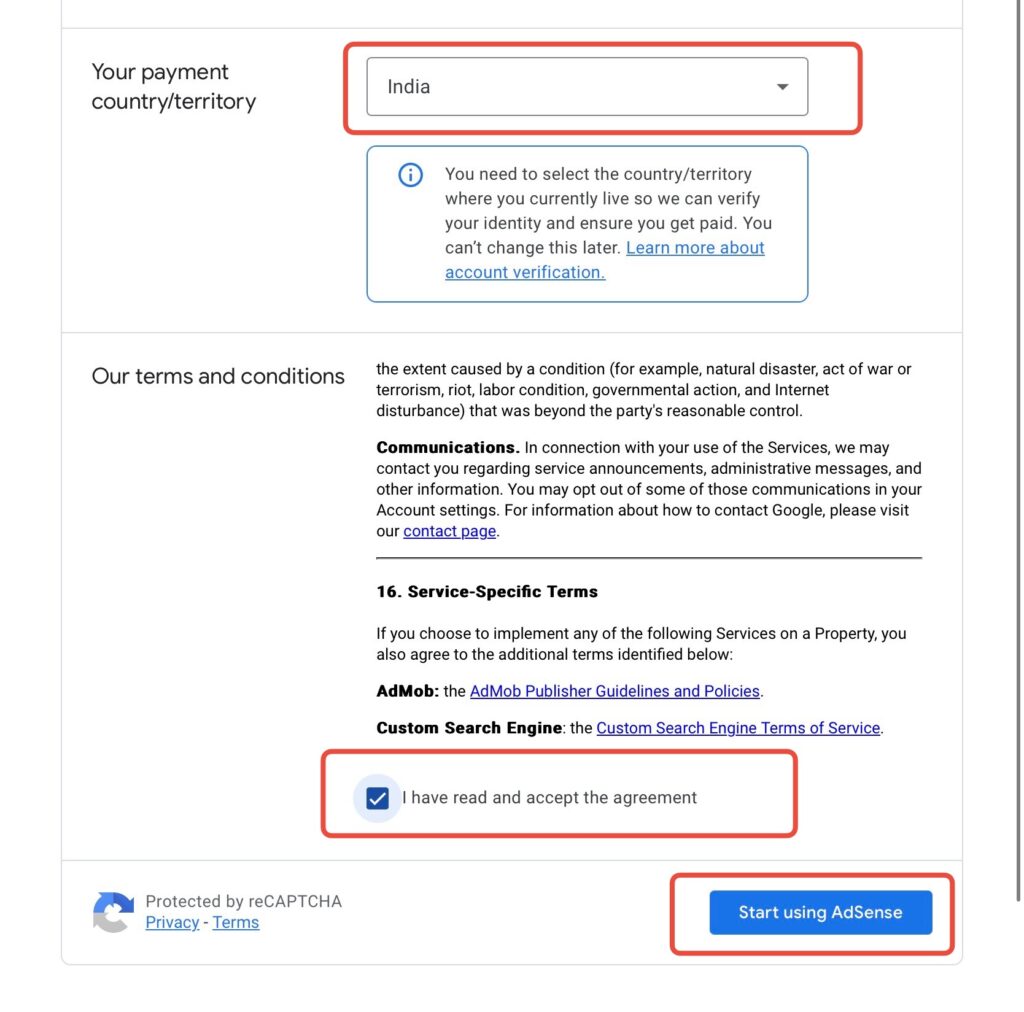
Now fill out the form by entering your website URL and choosing your payment country.

Scroll down and tick the checkbox to accept the agreement. Then click on the Start Using AdSense button.
After that, you will see three cards with buttons:
Tell us about you
See how ads look on your site
Connect your site to AdSense
Click on the first button “Enter Information”.

You will see a form. Fill it in with your details as shown in the image, then click Submit. The first card will turn green, showing that it’s completed.

Now here you should look the first card, it should have turn green.
Now we need to complete the other two cards and turn them green as well.
Click on the second card, Explore.

A preview of your website will open, as shown in the image below. Turn the auto ads On from the right side of the page. You will see a big banner ad at the top. Scroll down to see more ad previews.

Click on the desktop icon to see how ads will look on the desktop version of your site. You can adjust options on the right, or just leave it on auto ads. Then click Apply to site.

It will ask you to apply the settings. Click on Save to apply them.

You will be redirected to a page showing that auto ads are On for your website.

Now, go back to the three cards and click on the Let’s go button to connect your site to AdSense.

You will see a code. Copy this code by clicking Copy. Do not click anything else—just copy the code.

Next, go back to your WordPress dashboard. Click on Plugins, then Add New Plugin. In the search box, type Header and Footer. Scroll down to find the plugin by Stefano Lissa, click Install Now, and then click Activate. The button should show the status as Active. Now refresh the page.

Go to the left panel and click on Settings, then select Header and Footer, as shown in the image below. Find the section, and under On Every Page, you will see a blank text box. Paste the code you copied from Google AdSense here.
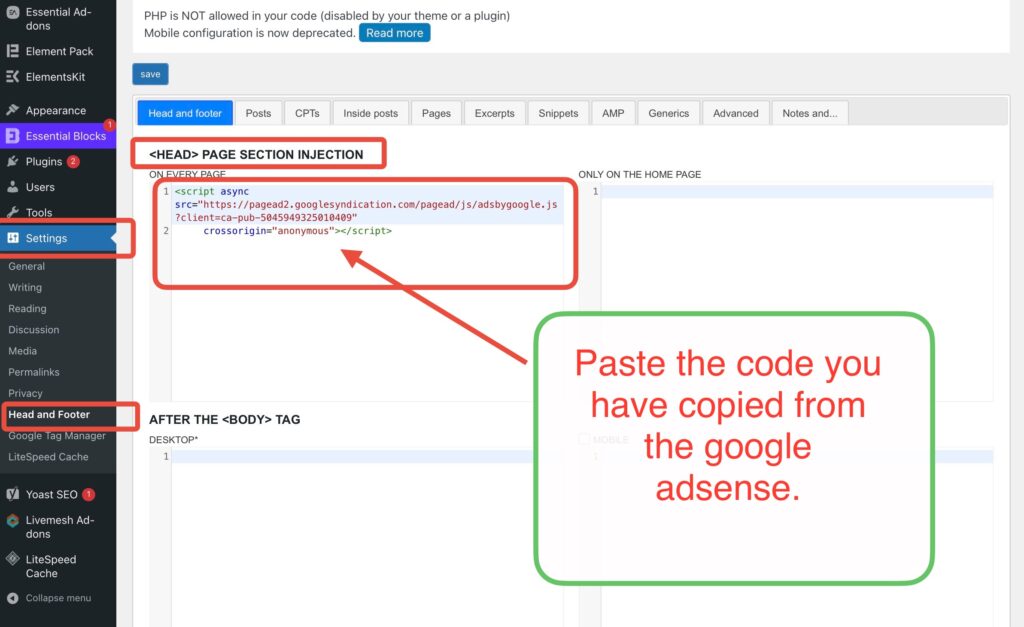
Scroll down and click on the Save button to save the code. Then go back to Google AdSense.
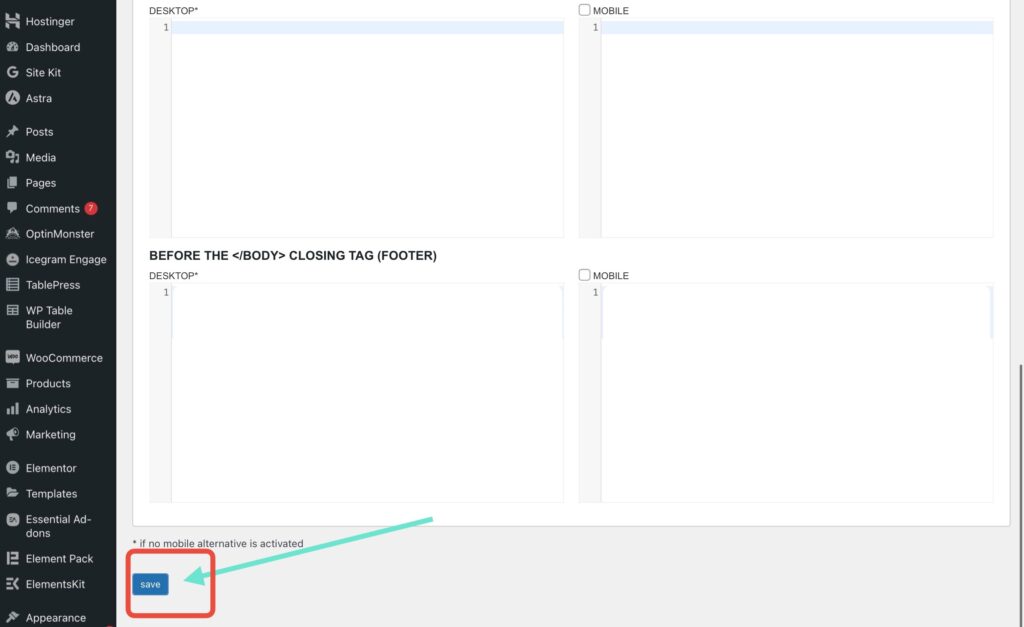
Tick the checkbox and click on the Verify button.

It will show Verify site ownership with a green checkmark, meaning your website is connected to Google AdSense. Now, you need to request a review from Google. Google will manually check your website and approve it if everything is fine.
Click on the Request Review button.

In the image below, you can see what your Google AdSense page should look like. There should be two green checkmarks for Payments and Ads, while Sites will be partially green and in process.
Once Google reviews and approves your website, ads will start showing up. This can take anywhere from one week to over a month, so relax and keep working on your content.

Substep d): Apply and get link for Amazon affilates
Now let’s set up an Amazon Affiliate account so we can earn commissions from Amazon.
Search for “Amazon Associate login” on Google.
Ignore the sponsored results and click on “Amazon Associates Central,” as shown in the image.

You will now be on the Amazon Associates page. Click on Sign Up.

You can log in with your existing Amazon account or sign up with a new email. Let’s create a new account. Select the Sign Up option, enter your details, and click on Create your Amazon account.

An email with a one-time password (OTP) will be sent to your email to verify your account. Enter the OTP and click Verify.

Next, enter your mobile number.

Enter the OTP sent to your mobile number and click on Create Your Amazon Account.

Now, fill in your address and select the appropriate options, as shown in the image below. Click on Next.

Enter your website URL and click the Add button.

After adding website, then click Next.

Write a name for your store ID. Then select the type of your website. Since we are creating a blog website, select Blog. Enter the CAPTCHA, tick the checkbox, and click Finish.

Now you’ll see an option to enter your payment and tax information. You can choose to do this later or fill it in now.

After that, you’ll finally see the Amazon Associates homepage for your account.
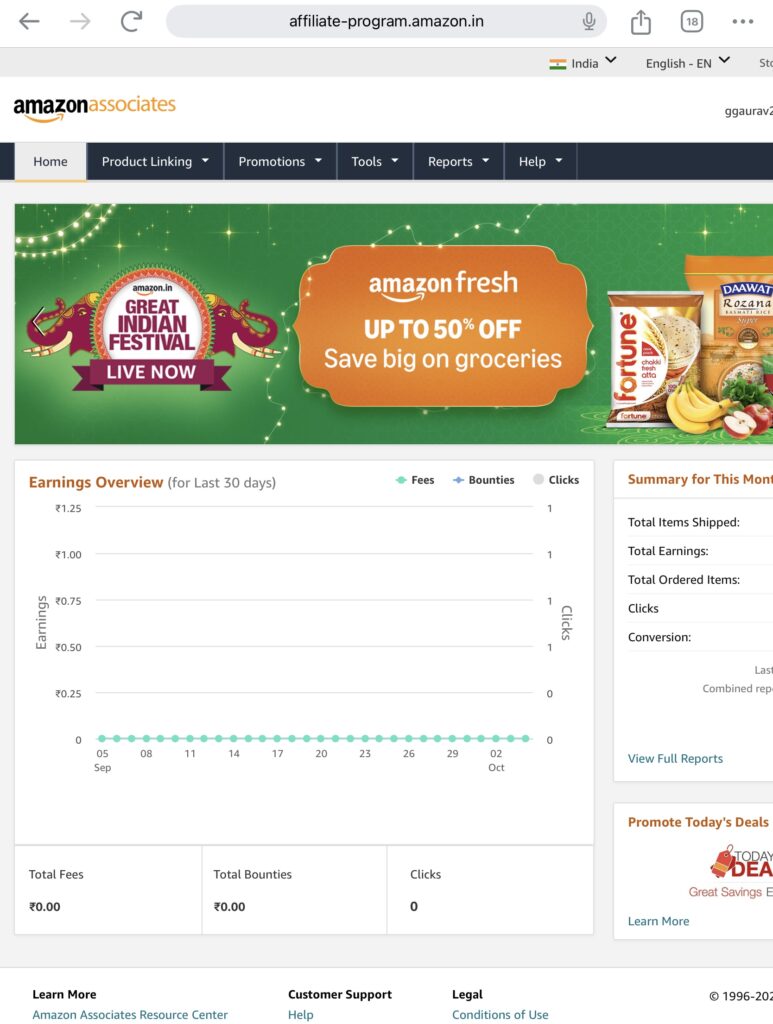
To get an affiliate link for a product, go to Amazon.com and search for the product you want to promote. For example, look at the image where we selected a product.
You will see a bar called “Site Stripe” at the top. This is where you can find the affiliate links 😊.
Click on the Get Link button.

You will now have two options: a short link or a full link. You can choose either one, but the short link looks cleaner, so we recommend selecting the short link. Copy it, then go to your website’s blog post, and paste it on your product headings or anywhere you want. When someone clicks on the link, they will be taken to the product page. If they add the product to their cart and buy it, you will receive a commission.
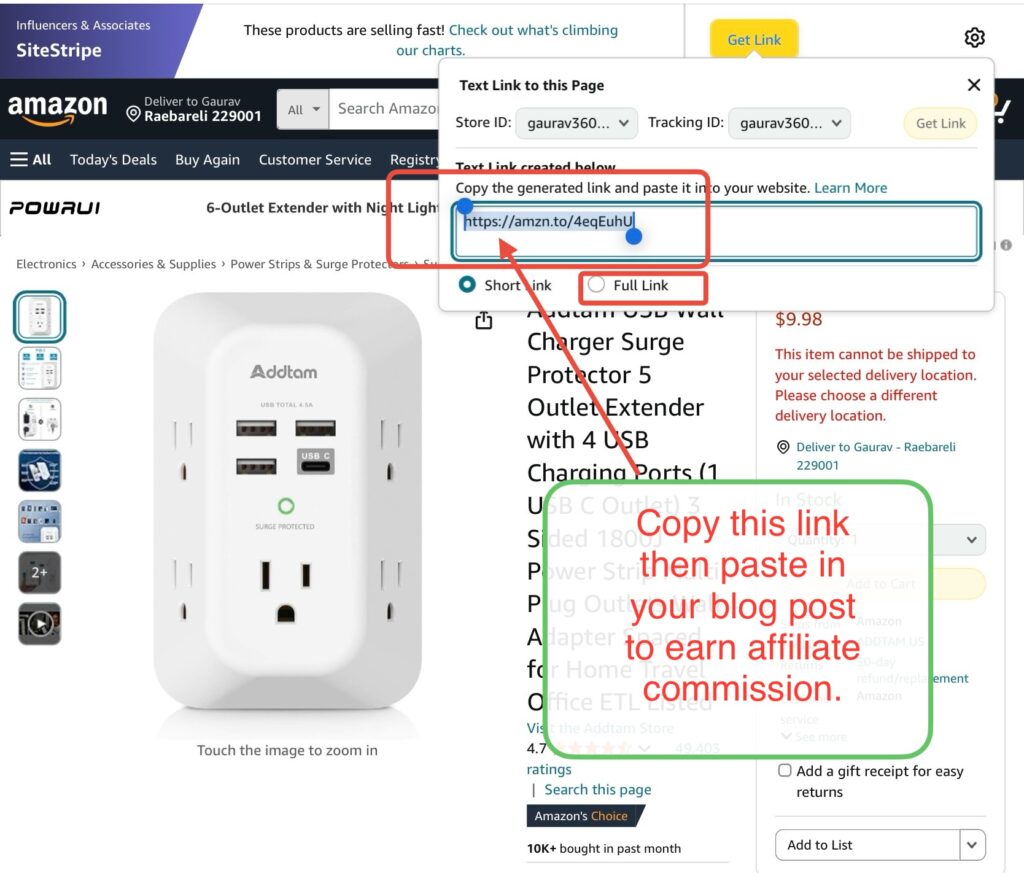
Note: The Amazon affiliate cookie lasts for 1 day.
Look at image below and then find out commission in percentage now.

Now here you can repeat the same process for writing and SEO audit then posting, etc.

