Tools: GTM, GTM4WP | Category: Analytics | Time: 1 to 3 hours |
Goal of this guide: Successfully learn & “Connect Your Website With GTM”.
Goal of this guide: Successfully learn & “Connect Your Website With GTM”.
| Attribute | Details |
|---|---|
| Outcome |
|
| Why this is important |
|
| Where it is done |
|
| When this is done |
|
| Who does this |
|
|
Outcome |
Why this is important |
Where it is done |
When this is done |
Who does this |
|
Successfully connected GTM with your website using GTM4WP plugin. |
Helps in growth. GTM will track your website data and sends to tools like Facebook, Twitter, GA4, GSC. |
In GTM tool and on your website’s CMS like WordPress. |
It is needed to be done only once in the beginning of tracking setup. |
Person responsible for tracking setup. |
Checklist: Tick 
Checklist: Tick 
| Goals | Started | Ongoing | Completed | Stuck |
|---|---|---|---|---|
| Goal 1: Create GTM Account | ||||
| Goal 2: Install GTM4WP plugin | ||||
| Goal 3: Connect GTM Website |
| Sno. | Table of Contents | Pno. |
|---|---|---|
| 1 | What is Google Tag Manager (GTM) | 1 |
| 2 | What are some tools where GTM can send our blog data for tracking | 5 |
| 3 | What are 3 Components of GTM that helps in tracking | 6 |
| 4 | How exactly GTM sends data when someone visits your blog | 10 |
| 1 | Create a New Account for Google Tag Manager (GTM) | 12 |
| 2 | Create a New Account inside GTM | 18 |
| 3 | Fill your website’s details | 20 |
| 4 | Install Plugin “GTM4WP” | 21 |
| 5 | Connect your website with GTM through Plugin | 23 |
| 6 | Publish the changes you have made up to this step | 36 |
Practical Approach
Steps to connect your website with GTM
Step 1: Create an account for GTM
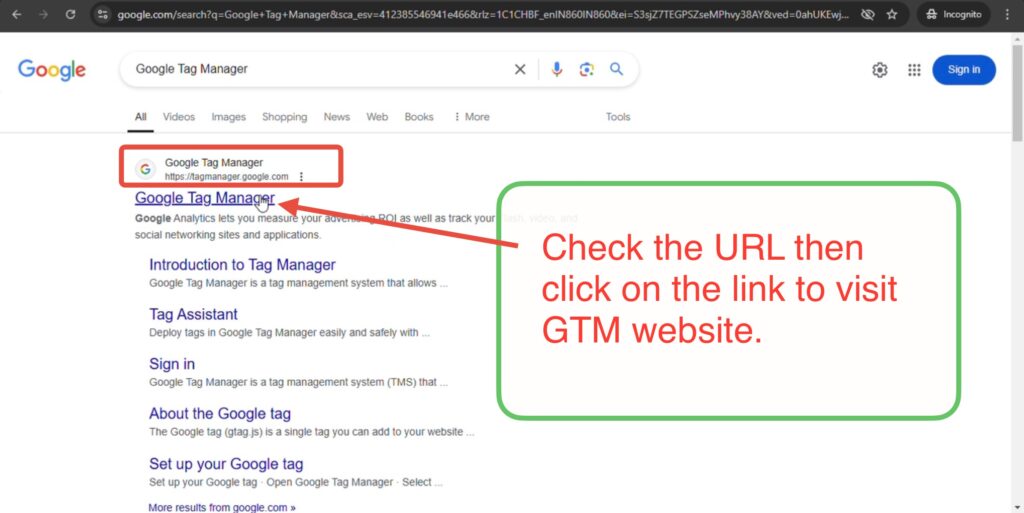
Go to GTM website – tagmanager.google.com, and login with your email id. Or you can search GTM in search engine and look for the above mentioned url and click on the link, as shown in below picture.
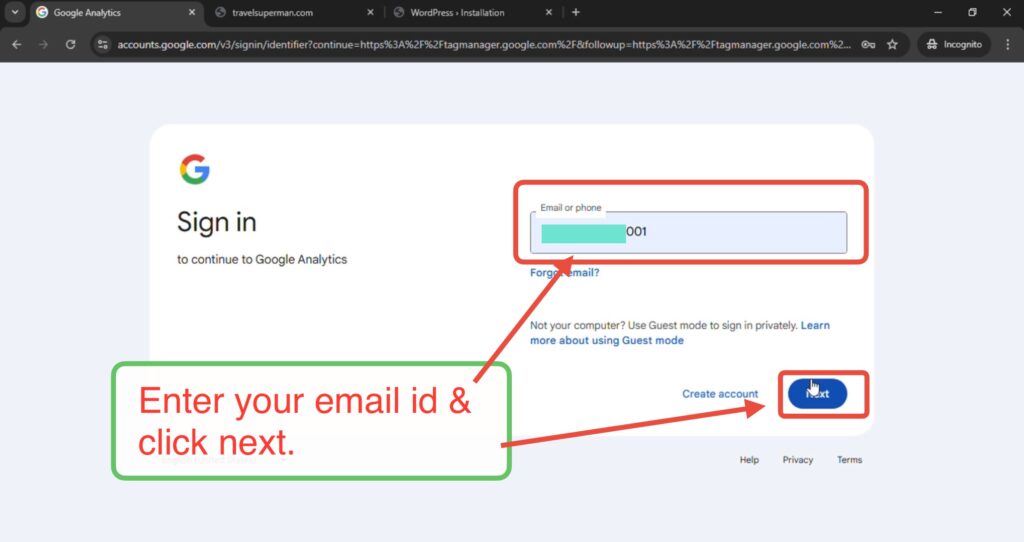
Enter your email-id and click on Next button.
Step 2: Create an account inside GTM
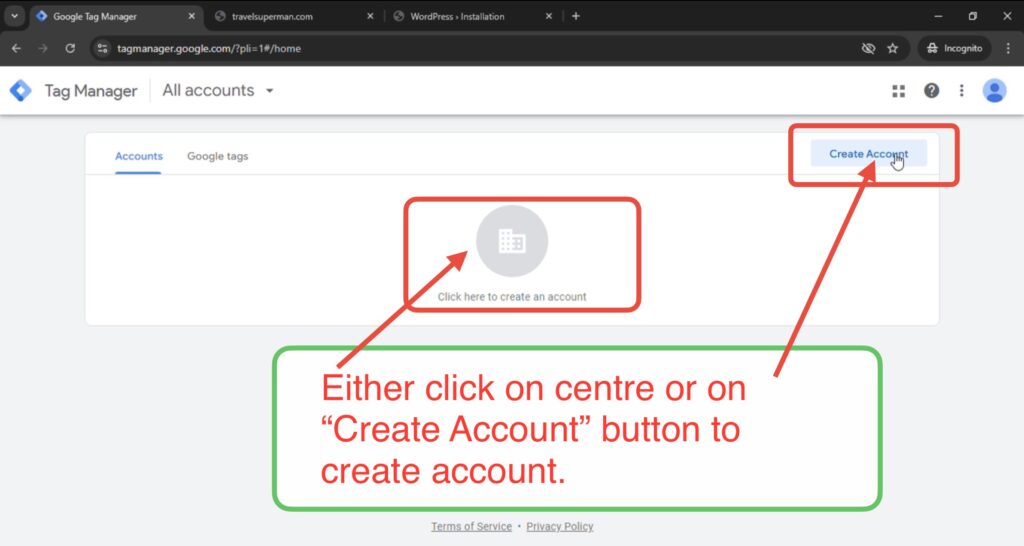
Now, look for “Create Account” button on top right corner as in image below, then Click on create account button as shown in image below.
Step 3: Fill Your Details:
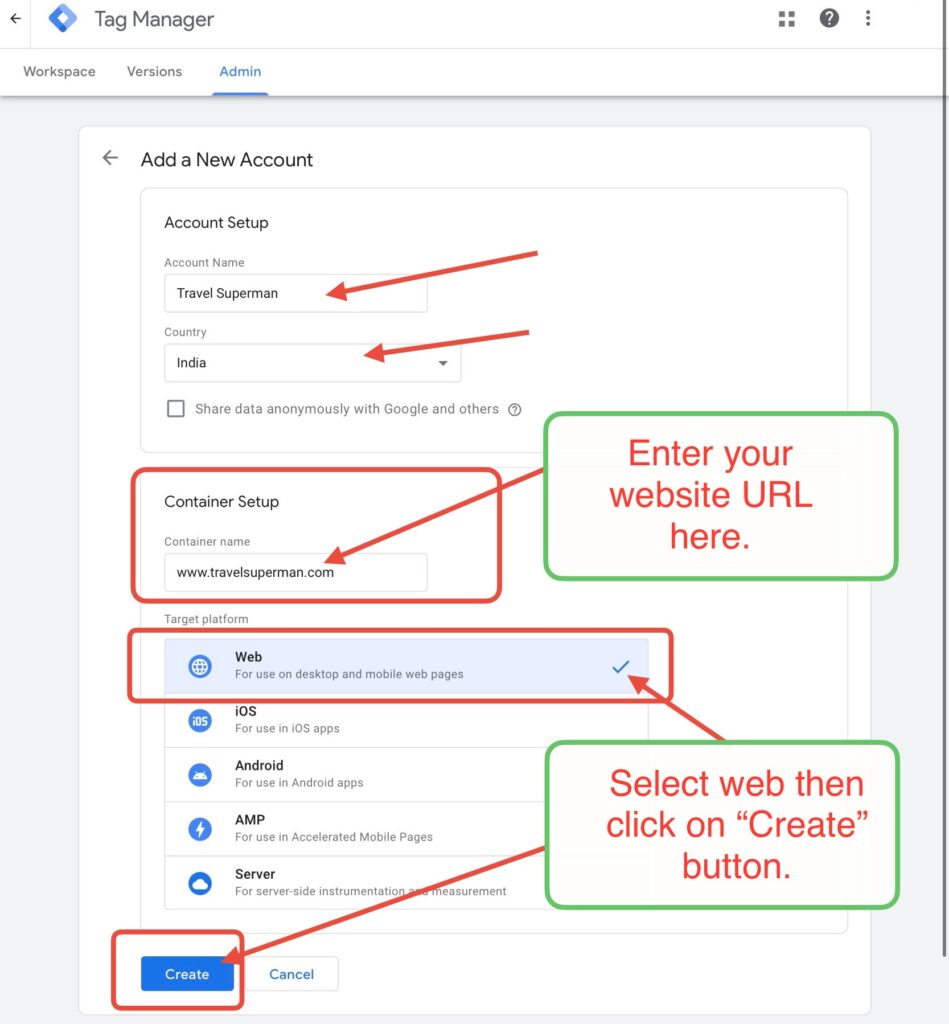
After that fill your website’s details as shown. Then click on create.
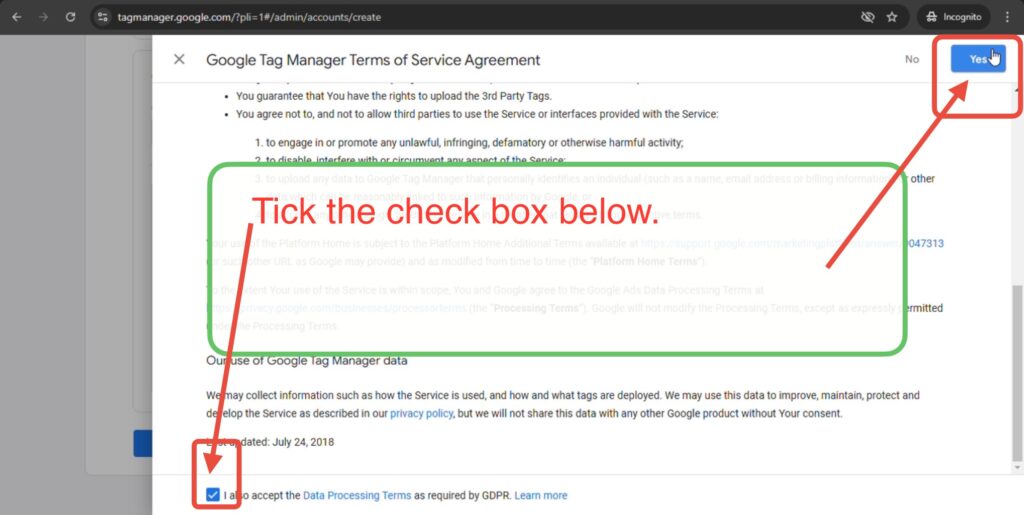
After that you read terms of service agreement if you want, then tick below on checkbox, then click “Yes”.
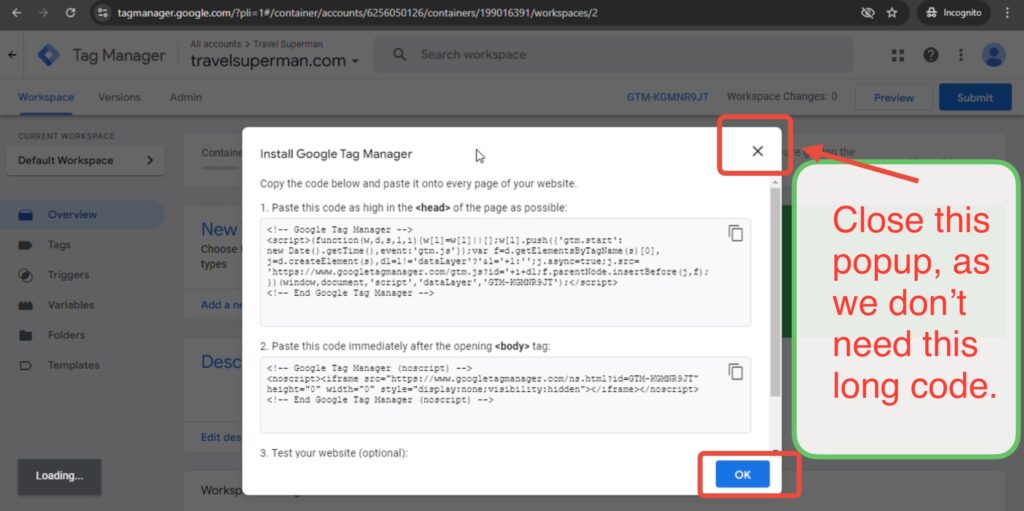
Then you will come across this page, you can close this page using cross button, as we don’t need this code.
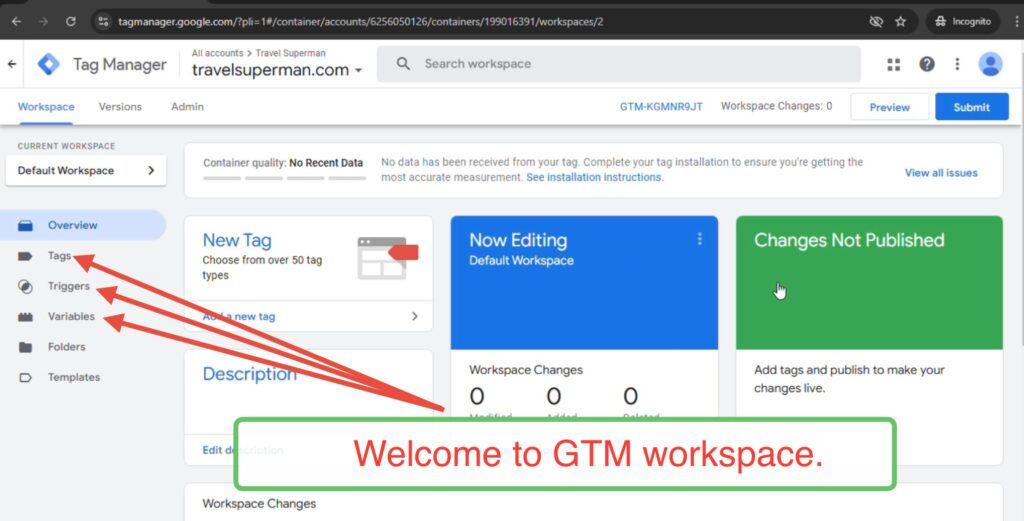
This is the GTM Workspace where you will spend most of the time creating tracking Tags, Triggers and Variables.
Step 4: Install GTM4WP plugin in WordPress:
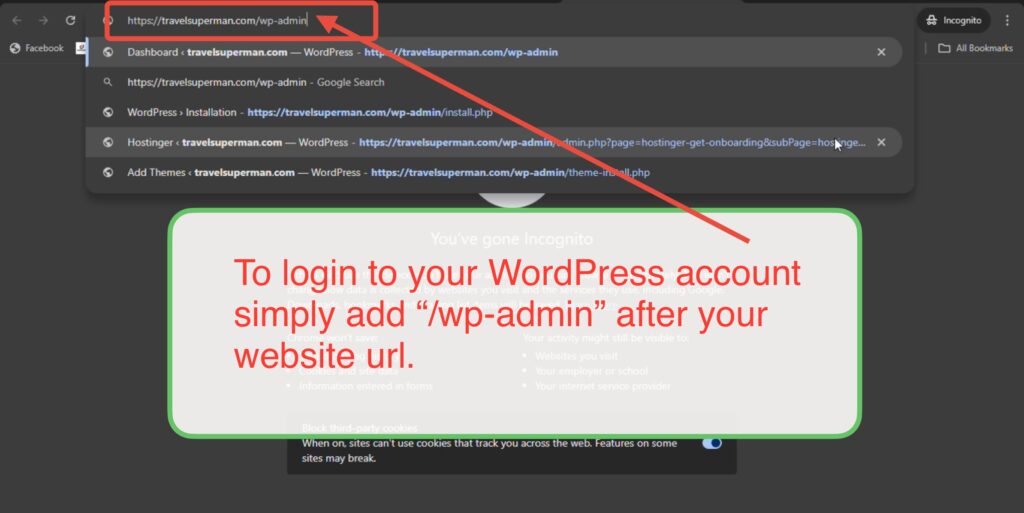
Now to login to your WordPress Account you can login through Hostinger.com as told in previous guides or login directly through WordPress, just type “/wp-admin” after your website’s url eg: travelsuperman.com/wp-admin, as shown in the below image url.
Then enter your email id and password then click on Log In button and if you have lost your password click on lost your password.

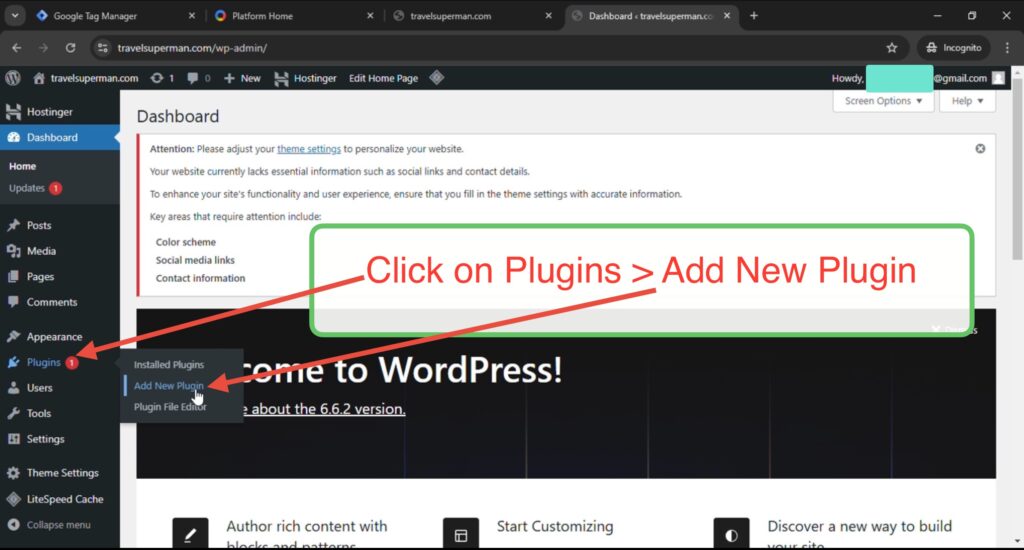
Now in WordPress Click on Plugins then Add New Plugins,
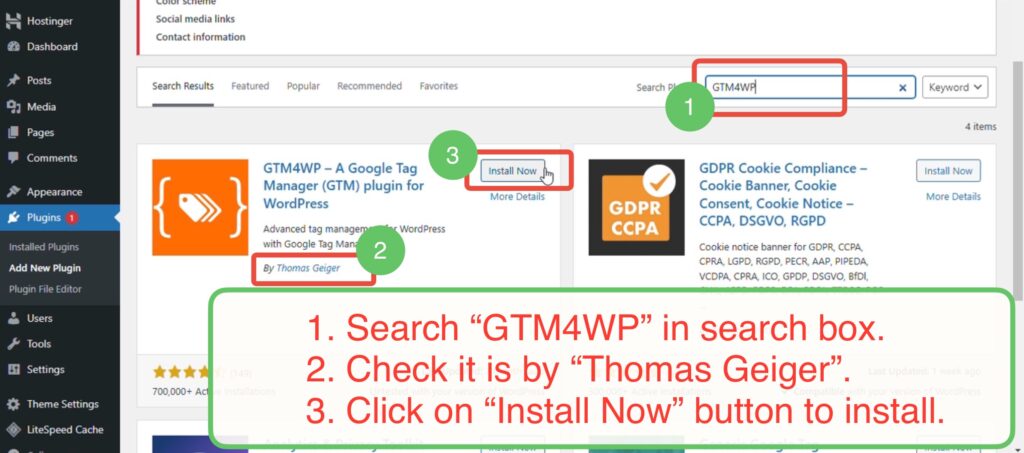
Then,
- Search for plugin named “GTM4WP”,
- Check this plugin is by “Thomas Geiger”.
- Click on “Install Now” button.
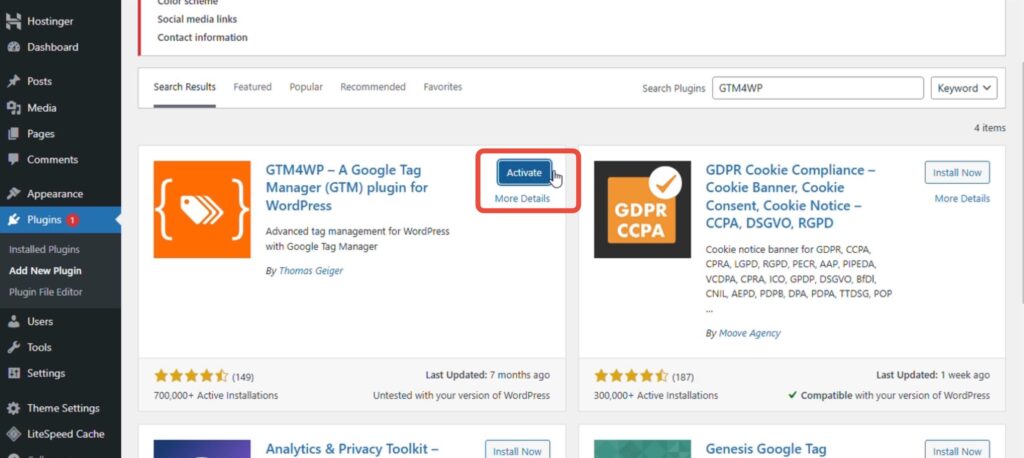
Then finally click on ‘Activate” button to activate the plugin.
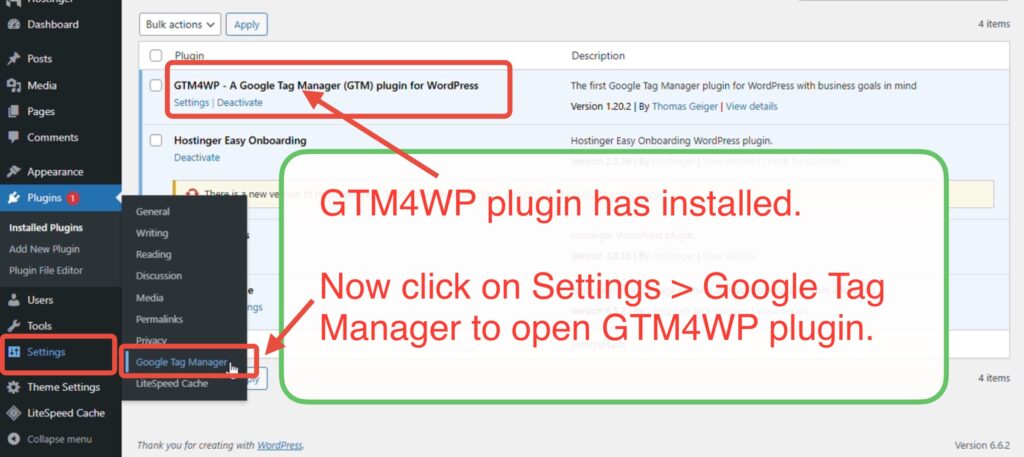
Step 5: Configure GTM4WP plugin:
Now open the GTM4WP plugin click on settings then Google Tag Manager.
Now you have 3 options to connect your website with GTM, we will tell you 1st and 3rd option, as 2nd option is not recommended my google it may create problem in future when you have to connect GSC with your website.
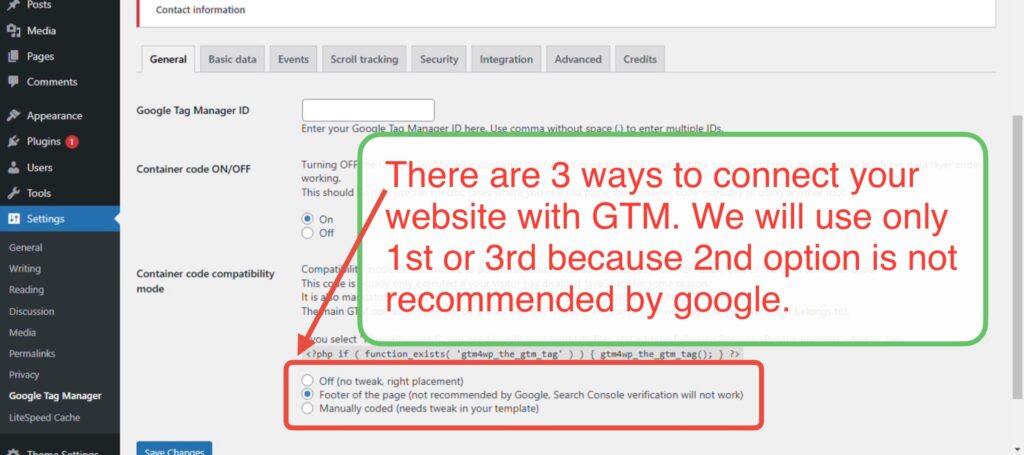
Method 1 (Of Step 5) - Off (no tweak, right placement):
Note: This is 1st method for connecting your website with GTM tool.
Substep i: Connect GTM with GTM4WP plugin:
Now go back to GTM website, and Copy the GTM code, see below image for reference.
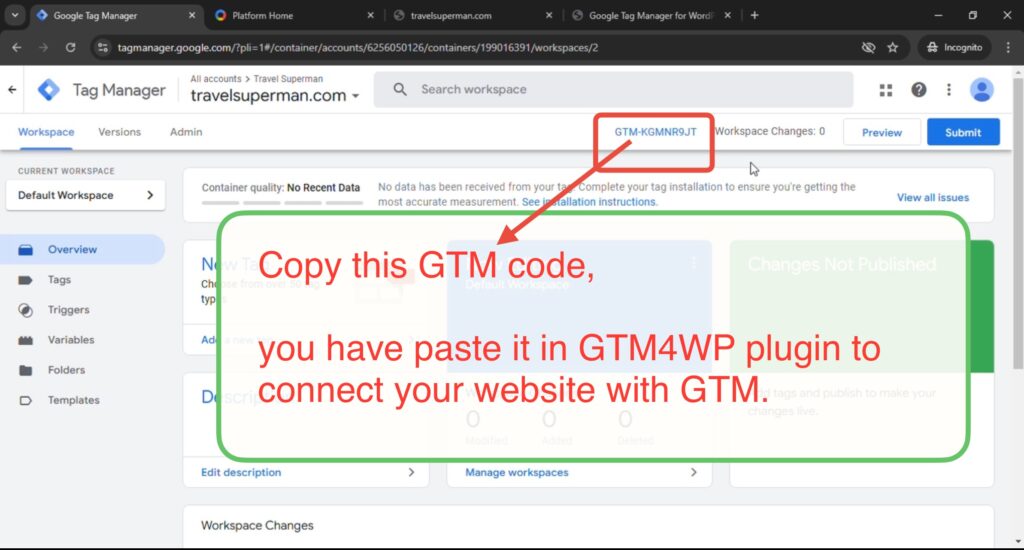
Now go back to WordPress:
- Paste the copied GTM code in Google Tag Manager ID,
- Select ON in the container code, (Pro tip – after clicking on save changes, check this option again, sometimes it switches back to OFF),
- Select the first option in Container code compatibility mode.
- Click on “Save Changes” button.
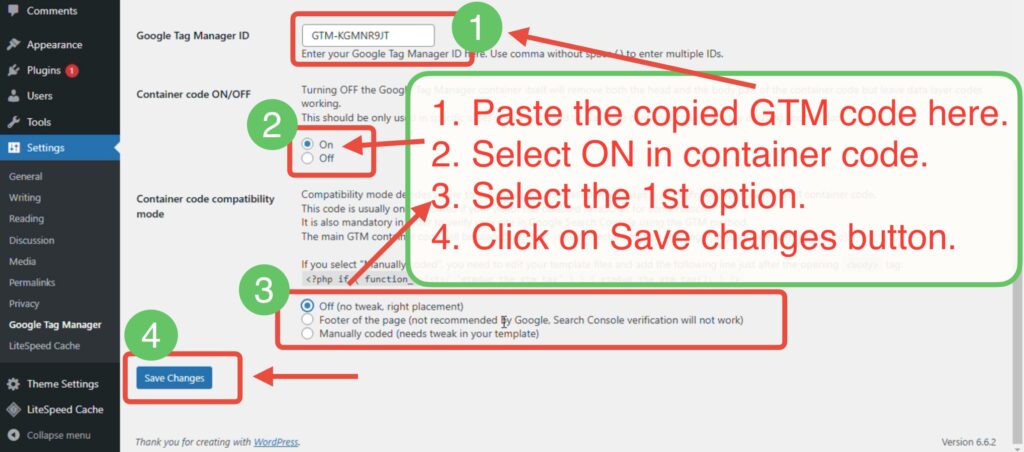
Now go back again to GTM website to verify that your website successfully connected with GTM.
In GTM website click on “Preview” button located on top-right corner.
Substep ii Verify the connection:
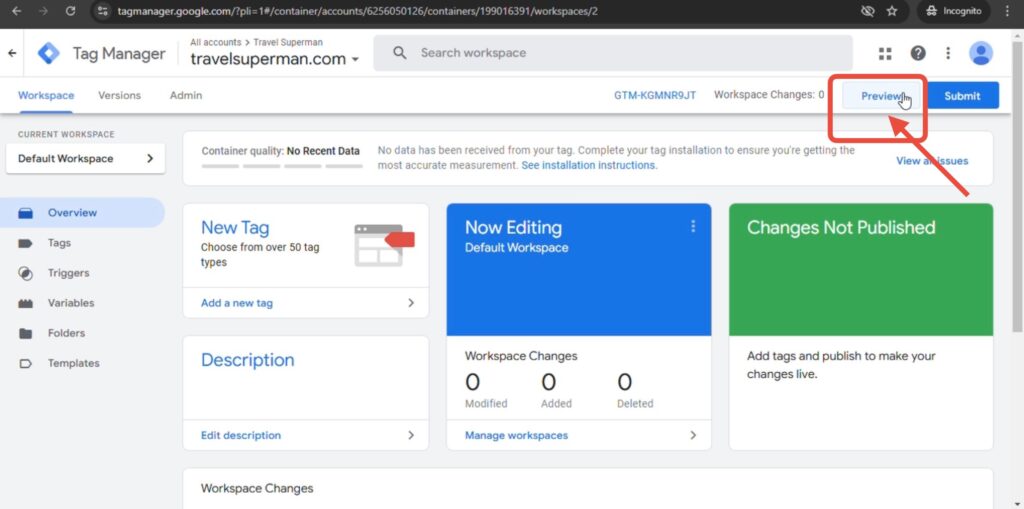
It will ask for your website, enter it then click on connect.
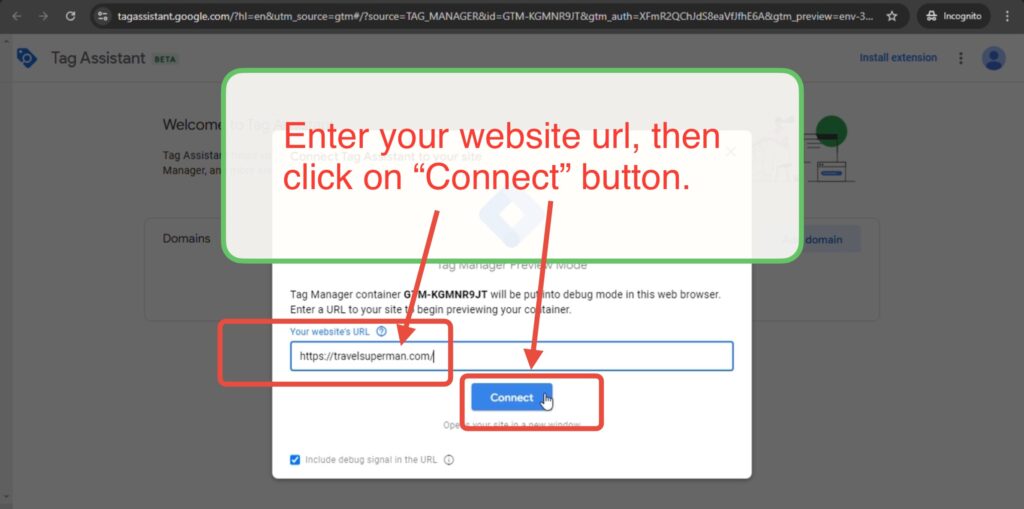
A connecting window tag assistant will open, then it will automatically load your website.
You website will automatically opens in new tab and you will see popup from below as shown below image. If it says Tag Assistant Connected green tick, means your website is connected successfully.
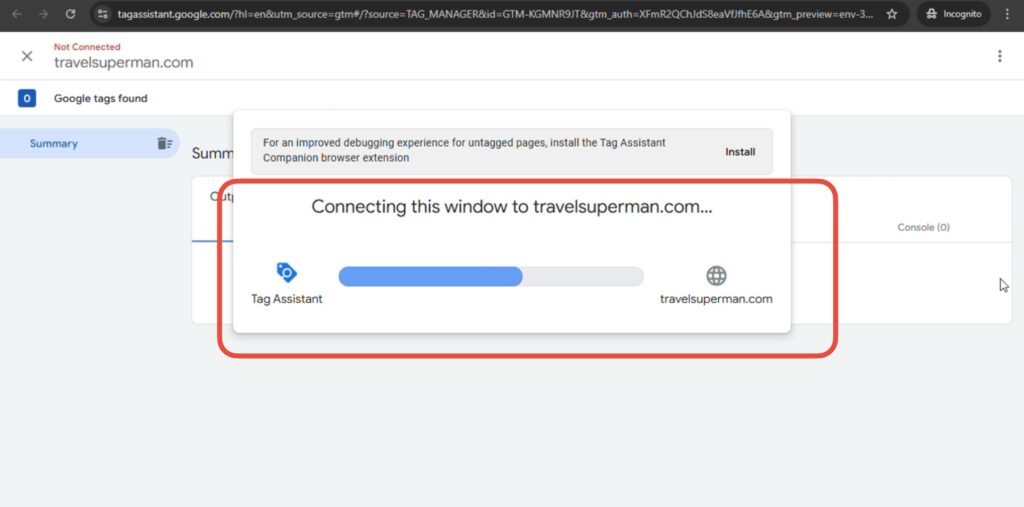
It will automatically open your website with tag assistant popup. If it shows green tick and saying “Tag Assistant Connected” congratulations your website is now successfully connected to GTM, now you can create Tracking Tags, Triggers snd Variables.

After clicking on finish button you will see tag assistant debug window it also saying Connected,
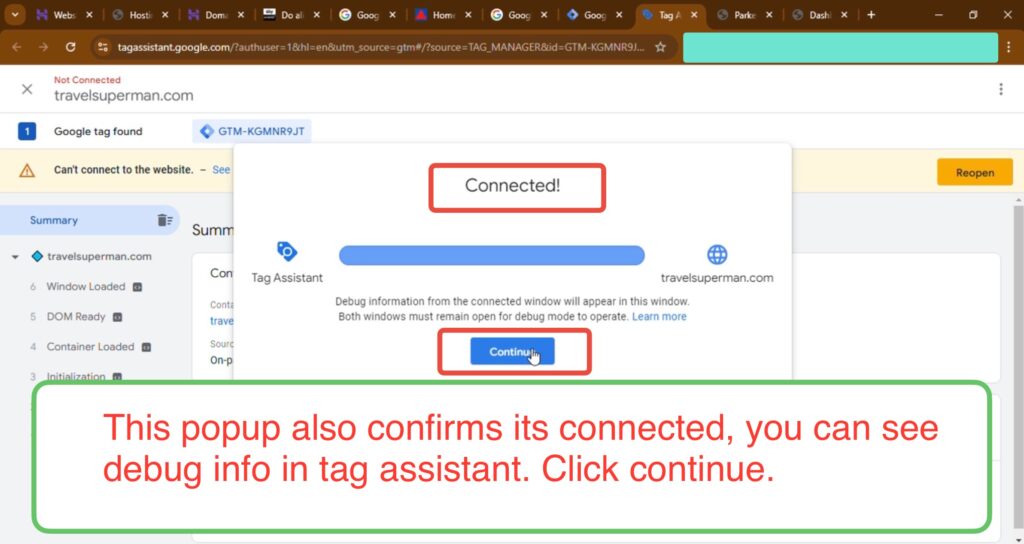
Now here your website is successfully got connected with GTM by using the method 1.
Let’s now move towards 2nd method to connect your website with GTM.
Method 2 (Of step 5) - Manually Coded:
This is 2nd method to connect your website with GTM, In this method we will edit the website Theme. You can choose any method to connect.
Substep i: Connect GTM with GTM4WP plugin:
Go in Settings then click on Google Tag Manager as before.

Go back to GTM website and copy the GTM code.

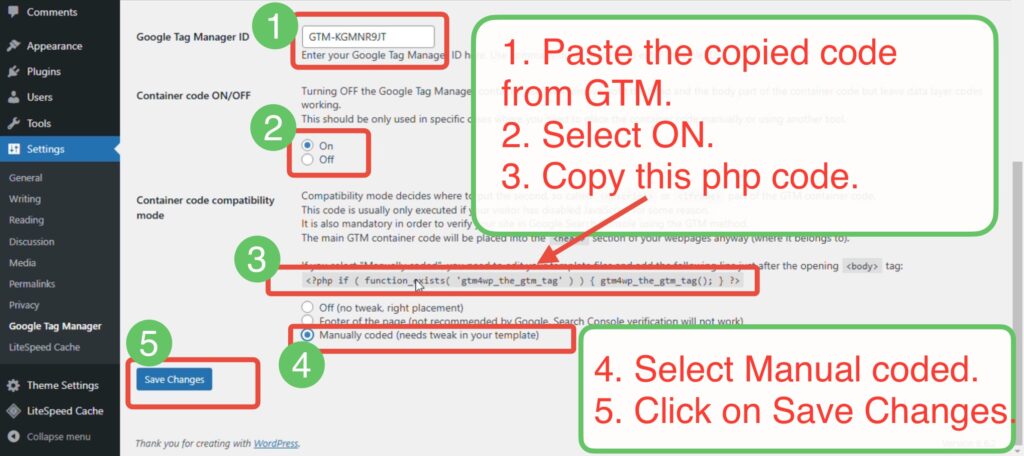
Then in GTM4WP plugin:
(see below image for reference)
- Paste the GTM code you have copied from GTM website.
- Select ON option in Container Code.
- Copy the php code highlighted in “Container Code Compatibility mode”
- Select the “Manually Coded” option.
- Click on Save Changes.
Now go to Appearance then click on Theme Editor.
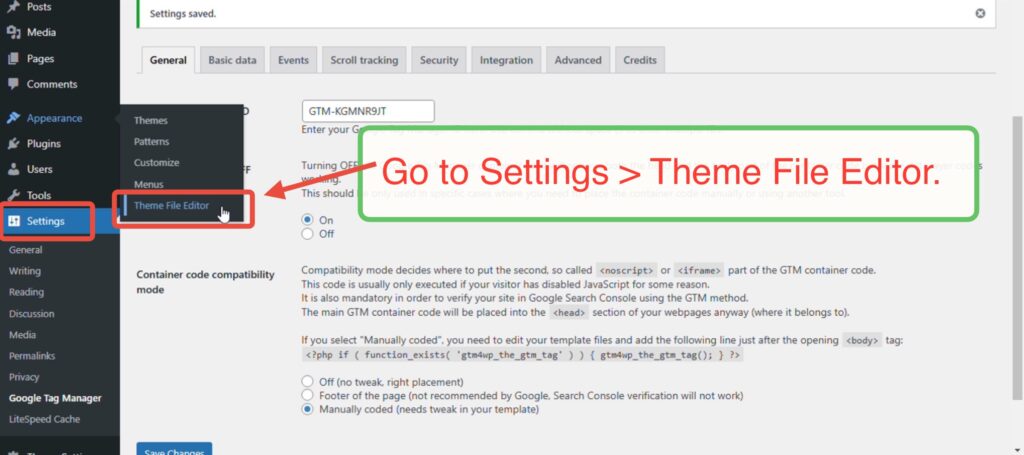
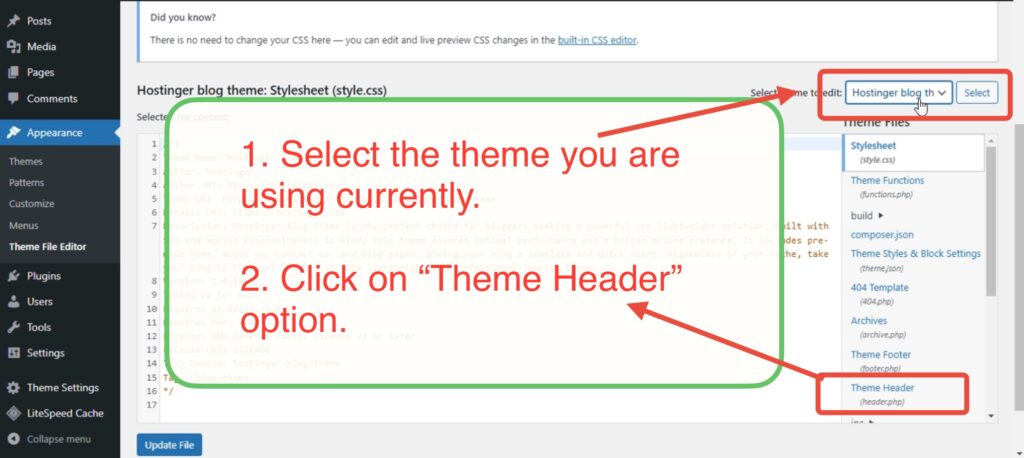
Select the theme your website currently using, by default it will be selected to current theme but checking is our responsibility.
Then click on “Theme Header”.
Now in theme editor search for body tag.
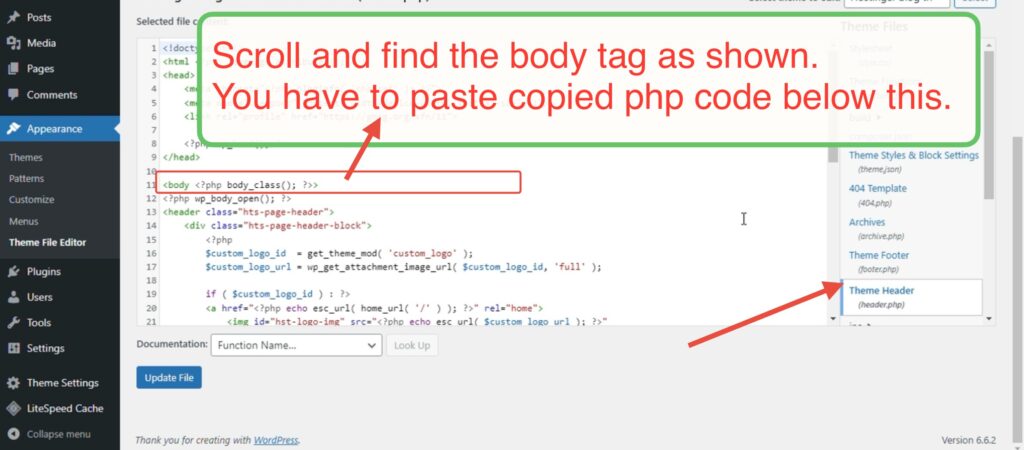
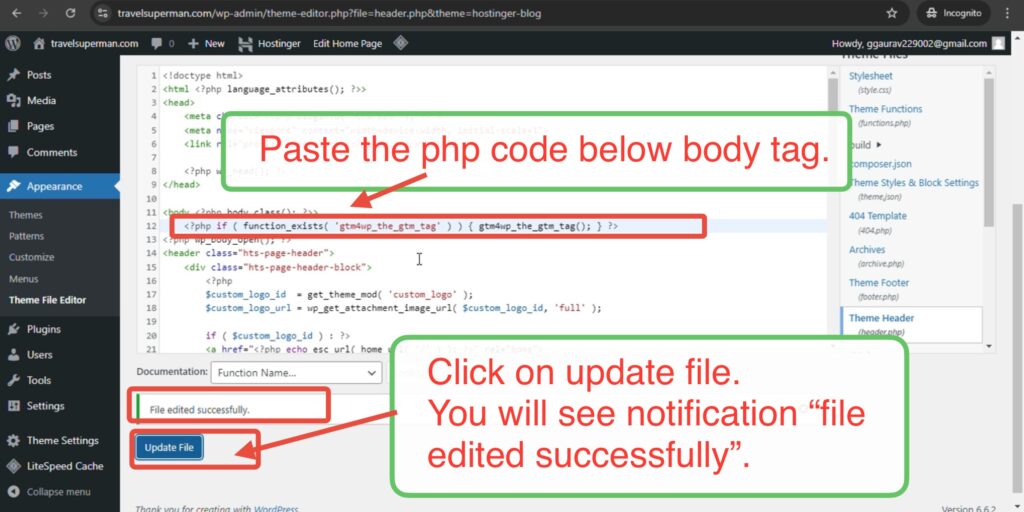
Now just below the body tag paste the copied php code and then click on “Update File” button, then you will see notification your file edited successfully.
Now as mentioned in method 1, go back to GTM website to verify connectivity.
Substep ii Verify connection of your website with GTM through GTM4WP Plugin:
In GTM website click on preview button.

Enter your website url and click connect.

You will see a popup and then you will be redirected automatically to your website with tag assistant – popup.

If you see the “Tag Assistant” popup have green tick and saying connected then congratulations your website has successfully connected to GTM now you can create Tracking Tags, Triggers, and Variables.

After clicking finish you will see Tag Assistant Page with popup saying “Connected” so it also confirms the connectivity, now click on the continue button now.

Step 6: Publish The Changes
Now finally, Submit and Publish the changes in GTM:
Click on Publish button in GTM.
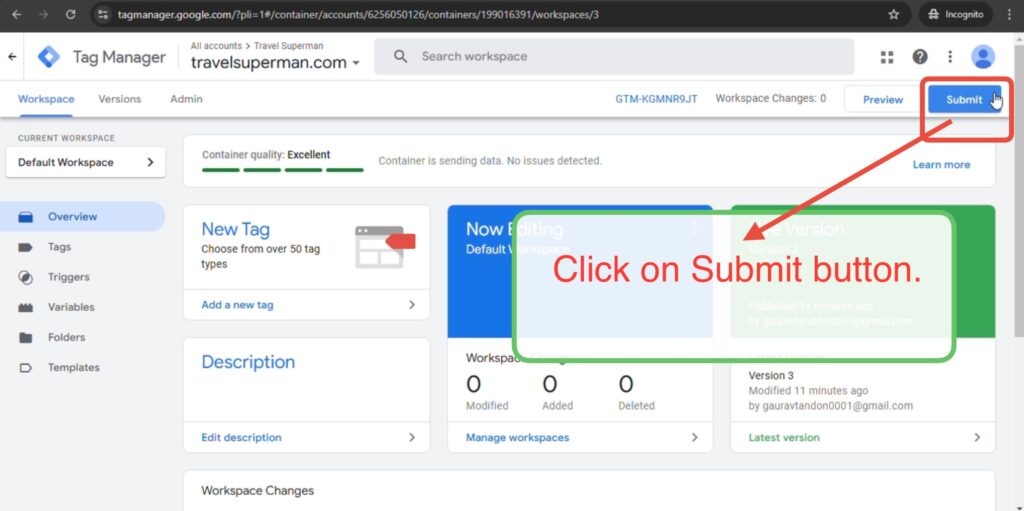
Enter the details as you wish, but it should be something specific so that when you see this in future you exactly know what it is about.
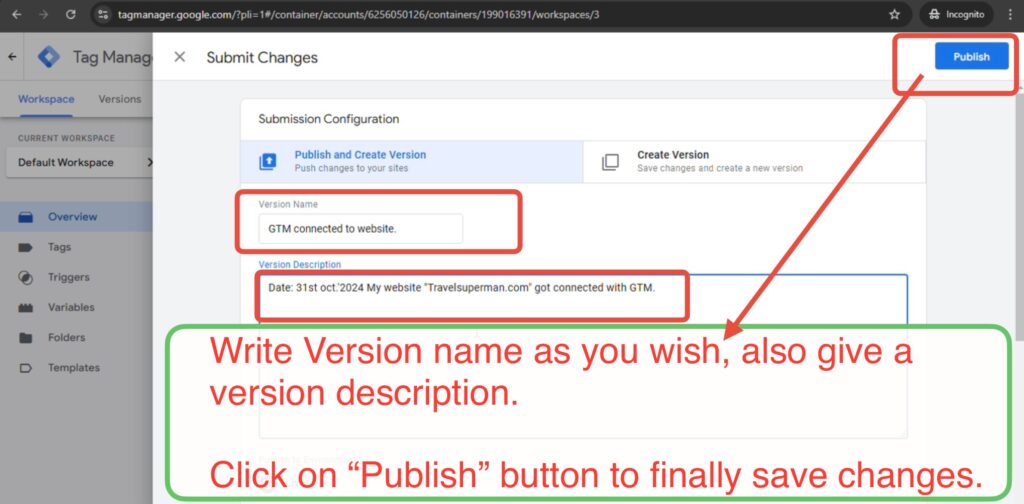
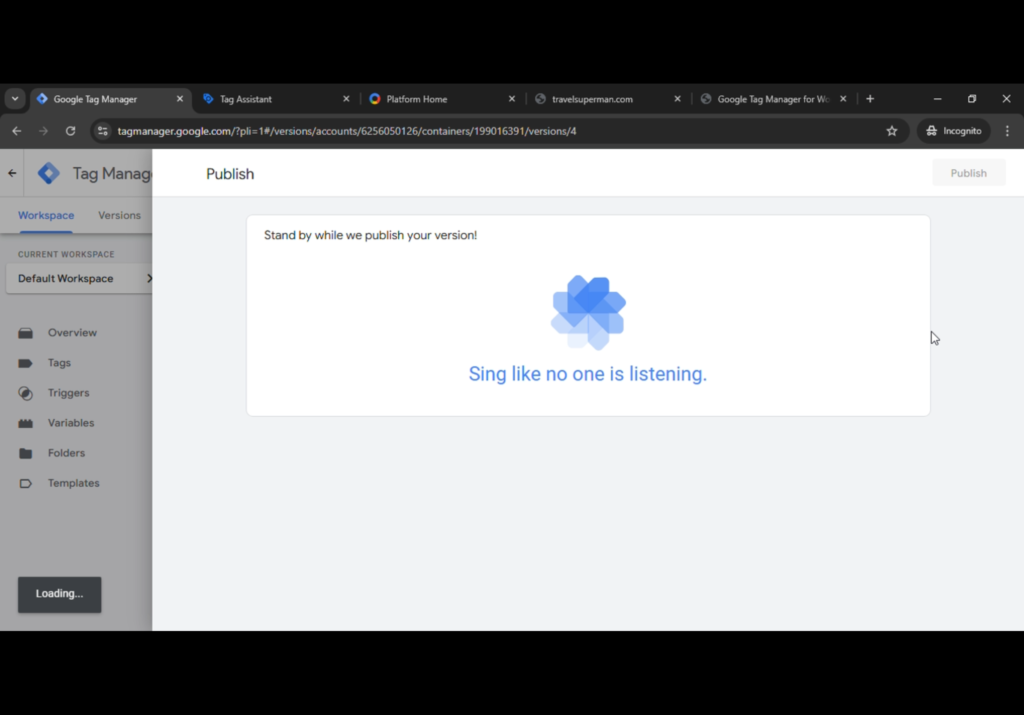
Finally, click on Publish button to publish changes
You will see summary of changes, close it.
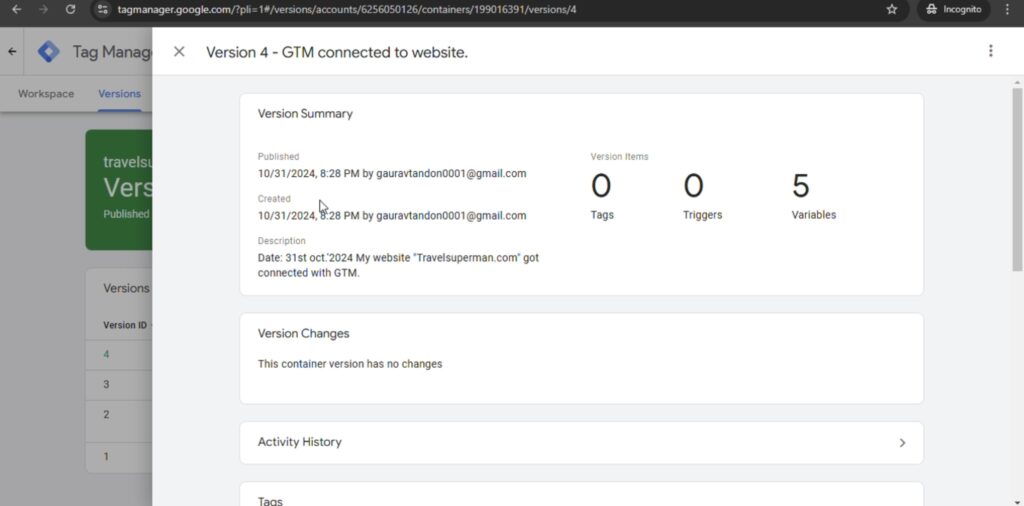
Here you will see your updates are live.
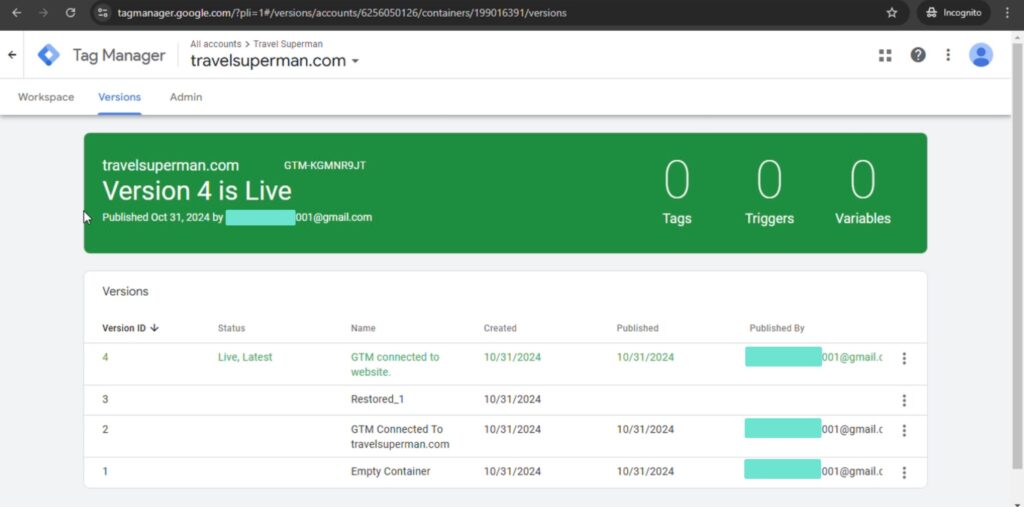
You can see these updates in Workspace also.
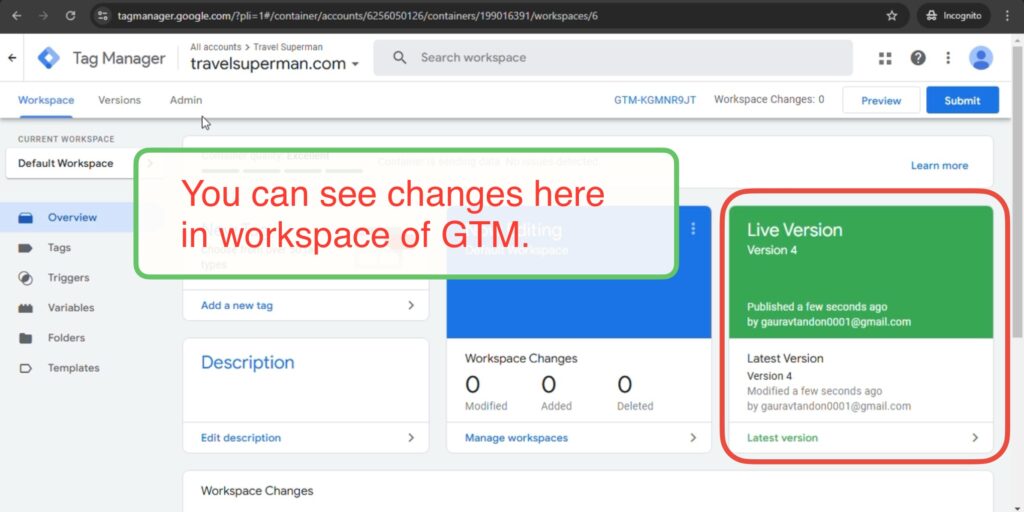
Your Website is now Connected with GTM tool and changes are published. now you can move to next steps. or go to theoretical section.
Check below in Next Step section to find out what could be your next step.
Task completion checklist
| Goals | Completed |
|---|---|
| My website got Connected with GTM successfully. | |
| Verified the connection successfully by Preview method. | |
| I have used Method 1 (Off no tweak right placement) or Method 2 (Manually Coded. | |
| I have Published all the changes to make it live. |
Next Steps
What Could be your Next Step after This GTM Project.
| Next project suggestion | Guide no. | Time est. | Use |
|---|---|---|---|
| GSC configuration to collect data. | Guide 18 | 1 hour | Tracking |
| Connect GA4 with Website | Guide | 2 hours | Tracking |
| Connect facebook with Website | Guide | 3 hours | Tracking |
Theory
| Que 1: | What is GTM (Google Tag Manager)? |
GTM Working
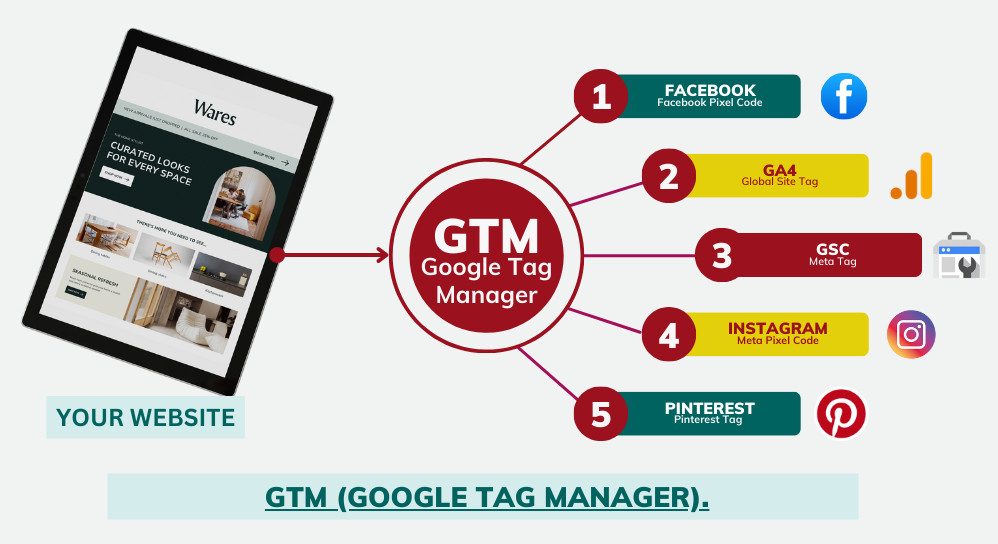
GTM is sending your website data to various tools
GTM (Google Tag Manager) is a free tool developed by google. It acts as a mediator to connects your website with various tools like Facebook, GA4, GSC, Instagram, Pinterest and 100s of other tools.
GTM makes it easy for you to manage and update the various tracking codes (tags) used on your website or mobile app without needing to change the code manually.
You can Think GTM works like a container that holds all your marketing and analytics tools (like Google Analytics, Facebook Pixel, or ad tracking) in one place.
Instead of asking a developer to insert or change tracking codes on your site every time, GTM allows you to control everything through an easy-to-use dashboard.
| Analogy: | Let’s understand GTM concept by analogy of a post office. |
GTM with Post Office analogy
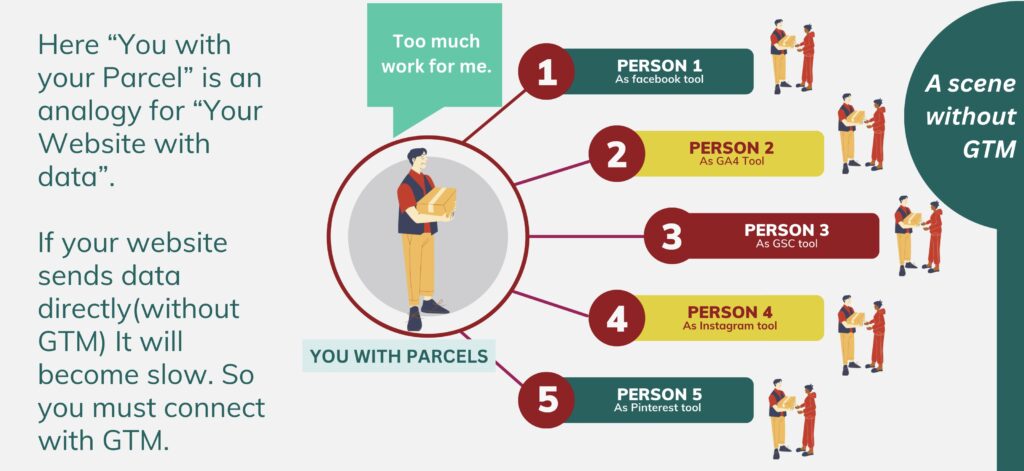
A scene without GTM
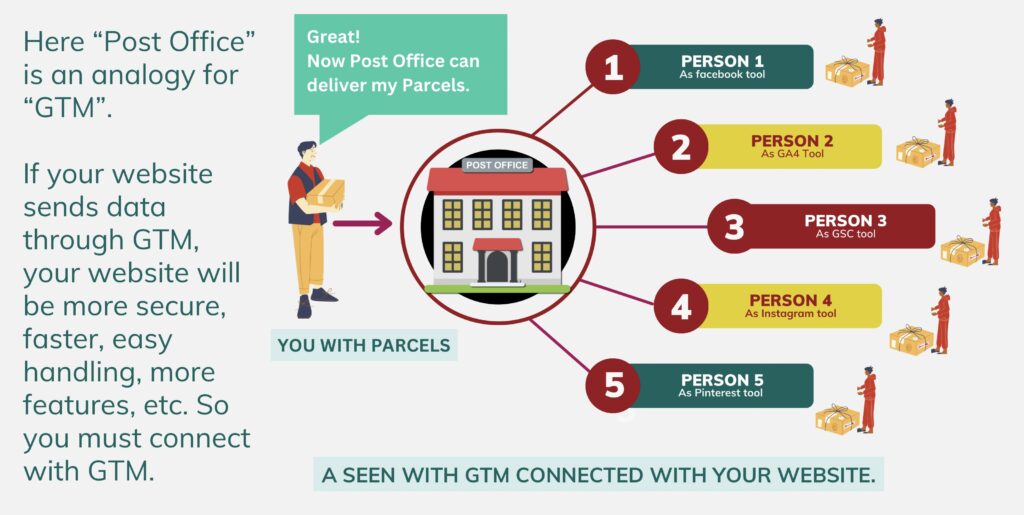
A scene with GTM
Scene 1:

Imagine you have 5 parcels to deliver, now if there are no Post offices 🏤 then you have to visit all 5 people’s places to give parcels, it’s a slow and time-consuming process.
This is also true for your website,
when there is no GTM tool, your website has to deliver data to all tools by itself and that can make your website slow 🐌.
| Features | Problem without GTM | Effect on blog |
|---|---|---|
| Adding Analytics | Requires adding tracking code (like Google Analytics) directly on each page manually. | Time-consuming and prone to errors, especially for updates. |
| Tracking Blog Visits | Adding or adjusting tracking requires coding knowledge and developer time. | Makes tracking setup rigid and harder to adapt quickly. |
| Tracking User Actions | Tracking clicks, scrolls, or form submissions requires complex coding. | Limited insights into user behaviour; hard to track actions. |
Scene 2:

Imagine now you have 5 parcels to deliver but this time there is a Post office 🏤 .
Now you can simply submit all 5 parcels to the post office and go home. The post office will do the rest of the work and give deliveries to those people’s houses where it is meant tobe.
This is what GTM does.
It takes all the required data from your blog or website and sends it to various tools like Facebook, GA4, GSC, Instagram, and 100s of other tools.
It works as a mediator (like the post office in the above example). This is more secure, faster, easy to use, has various features, and is free and powerful 🦾.
| Features | Problem without GTM | Effect on blog |
|---|---|---|
| Adding Analytics | Simplifies adding analytics by using a single GTM code snippet. | Quick setup and easier management of tracking scripts |
| Tracking Blog Visits | Enables seamless tracking of visits with minimal coding effort. | More accurate visitor data and insights without delays. |
| Tracking User Actions | Simplifies tracking of user interactions (clicks, scrolls, form submissions) with built-in templates. | Improved understanding of user behavior and engagement. |
| Que 2: | What are some tools where GTM can send our website data? |
5 important Tools where GTM can and should send our website’s data.
- Google Analytics 4 (GA4 by Google),
- Google Advertisement (by Google),
- Facebook,
- LinkedIn, &
1. Google Analytics (GA4):
A tool created by google to track.
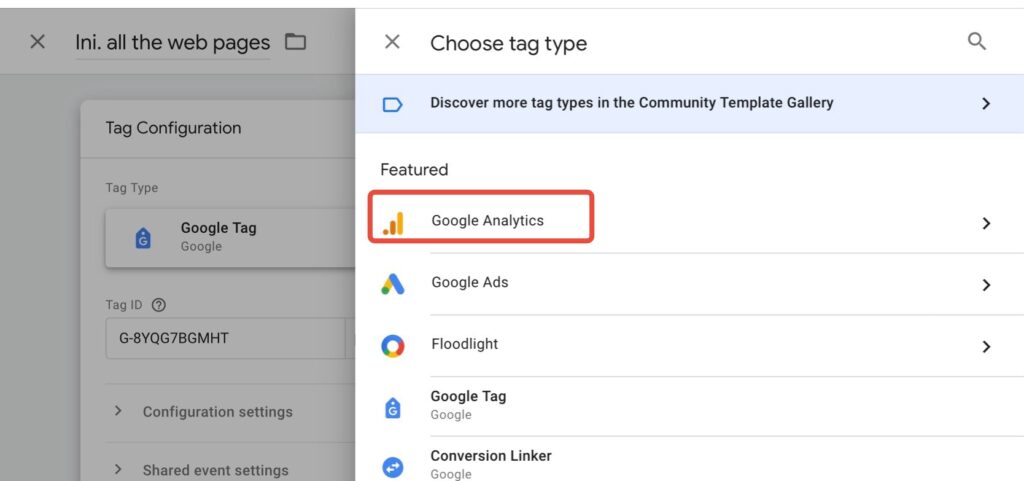
This is a free tool developed by Google to track users’ interaction and behavior on your blog website and then make it in report format understandable by any person.
When you go to the GTM website and go to the tags section you will find an option to connect GTM with this GA4 tool so that you can send your website’s data to GA4 through GTM. Look at the image for reference.
2. Google Advertisements:
Again this is a tool by google.
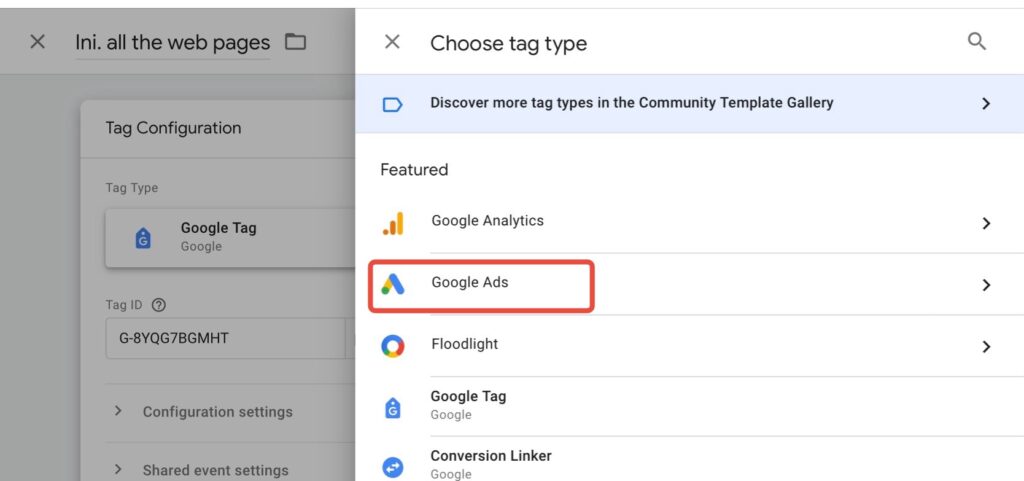
It is used to show advertisements on google search engines or on other websites as display advertisements. You would be able to show ads on other blogs. You should connect this tool to your blog website through GTM. See above image for reference.
3. Facebook:
As everybody knows Facebook is a social media website.
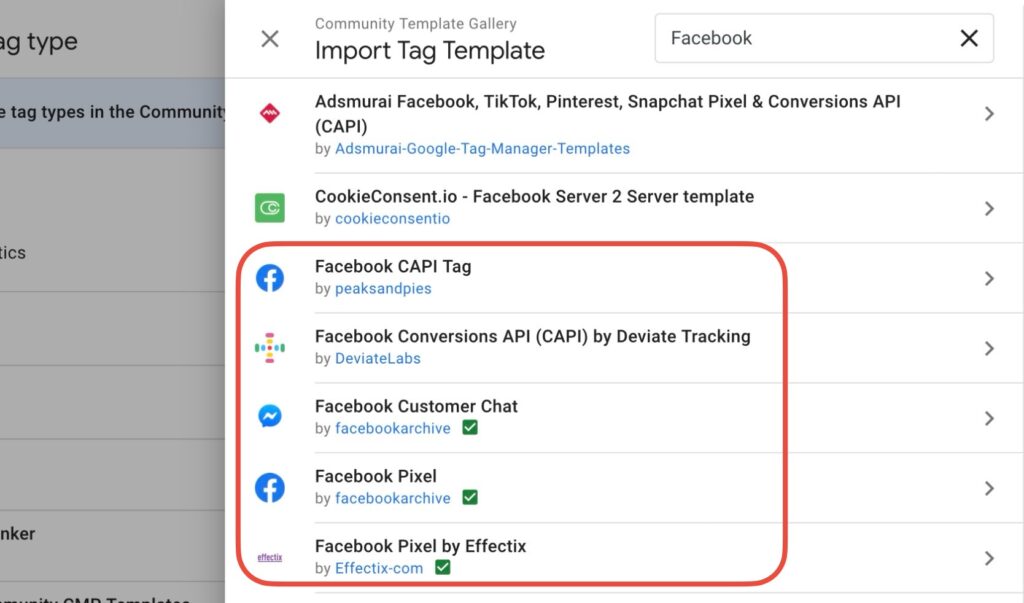
From a blogging perspective Facebook is where you can show advertisements, join groups, share your blog posts and more. We can connect the Facebook with our website through GTM by using the Facebook Pixel tag.
There are many tags available as you can see in image above. You can use “Facebook CAPI Tag” to connect your website with facebook through GTM.
4. LinkedIn:
LinkedIn is a tool for professionals.
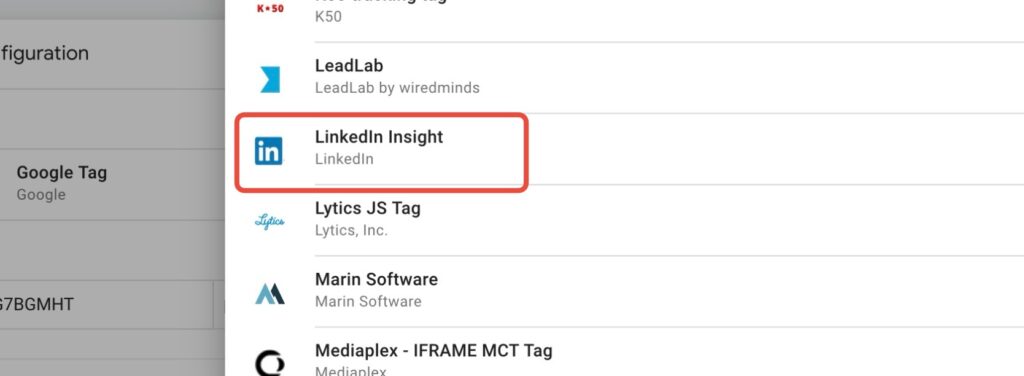
If we can connect our website LinkedIn we can target B2B Audience. To connect it we will learn in different guide, for now see the image above, “LinkedIn Insight” Tag is used to connect your blog website with LinkedIn through GTM.
5. Twitter (X):
Twitter is now known as the X, its a social media platform can be used to promote blogs.
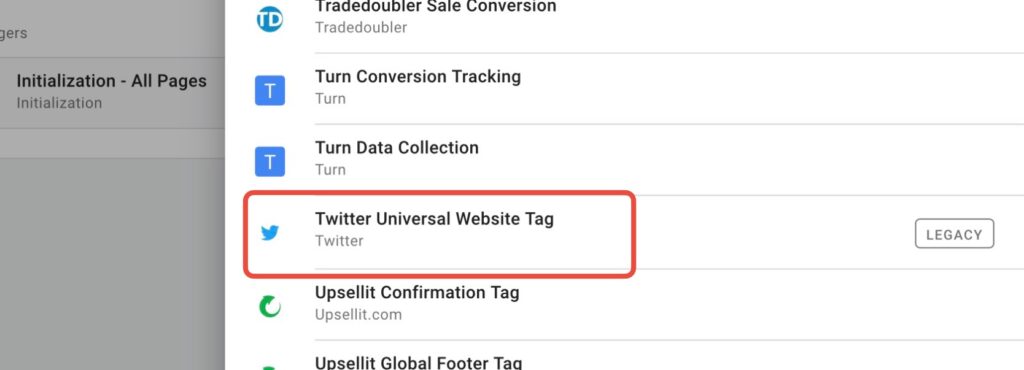
It can be used to make your blog as a brand but it takes a lot of work, other uses are like you have g any blog post that could be interested for people on twitter you can share your blog post, or you can advertise on twitter for product ir services. You will learn in guide 099. Tag “Twitter Universal Website Tag” could be used to connect twitter with your website using GTM.
Let’s See below for summary table showing 5 tools where GTM can send your website data:
|
Table 1: 5 tools where GTM can send your website data.
|
||
|
Tool Name
|
Use Case
|
Purpose of Integration with GTM
|
 Google Analytics4
|
Website tracking and analytics
|
Send page views, events, and user interactions from blog website for analysis
|
 Google Ads
|
Advertising and remarketing
|
Track conversions, optimize ad performance, and remarketing for blog
|
 Facebook
|
Social media marketing and retargeting.
|
Track user behaviour, conversions, and remarketing campaigns for users who visited your blog pages, then target them on Facebook.
|
 LinkedIn
|
B2B advertising and audience insights.
|
Capture conversion data and target relevant LinkedIn users, send necessary data from blog to LinkedIn to retarget users.
|
 Twitter
|
Social media advertising
|
Track conversions from Twitter ads and optimize campaign data
|
| Que 3: | What are 3 components of GTM which helps to receive and send data from your blog to tools mentioned above. |
Now, when you go inside GTM tools you will find that it have 3 components to send your website’s data properly to different tools(like Facebook, Instagram, GA4, LinkedIn etc).
GTM’s 3 main components:
- Tags,
- Triggers, and
- Variables.
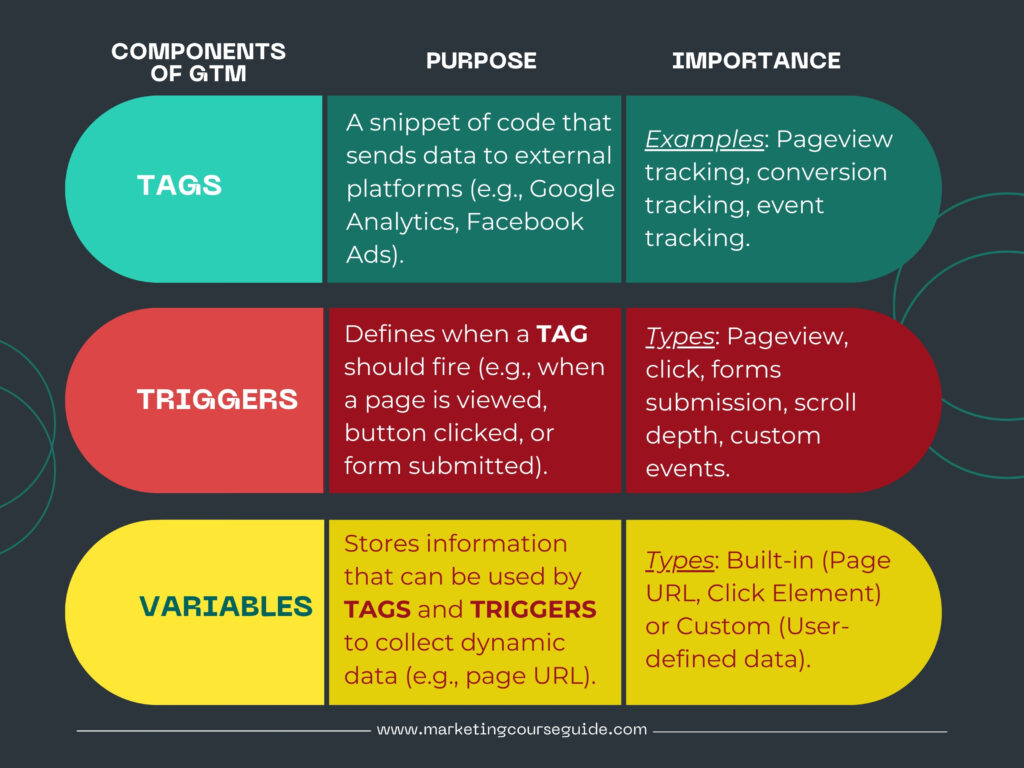
1. Tags:
In GTM, a tag is a piece of code that you want to execute on your website. Tags can be used to track different actions, such as page views, button clicks, or form submissions.
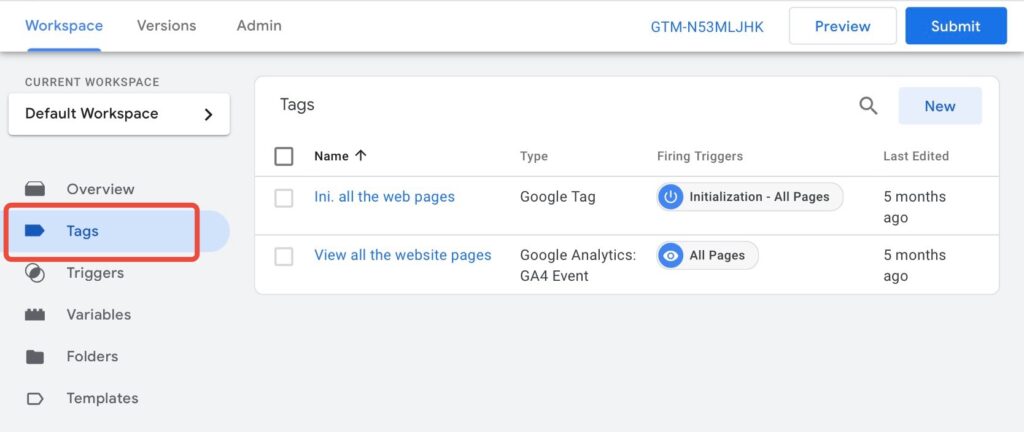
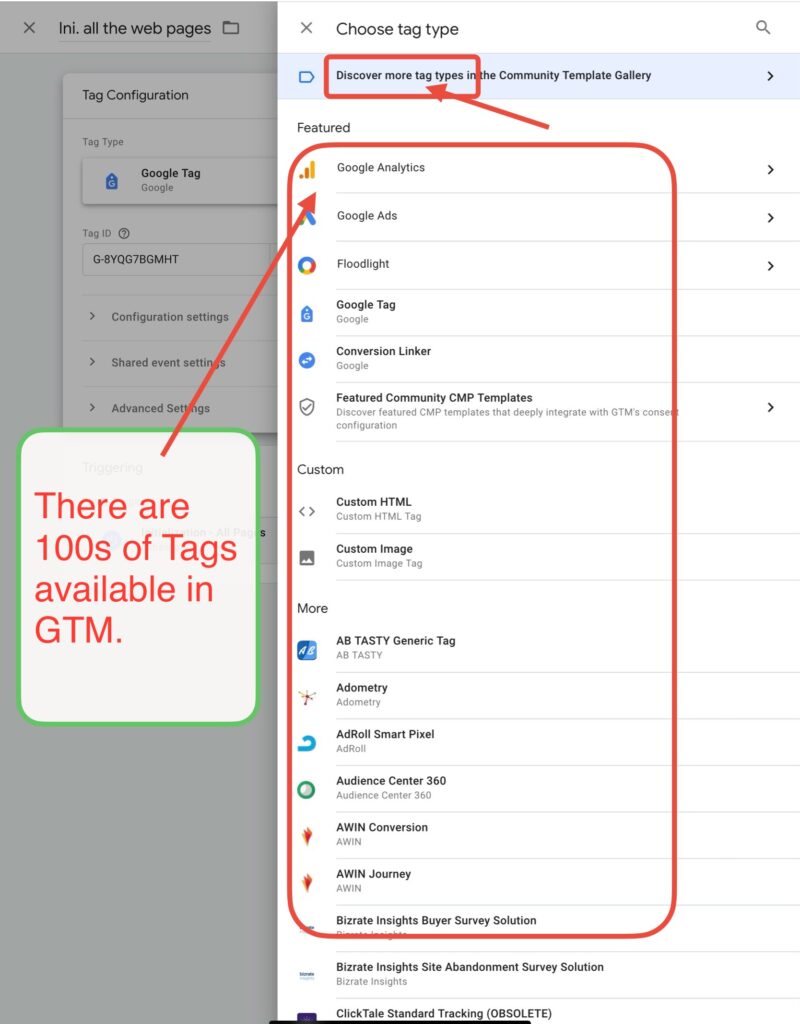
They help you collect data about how users interact with your site, which can then be sent to tools like Google Analytics, Facebook Pixel, or Google Ads for analysis and remarketing purposes.
Example: Let’s say you want to track how many people read your blog post and scroll down to at least 50% of the content. You could set up a scroll tracking tag in GTM, which sends this data to Google Analytics whenever a visitor scrolls halfway down the page.
2. Trigger:
In GTM, a trigger is a condition that tells a “tag” when to fire (or execute).
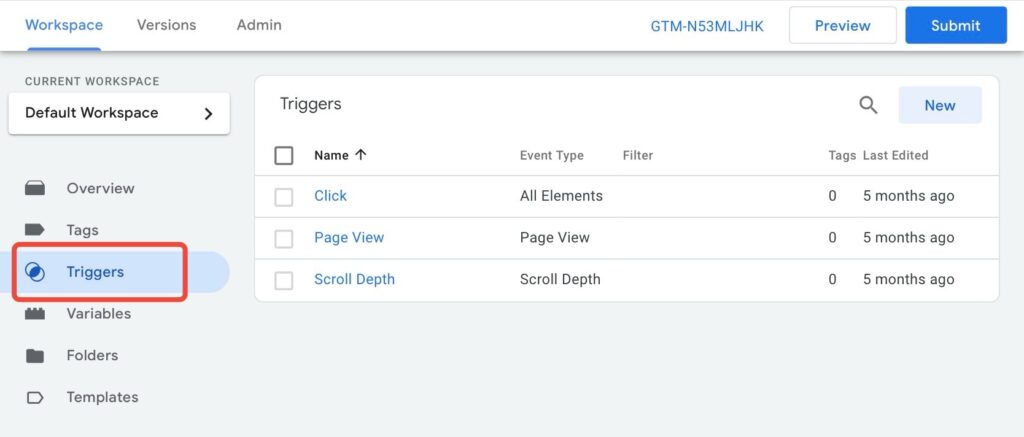
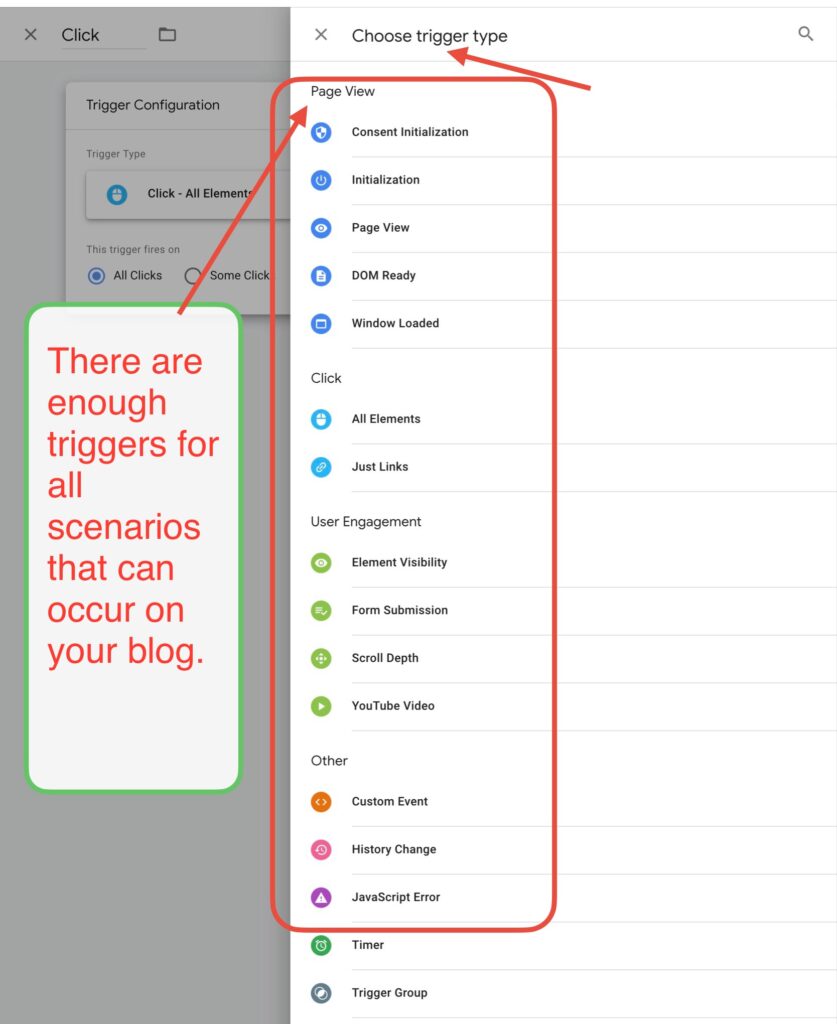
It defines the moment or action on your website when a “tag” should be activated, such as when someone clicks a button, visits a specific page, or submits a form.
Example: For the scroll tracking example, you’d create a trigger for “Scroll Depth.” This trigger will be set to fire the tag (the scroll tracking code) when a reader scrolls to 50% of the blog post. So, every time someone reaches halfway, the tag is triggered, and the data is sent.
3. Variable:
In GTM, variables are placeholders that store dynamic values or information used by tags and triggers.
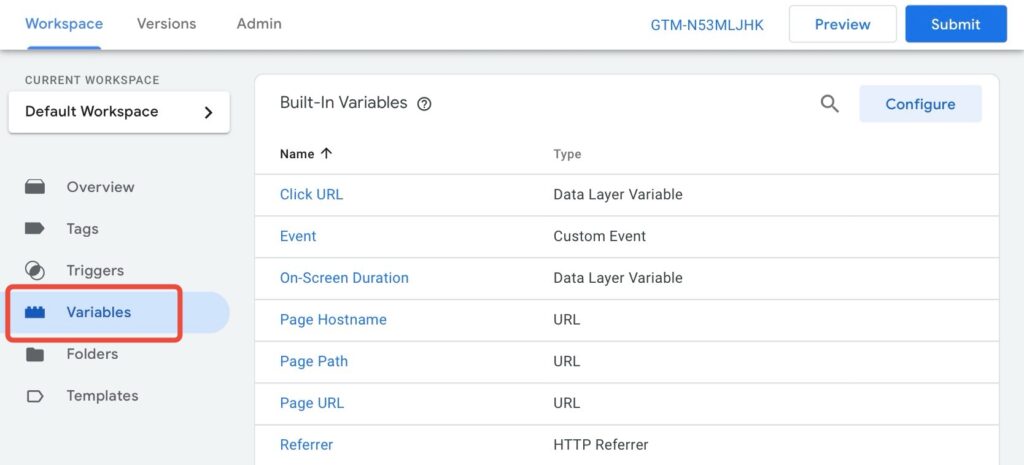
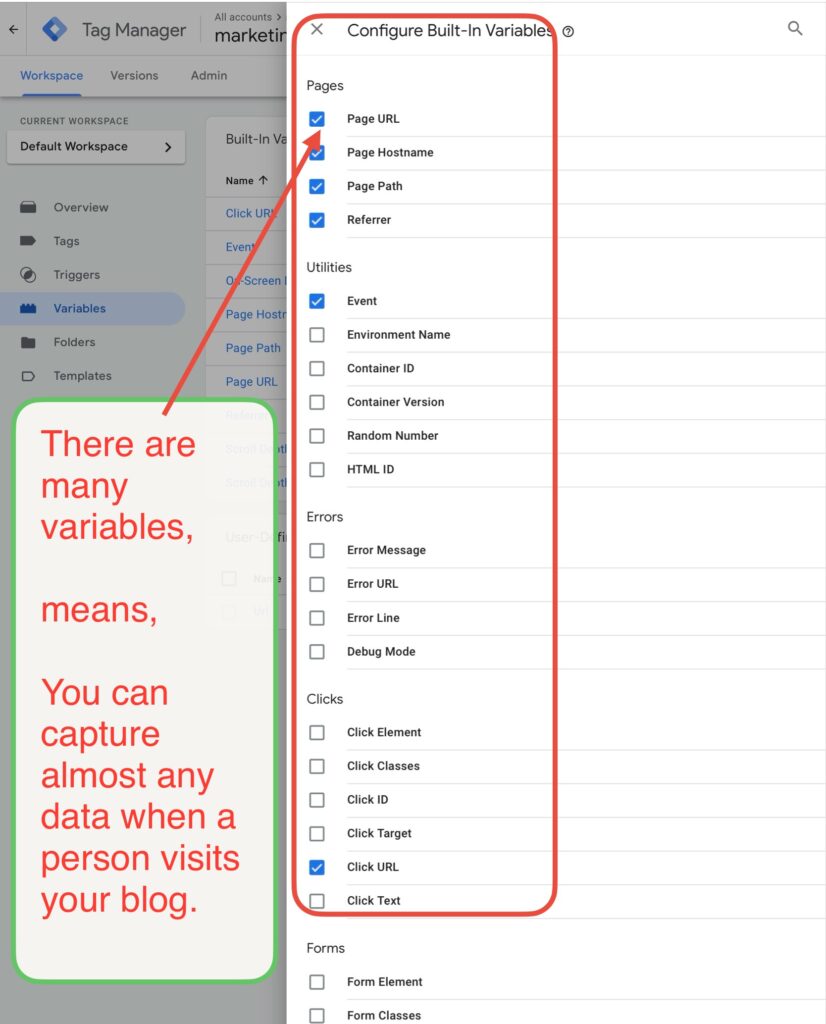
They help you create more customized and efficient tracking by providing details such as your blog page URLs, click IDs, or form input data. Variables can be predefined by GTM (built-in variables) or custom-created based on your specific needs.
Example: Let’s say you want to track which blog post category (like “SEO Tips” or “Marketing Strategies”) is being read. You can create a variable that pulls the page’s category name. This variable can then be used in your tag to send data about the specific category the visitor is reading to Google Analytics.
| Que 4: | How exactly GTM collects your website data and sends to GA4 or any other tool. |
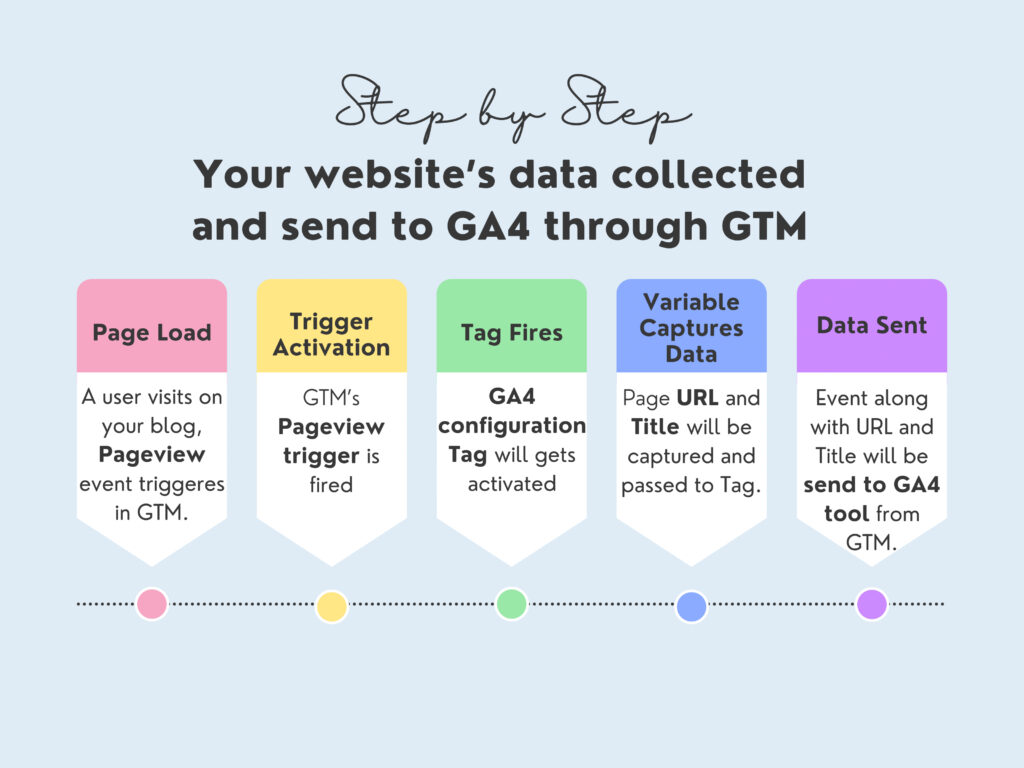
Understanding How Page Load Tracking Works in Google Tag Manager (GTM)
1. When a Visitor Lands on Your Page: Imagine someone clicks a link and visited on your blog post. As soon as your blog post opens GTM recognizes that a visitor has arrived. This action is called a Pageview Event. This event lets GTM know that a new page has loaded and prepares it to gather information about this visit.
2. Activating the Pageview Trigger: GTM has a tool called “Trigger” that activates whenever a page is loaded. As soon as someone lands on your homepage or any blog post, “ trigger” is fired, signaling GTM to collect data for that specific pageview.
3. Google Analytics Tag Fires: With the Pageview Trigger active, the connected Google Analytics Tag fires as well. This tag is responsible for sending the details of the pageview over to Google Analytics.
4. Capturing Page Data: GTM captures specific details, like the URL and title of the page the visitor is on, using Variables. These variables are then included in the data sent to Google Analytics, adding context to each pageview.
5. Sending Data to Google Analytics: Finally, the pageview data, complete with the page URL and title, is sent to Google Analytics. There, you can see who visited your homepage and track visitor behavior, helping you understand how people interact with your website.
In summary, every time someone lands on any page, GTM’s triggers and tags work together to send essential data to Google Analytics, giving you valuable insights into your site’s performance.