Members' Preview
bloggers' KIT
SEO Checklist: Guide For Your Blog.
Part 1: Now this is part 1 of 8-parts SEO Checklist. Go to Part 2. This SEO guide will help you manage SEO task like connecting GA4, GSC, etc. You can download complete checklist from the below.
Disclaimer: In alignment with our business plan to minimize product costs for our customers, we may incorporate affiliate links.If a purchase or usage occurs through these links, we may receive compensation at no additional cost to the customer. Additionally, any discounts available through affiliate links are determined by the respective companies. If customer going to make a purchase, we encourage customers to verify any applicable discounts.
How To Use SEO Checklist
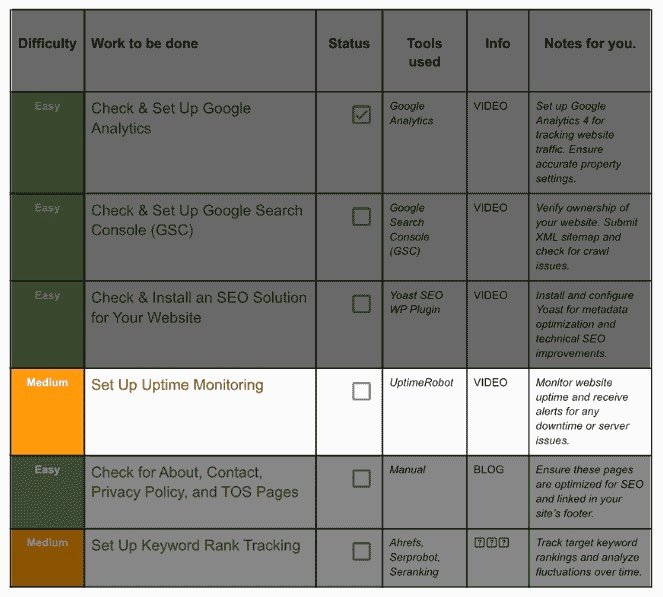
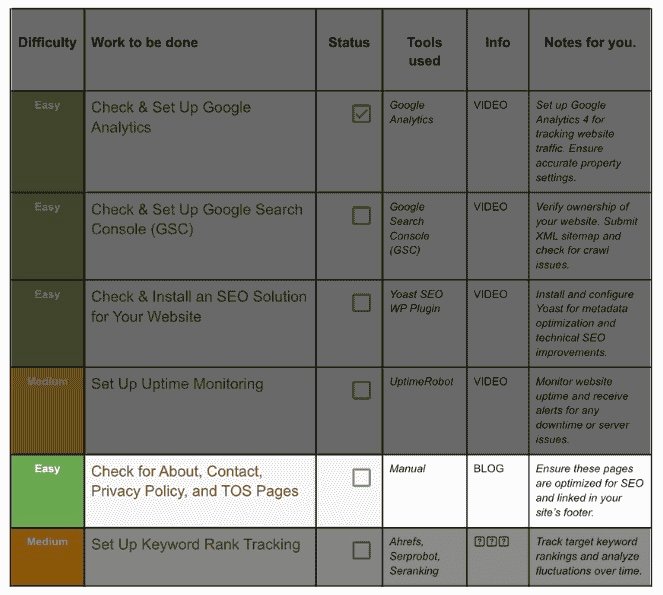
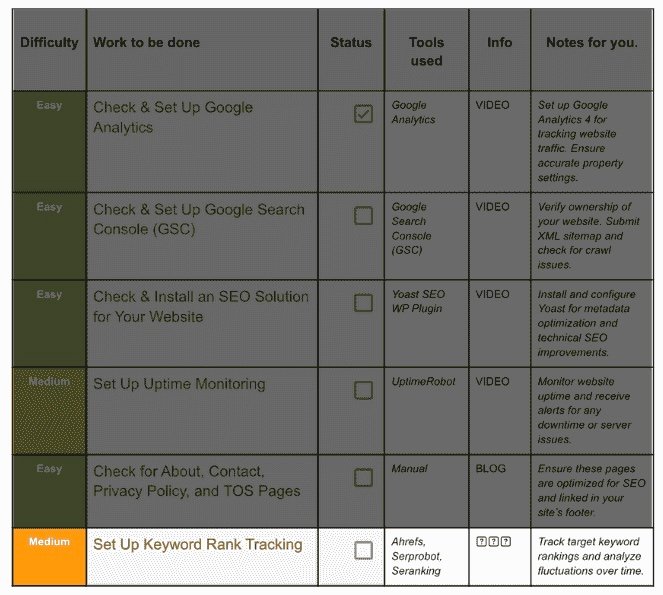
Template image: Click on it to download template
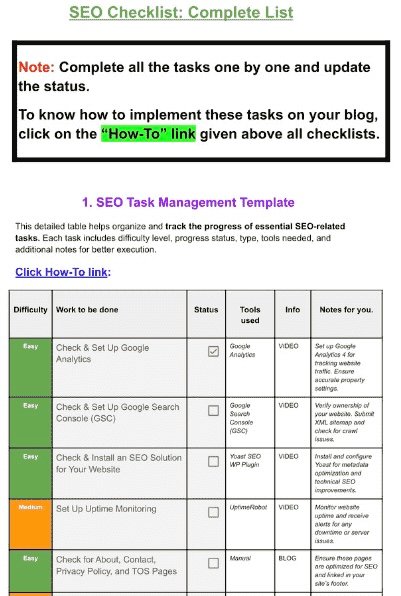
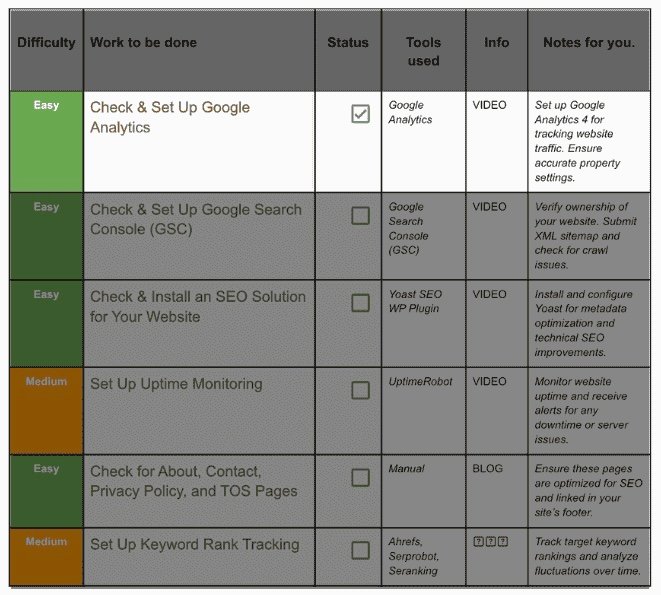
This SEO checklist is a long list of “Work to be done” on your blog or website to improve its SEO.
You can download SEO checklist from here then scroll down this page to find out how you can implement the Tasks given in the checklist.
Don’t try to do in 1 day🙂. The whole checklist’s task could take something like 3 months but it also depends on your team.
🌟Important: This below guide contains only Part 1 of checklist, complete checklist have 8 parts, you can click here to visit Part 2 of this checklist.
Pro Tip: Collect all necessary resources (Bookmark it, download, buy or screenshot) before analysis, then start analysing ✅.
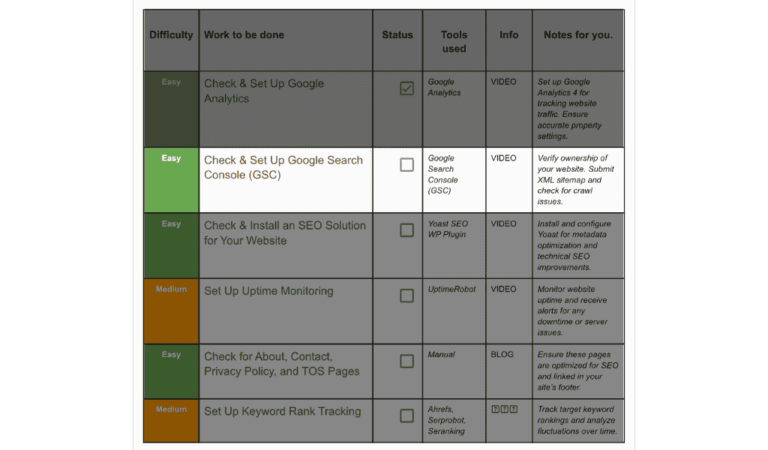
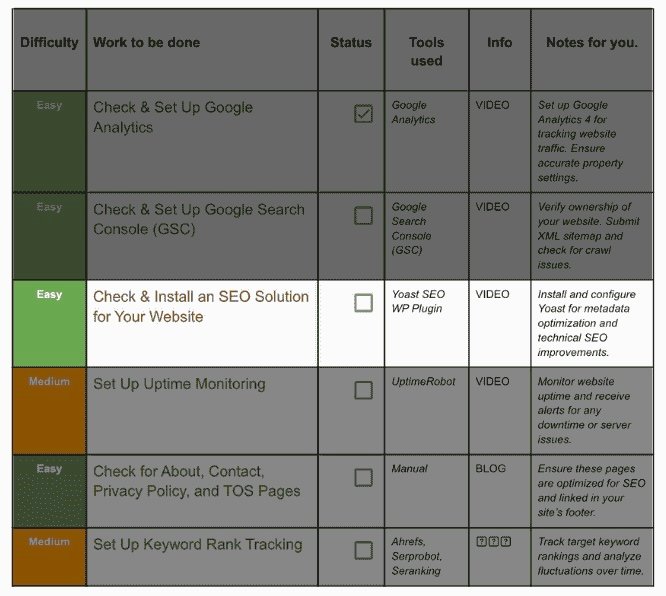
1. Check and set up Google Analytics:
Step 1.1 Create or Confirm a GA4 Property:
- Sign in at analytics.google.com with the Google account that will own the data.
- Click Admin (bottom‑left).
- In the left column choose the correct account (one account can hold many properties).
- In the Property column click Create property.
- Name it (e.g. example.com GA4), pick India time‑zone (UTC +05:30), choose INR, hit Next → Create.
- Accept the Terms.
Tip: Already have a GA4 property? Great—open it and jump to 2.3 Check the vital settings.
Step 1.2 Add a Web Data Stream:
- Still in Admin, under Property click Data streams → Web → add your https://example.com.
- Copy the Measurement ID (starts with G‑). We’ll need it to tag the site.
Step 1.3 Install the Tracking Code (3 common methods):
| Method | When to use | Steps (summary) |
| A. GA4 native “gtag.js” snippet | Any CMS with theme editor access | Paste the two‑line snippet immediately before </head> in your global header. |
| B. Google Tag Manager | You already run GTM or plan multiple tags | Create a new GA4 tag → paste Measurement ID → Trigger All Pages → Submit & Publish. |
| C. WordPress plugin (Site Kit or GA4‑Only) | Prefer “no‑code” | Install Site Kit by Google → Connect Analytics → pick the property → done. |
Detailed screenshots and DebugView walkthrough are in Analytics Mania’s 2025 guide Analytics Mania.
Step 1.4 Verify Real‑Time Data:
Open Reports → Realtime and visit your site in another tab. You should see “1 user in last 30 minutes.”
If not, wait 5 min, clear cache, or double‑check the tag.
Step 1.5 Key GA4 Settings to Check Once:
- Data retention: Admin → Data settings → Data retention → set to 14 months.
- Conversions: Configure → Events → Mark purchase, signup etc. as Conversions.
- Internal traffic filter: Admin → Data streams → More tagging settings → Define internal traffic (use your IP).
- Currency & time‑zone: Admin → Property settings.
Step 1.6 Common Pitfalls & Fixes:
| Symptom | Likely cause | Fix |
| No realtime users | Tag blocked by ad‑blocker | Add server‑side tagging or use GTM’s server container. |
| Duplicate page views | WordPress theme + plugin both inject tags | Keep one method only. |
| Stripe or PayPal payments missing | Checkout on external domain | Add that domain to List of unwanted referrals in Admin. |
You’re done! Leave the tab open; we’ll reference GA4 later when checking keyword cannibalisation.
Notes for Successful Implementation
- Progress Tracking: Use a task management tool like Trello or Asana to track and visualize progress in real-time.
- Content Optimization: Use a mix of blog posts, videos, and interactive guides to keep team members informed on task execution.
- Resource Allocation: Assign specific team members to each task based on their skill set and availability.
2. Check and Set Up Google Search Console(GSC):
Step 2.1 Add a Property:
- Log in at search.google.com/search‑console.
- Click ▼ next to the current property → Add property.
- Choose Domain (tracks all protocols + sub‑domains) and enter example.com.
- GSC shows a TXT record—copy it.
Step 2.2 Verify Ownership (TXT method):
- Open your domain registrar (GoDaddy, Namecheap etc.).
- Find DNS / Zone editor → add TXT record:
Name / Host: @ Value: google‑site‑verification=XXXX… - Save. Propagation takes 30 sec‑5 min.
- Return to GSC → Verify. Success? You’re in!
(Alternate HTML file / tag methods also work; see Google’s official doc) Google Help.
Step 2.3 Submit an XML Sitemap:
- In WordPress, Yoast auto‑creates one at https://example.com/sitemap_index.xml.
- GSC left menu → Sitemaps → paste the URL → Submit.
- Status shows Success within moments.
Step 2.4 Check Coverage & Enhancements:
- Pages → Crawled – currently not indexed: scan reasons (slow server, thin content).
- Mobile Usability: aim for zero errors.
- Core Web Vitals: LCP < 2.5 s, CLS < 0.1.
- Manual Actions / Security: pray this stays empty.
Step 2.5 Performance Report Crash‑Course (5 minutes):
- Search results → Queries: sort by Clicks or Impressions.
- Toggle Average position; anything ranked 11‑20 is “low‑hanging fruit.”
- Pages tab: note if a page with many Impressions but low CTR needs a better title tag.
Step 2.6 Pro Tips:
- Connect GSC to GA4 (Admin → Product links) to see search queries inside GA4.
- Export CSV each month for a permanent record; GSC keeps only 16 months.
With GSC humming, we can confidently “talk to Google” about fixes.
3. Install SEO Plugin “Yoast”
Step 3.1 Install & Activate:
- WP Admin → Plugins → Add New.
- Search Yoast SEO → Install Now → Activate.
(The full 2025 walkthrough video is handy if you prefer visuals YouTube.)
Step 3.2 Configuration Wizard (7 quick screens):
- Site type: Blog / Online Shop / Portfolio.
- Organisation or Person: fills schema.org.
- Social profiles: paste URLs; leave blank if none yet.
- Post type visibility: leave Posts + Pages set to Show.
- Multiple authors? Say Yes only if guest posts exist.
- Title separator: choose dash ( – ) or pipe ( | ).
- Done!
Step 3.3 Essential Settings to Review:
Setting | Path | Recommended |
XML sitemaps | Yoast → Settings → XML | Keep Enabled (emits /sitemap_index.xml). |
Breadcrumbs | Yoast → Settings → Breadcrumbs | On if your theme supports it. |
Schema output | Yoast → Settings → Schema | Default is fine. |
Open Graph images | Yoast → Settings → Social | Upload a fallback 1200 × 630px image. |
Step 3.4 Using Yoast on Each Post/Page:
- Scroll below the WP editor to Yoast SEO panel.
- Focus keyphrase: e.g. “blogging checklist”.
- Green / orange / red bullets guide you:
SEO: Check slug, density, alt text.
Readability: Aim for shorter sentences (Flesch score). - Meta description: write compelling 150‑160 characters—they often become your SERP snippet.
- Update / Publish.
Step 3.5 Technical Tweaks (once):
- Robots meta: set thin pages (thank‑you, checkout) to noindex.
- RSS footer credit: Yoast → Settings → Advanced → RSS, add “Originally published at…” to fight scrapers.
Step 3.6 Common Mistakes:
Mistake | Consequence | Fix |
Blocking wp‑content via robots.txt | Images vanish from Google Images | Remove disallow. |
Changing permalink structure after launch | All URLs break | Set permalinks once, never again. |
Your site now speaks Google‑ese fluently.
4. Setup 24/7 Uptime Monitoring:
Step 4.1 Create a Free Account & Dashboard Tour:
- Go to uptimerobot.com → Sign Up (free plan = 50 monitors @ 5‑min checks).
- From the sidebar you’ll later access Monitors, Status Pages, Alerts.
Step 4.2 Add Your First Monitor:
- Click + Add Monitor.
- Monitor Type: HTTP(s).
- Friendly Name: “Homepage”.
- URL: https://example.com.
- Monitoring Interval: Free = 5 min.
- Alert Contacts: enter email, Telegram, Slack, SMS.
- Save. You’ll see a green heartbeat within 30 sec.
(The UptimeRobot knowledge‑hub guide, April 2025 edition, shows screenshots uptimerobot.com.)
Step 4.3 Create a Public Status Page (Optional but Cool):
- Sidebar → Status Pages → Create.
- Name: “Example.com Status”.
- Add the monitors you just created.
- Choose light / dark theme.
- Toggle Robots meta = noindex if you don’t want Google to crawl it.
- Publish. Share the URL with clients (“All systems operational”).
Step 4.4 Fine‑Tune Alerting Rules:
Contact method | Latency | Cost |
E‑mail | Instant | Free |
Slack webhook | 2‑3 s | Free |
SMS | < 10 s | Paid credits |
Tip: Add 0‑min “verify down status twice before alert” to reduce false positives.
Step 4.5 Reading Your Logs:
- Click a monitor → Response Times graph. Look for spikes > 1000 ms.
- Logs tab: every entry shows Time down → Time up → Duration.
- Export CSV monthly, or connect API to Google Sheets.
Step 4.6 Troubleshooting:
- Many 522/Timeouts? Your host or CDN is throttling. Ask support.
- “SSL expired” alerts: set a secondary monitor for port 443 SSL‑cert validity.
Congrats—you will know before Twitter does if the site crashes.
5. Create And Optimise Legal Or Trust Pages:
Step 5.1 Pages You Absolutely Need:
Page | Purpose |
About | Brand story, mission, team faces → boosts E‑E‑A‑T. |
Contact | Email, form, phone, physical address if any. |
Privacy Policy | Required by GDPR / CPRA; explains cookies, data use. |
Terms of Service (TOS) | Your “rules” + warranty disclaimers. |
Step 5.2 Drafting in Simple English:
About
Opening hook: “Hi, I’m Priya, and in 2017 I nearly quit blogging…”
Finish: CTA to newsletter.
Privacy & TOS
Use a trusted generator (Termly, FreePrivacyPolicy). Review with a lawyer if you sell products.
Step 5.3 On‑Page SEO Touch‑Ups (Yoast helps):
- Slug: /privacy-policy/, /about/.
- Indexation: Keep About & Contact index, but set Privacy / TOS to noindex if they’re thin.
- Schema type: About = ProfilePage, Contact = ContactPage.
Step 5.4 Link Placement:
- Footer nav: row 1 = About, Contact; row 2 = Privacy, TOS.
- Contact in main menu if support is a selling point.
Step 5.5 Accessibility & Trust Signals:
- Phone number as clickable tel: link.
- Add business hours in <time> markup.
- Office photo or Google Map embed.
Backlinko’s 2025 SEO strategy reminds us that trust pages indirectly lift rankings by satisfying E‑E‑A‑T signals Backlinko.
6. Set Up Keyword Rank Tracking:
Step 6.1 Option A – Ahrefs Rank Tracker (Free Tier with Webmaster Tools):
Steps
- Sign up at ahrefs.com (or log in) → Webmaster Tools → add property (connect GSC).
- Rank Tracker → + New project.
- Paste up to 500 keywords (export queries from GSC for free).
- Select Locations (e.g. India, United States) and devices (Desktop, Mobile).
- Add 3 competitor URLs for context.
- Ahrefs will run the first refresh; future updates arrive via e‑mail.
Graph view: Filter by tag, SERP features, or positions (Top 3, 4‑10, 11‑20).
(Official product page: features and screenshots) AhrefsAhrefs.
Smart Use Tips
- Click a keyword → SERP overview to spy on ranking page titles.
- Set Alerts → New / Lost keywords for quick wins.
- Export CSV monthly → pivot table for trend lines.
Step 6.2 Option B – Serprobot (Ultra‑budget):
- Visit serprobot.com → Sign Up (first 10 keywords free).
- Add new robot → give a project name.
- Enter domain & keywords, choose Google .com or regional.
- Robots run hourly. Green = up, Red = down.
Serprobot’s minimal interface is perfect for hobby sites serprobot.com.
Step 6.3 Option C – SE Ranking (Generous Trial):
- seRanking.com → Start free trial (14 days).
- Create project → domain, region, search engine, competitor URLs.
- Paste keyword list or upload CSV.
- Dashboard shows Position, Traffic forecast, Visibility score.
- Set Schedule → Every day for precise graphs.
Its 2025 review highlights affordability and YouTube tracking SE RankingExploding Topics.
Step 6.4 Reading & Acting on Rank Data:
Metric | Meaning | Action |
Visibility % | Share of top‑100 positions (weighted) | Track weekly; aim for + trend. |
Average position | Mean rank per keyword | Improve on‑page optimisation for terms stuck at 11‑20. |
SERP features | Featured snippet, People‑Also‑Ask etc. | Rewrite content to target those formats. |
Step 6.5 Avoiding Tracking Errors:
- Match URL exactly—“/” vs “/index.html”.
- Use country‑specific Google if you target multiple markets.
- Don’t bloat list with irrelevant terms; focus on 50‑100 priority keywords.
When you link GA4 traffic + GSC clicks + rank shifts, you’ll know which tweaks move the needle.
Pulling Everything Together:

- Publish new article.
- Yoast: fill keyphrase, meta, schema → Publish.
- In GSC, request URL inspection → Submit to index.
- Wait 24 h, then open GA4 Realtime to watch visits arrive.
- Rank tracker logs your starting position automatically.
- If uptime monitor texts at 2 a.m., fix the server before Google bot encounters errors.
- Next week, compare GSC Impressions vs Rank Tracker movement. Adjust headlines, internal links, or add FAQ schema.
- Repeat → iterate → grow.
Frequently Asked Questions (FAQs):

Q1. Can I switch from Yoast to Rank Math later?
Yes. Deactivate Yoast, install Rank Math, import settings, check sitemap URLs.
Q2. Is 5‑minute monitoring enough?
For e‑commerce, downgrade risk by choosing UptimeRobot Pro (1‑min checks).
Q3. Do I need a cookie banner?
If you serve EU visitors and use GA4 or remarketing, yes—add a CMP like CookieYes.
Q4. How many keywords should a small blog track?
Start with your top 50 money terms, 50 informational, and brand name variations.
You Made It! 🎉
You now have:
- Analytics and Search Console speaking to each other.
- An SEO plugin guarding meta tags and sitemaps.
- A silent watchdog pinging your site every five minutes.
- Trust pages that satisfy both readers and regulators.
- A rank journal that tells the truth about your SEO experiments.
Bookmark this guide, tick off each checkbox, and revisit monthly.
The tools are free; the only cost is the hour you invest today—an hour that pays dividends every week going forward.
Happy optimising!