Members' Preview
bloggers' KIT
Technical SEO Optimisation Guide [with Checklist]
Part 4: This is part 4 of 8-parts SEO Checklist. Go to now Previous or Next Part. In this checklist part you will learn about Performance Optimisation Tasks of blog website which will improve Performance of your blog. Download checklist now from button.
Disclaimer: In alignment with our business plan to minimize product costs for our customers, we may incorporate affiliate links.If a purchase or usage occurs through these links, we may receive compensation at no additional cost to the customer. Additionally, any discounts available through affiliate links are determined by the respective companies. If customer going to make a purchase, we encourage customers to verify any applicable discounts.
Technical SEO Optimisation Guide
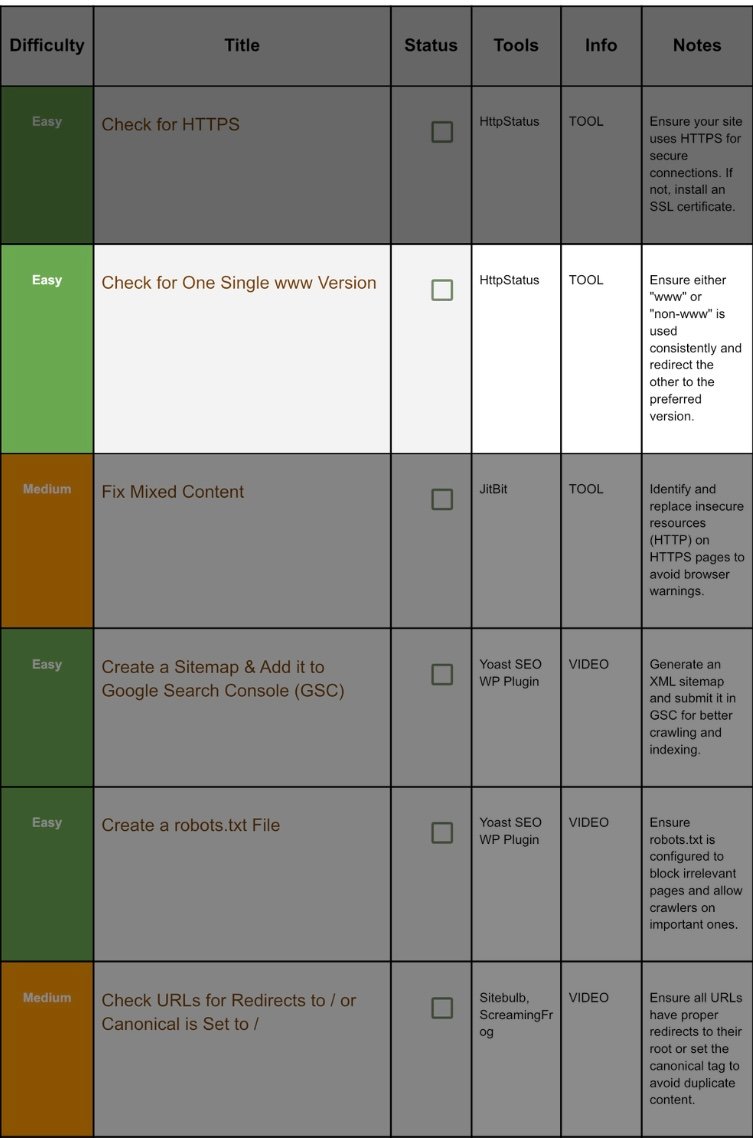
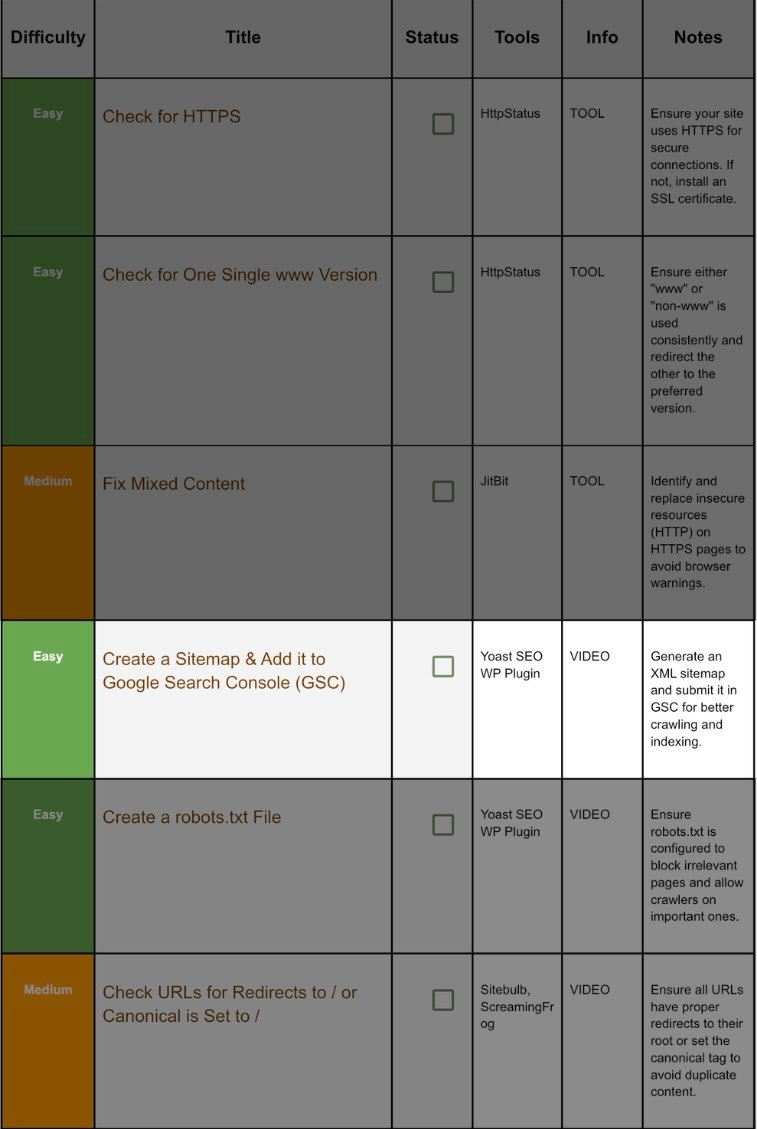
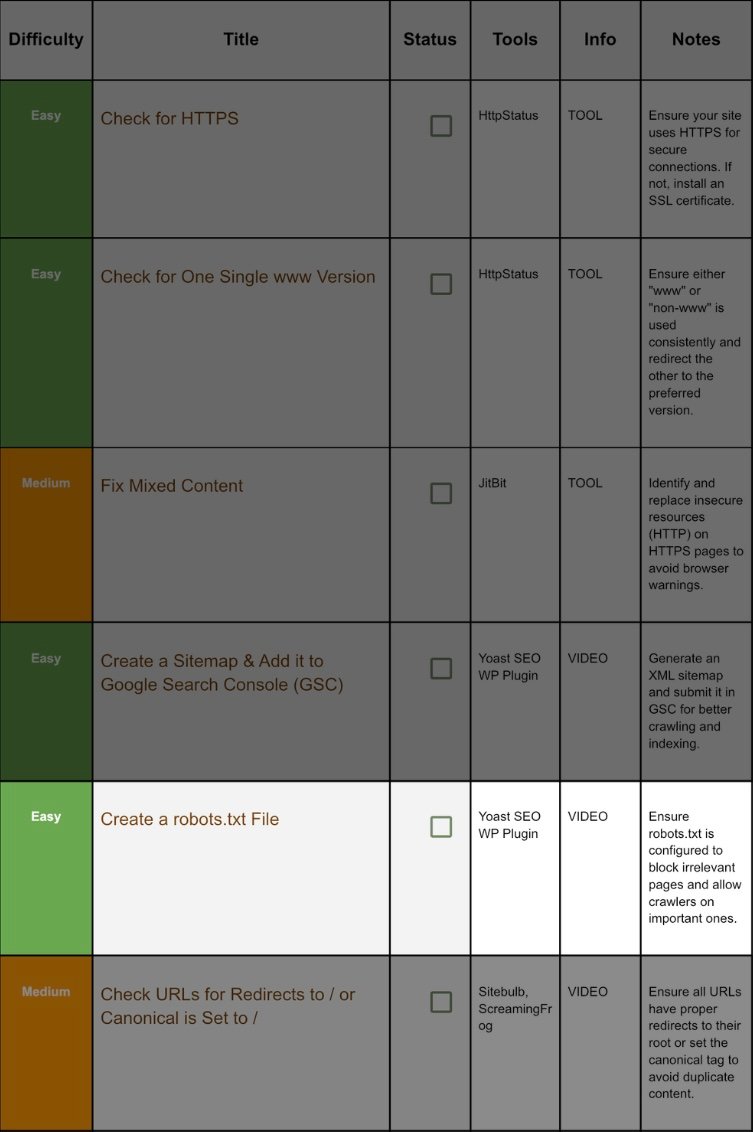
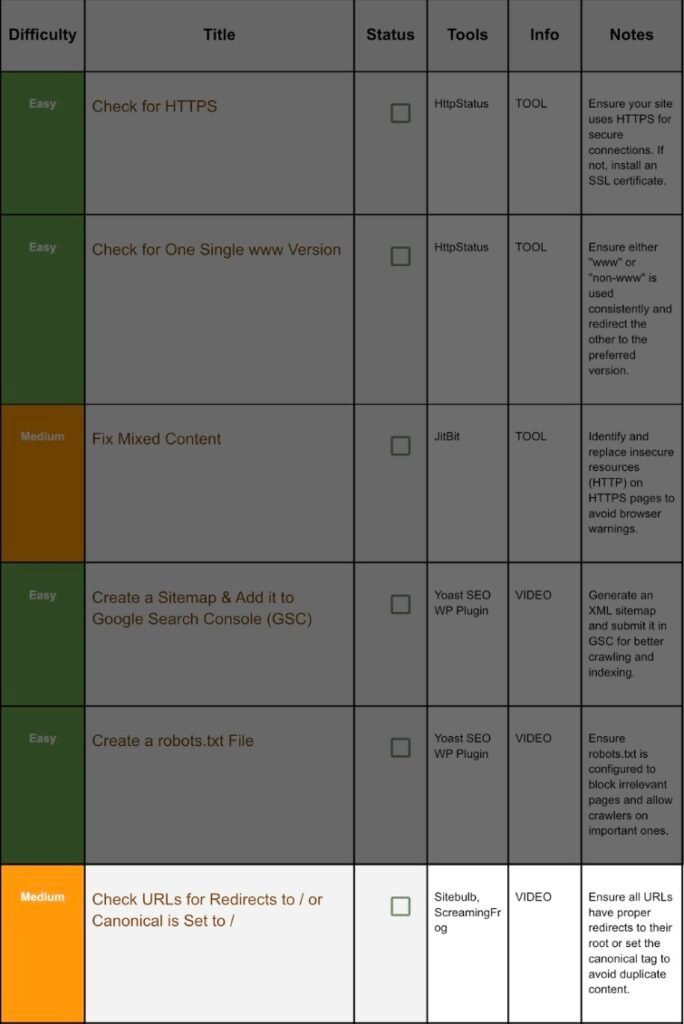
Template image: Click on it to download template
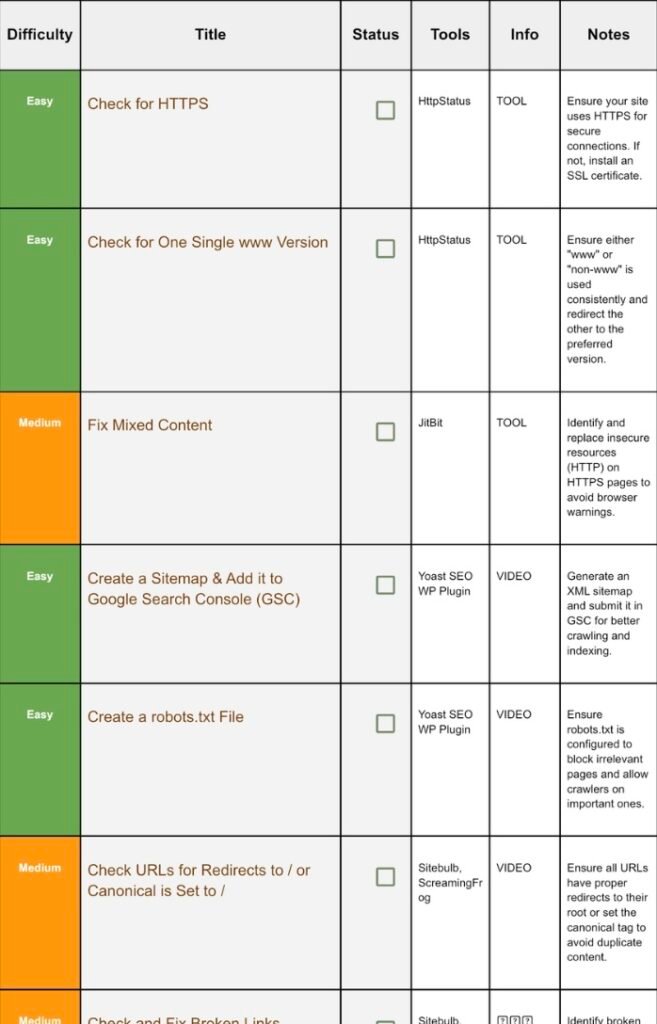
This SEO checklist is a long list of “Work to be done” on your blog or website to improve its SEO.
You can download SEO checklist from here then scroll down this page to find out how you can implement the Tasks given in the checklist.
Don’t try to do in 1 day🙂. The whole checklist’s task could take something like 3 months but it also depends on your team.
🌟Important: This below guide contains only Part 4 of the checklist, checklist have total 8 Parts. Click here to visit Previous or Next part of checklist.
Pro Tip: Collect all necessary resources (Bookmark it, download, buy or screenshot) before analysis, then start analysing ✅.
1. Check For Https:
Step 1.1 Quick Test:
Open a private window, type your full domain with http:// (note: no s). If the browser instantly rewrites to https:// and shows a padlock icon, congrats—HTTPS is active and forced.
Prefer a tool? Go to httpstatus.io, paste your http URL, run test.
Look for:
Column | Ideal value |
Status | 301 |
Redirect To |
Step 1.2 Install a Free SSL Certificate (If Needed):
Most hosts give Let’s Encrypt free:
- Log in to cPanel / hPanel / Plesk.
- Find Security → SSL / TLS.
- Click Install Let’s Encrypt or Auto‑SSL.
- Choose domain + www subdomain → Issue Certificate.
- Wait 1–5 min; refresh your site with https://.
Step 1.3 Force HTTPS Site‑Wide:
Apache .htaccess
apache
CopyEdit
RewriteEngine On
RewriteCond %{HTTPS} off
RewriteRule ^(.*)$ https://%{HTTP_HOST}%{REQUEST_URI} [L,R=301]
Nginx
nginx
CopyEdit
server {
listen 80;
server_name example.com www.example.com;
return 301 https://$host$request_uri;
}
2.4 Troubleshooting Padlock Failures
- Mixed content (next job) is most common.
- Certificate expired → renew in host panel.
- Wrong hostname on cert → reinstall but tick both root & www.
2. Check For Single WWW:
Step 2.1 Why Consistency Matters:
Google treats https://example.com and https://www.example.com as two different hosts. If both serve 200 status, you risk duplicate content, split PageRank, and messy analytics.
Step 2.2 Pick Your Master Version:
- Brand‑first? Bloggers, SaaS, and DTC brands often go non‑www—shorter, modern.
- Enterprise / subdomains? Use www to leave room for shop., blog. etc.
Step 2.3 How to Redirect the Alternate:
Apache (.htaccess)
To force non‑www →
apache
CopyEdit
RewriteEngine On
RewriteCond %{HTTP_HOST} ^www\.(.*)$ [NC]
RewriteRule ^(.*)$ https://%1/$1 [L,R=301]
To force www →
apache
CopyEdit
RewriteCond %{HTTP_HOST} !^www\.
RewriteRule ^(.*)$ https://www.%{HTTP_HOST}/$1 [L,R=301]
Nginx: create two server blocks—one server_name example.com that redirects with return 301 https://www.example.com$request_uri;, the second serves content.
Step 2.4 Verify:
Run httpstatus.io for the non‑preferred variant. Expect 301 to the correct one.
3. Fix Mixed Content:
Step 3.1 What Is Mixed Content?:
A page loads over HTTPS but calls some assets (images, CSS, JS) over HTTP. Browsers block or warn, breaking layout and trust.
Step 3.2 Scan with JitBit:
- Go to https://www.jitbit.com/sslcheck/.
- Enter your homepage.
- The report lists each insecure asset.
Step 3.3 Batch Fix Methods:
Scenario | Fix |
WordPress image links | In DB, run Search & Replace plugin: replace http://example.com/ wp-content/ uploads/ with https:// |
Theme hard‑coded http | Edit theme files; replace with //example.com/… (protocol‑relative) or https://… |
External scripts | Use the provider’s HTTPS endpoint. If none, self‑host. |
Step 3.4 Final Validation:
Open Chrome DevTools → Console. Reload page. “Mixed Content” warnings should be zero.
4. Add A Sitemap And Connect It With GSC(GooGle Search Console)
Step 4.1 Generate Sitemap:
- WP Admin → Yoast SEO → Settings → General → Site features.
- Ensure XML sitemaps toggle = On.
- Click View the XML sitemap—copy URL (usually /sitemap_index.xml).
Step 4.2 Submit in Google Search Console:
- GSC → choose property.
- Left menu Sitemaps.
- Paste the sitemap URL (omit domain prefix).
- Submit. Status turns Success in seconds.
Step 4.3 Best Practices:
- Include only indexable pages. Yoast auto‑excludes noindex.
- Split by type: posts, pages, categories—Yoast does that.
- Update frequency: automatic; no manual ping required.
5. Create Robot.txt:
Step 5.1 Create / Edit robots.txt:
- WP Admin → Yoast → Tools → File editor.
- If no file, Yoast creates one. Add rules:
txt
CopyEdit
User-agent: *
Disallow: /wp-admin/
Allow: /wp-admin/admin-ajax.php
Sitemap: https://example.com/sitemap_index.xml
Step 5.2 Block Only Junk:
- Disallow /cgi-bin/, /cart/ for inactive e‑comm.
- Never disallow /wp-content/uploads/ (blocks images from Google Images).
Step 5.3 Test:
GSC → Robots.txt tester → Paste contents → Test random URLs.
6. Check Redirects Set Canonicals:
Step 6.1 What’s the Problem?:
/about and /about/ can exist as duplicates if your server treats them separately. Add trailing‑slash redirect or canonical.
Step 6.2 Audit with Screaming Frog:
- Crawl site (mode: spider).
- Filter Duplicate → see paired slash/no‑slash.
- Click a duplicate URL → Response Codes.
Step 6.3 Solutions:
- In WP → Settings → Permalinks choose structure (post‑name) which adds trailing slash.
- Force slash in Nginx: try_files $uri $uri/ /index.php?$args;.
- Yoast auto‑outputs <link rel=”canonical” href=”https://example.com/about/” />. Validate page source.
7. Check, Repair Broken Links:
Step 7.1 Scan with Sitebulb:
- Create a project → crawl.
- Go to All Hints → Broken links. Export CSV.
Step 7.2 Fix Routes:
Broken Type | Fix |
Internal link | Edit post: update URL or remove anchor. |
External 404 | Replace with new source or unlink. |
Resource 404 (image, CSS) | Re‑upload file or adjust path. |
Step 7.3 Automate Prevention:
Install Broken Link Checker plugin. Set Check Frequency weekly; email alerts.
8. Check And Fix Redirect Chains:
Step 8.1 Why Chains Hurt:
A→B→C wastes time (extra 301 hops) and can drop cookies, UTM tags, or lose 15 % PageRank per hop.
Step 8.2 Identify in Screaming Frog:
Crawl → Reports → Redirect Chains → Export.
Step 8.3 Fix:
- Update legacy internal links to final destination.
- In Redirection plugin merge rules: set A→C direct, delete B.
- For 100+ bulk rules, export .htaccess, edit, re‑upload.
9. Check And Fix Duplicate Meta Tags:
Step 9.1 Crawl Titles & Descriptions:
Screaming Frog → Page Titles and Meta Descriptions tabs. Tick columns Missing or Duplicate.
Step 9.2 Rewrite in Yoast:
Open each offending page → Yoast panel:
- SEO title: ≤ 60 chars, include primary keyword toward front.
- Meta description: 140–155 chars, action verb + benefit + CTA.
- Slug: concise.
Update → Recrawl after batch done.
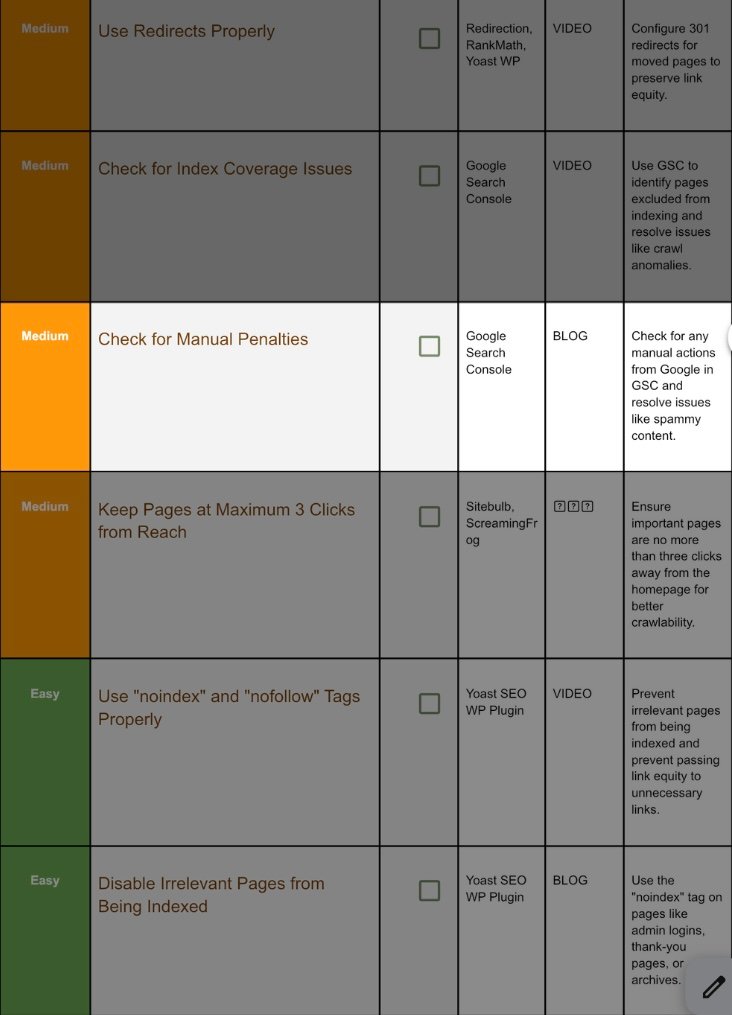
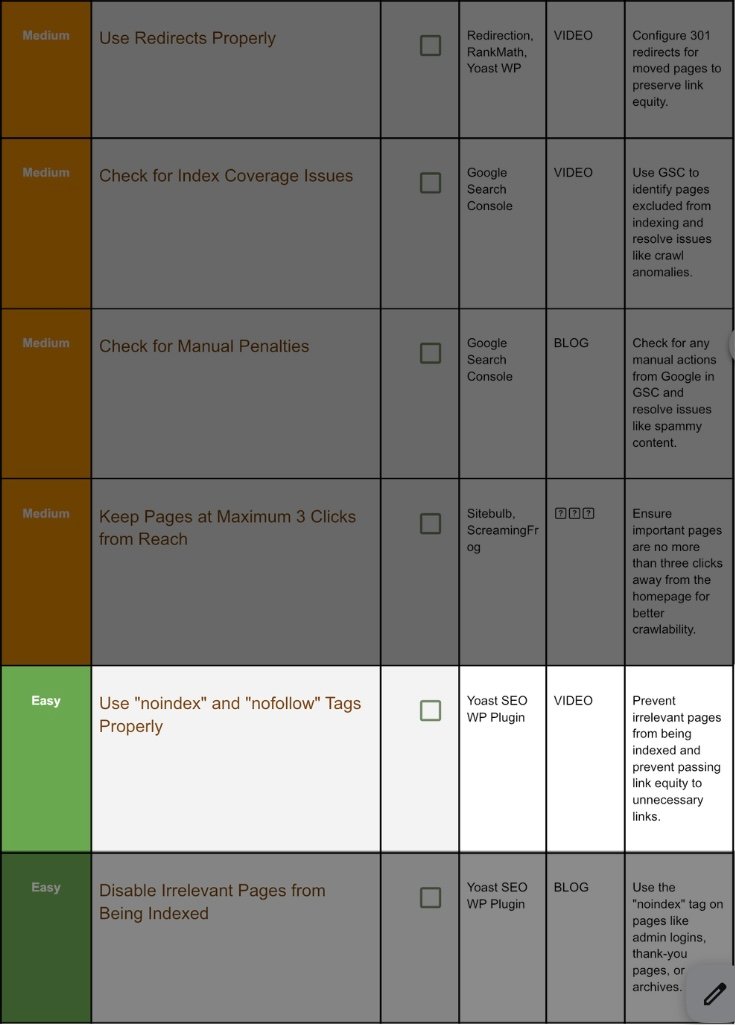
10. Set And Use 301 Redirects:
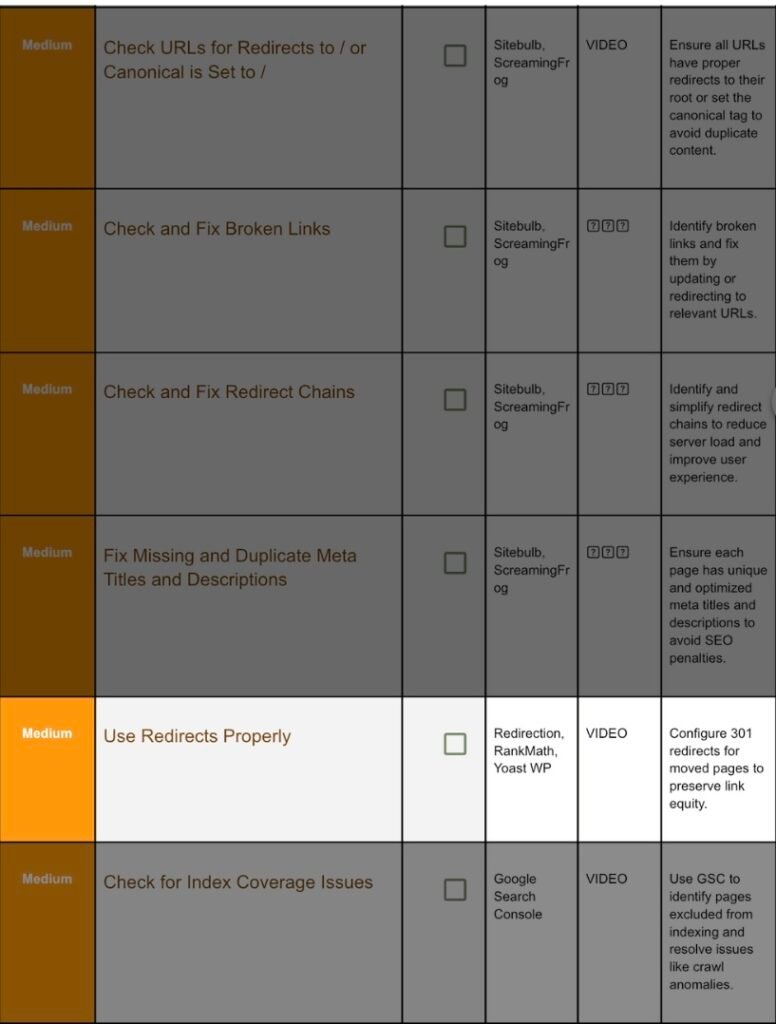
Step 10.1 When to Redirect:
- Removed page with backlinks.
- Changed slug for SEO.
- Merged duplicate content.
Step 10.2 Redirection Plugin Steps:
- Plugins → Redirection → Activate.
- Add New Redirect:
Source URL /old-post/
Target URL /new-post/
Group: Redirections (301). - Add Redirect.
Step 10.3 Test:
HttpStatus → /old-post/ returns 301 → /new-post/ (200).
11. Check For Now Index Coverage Issue:
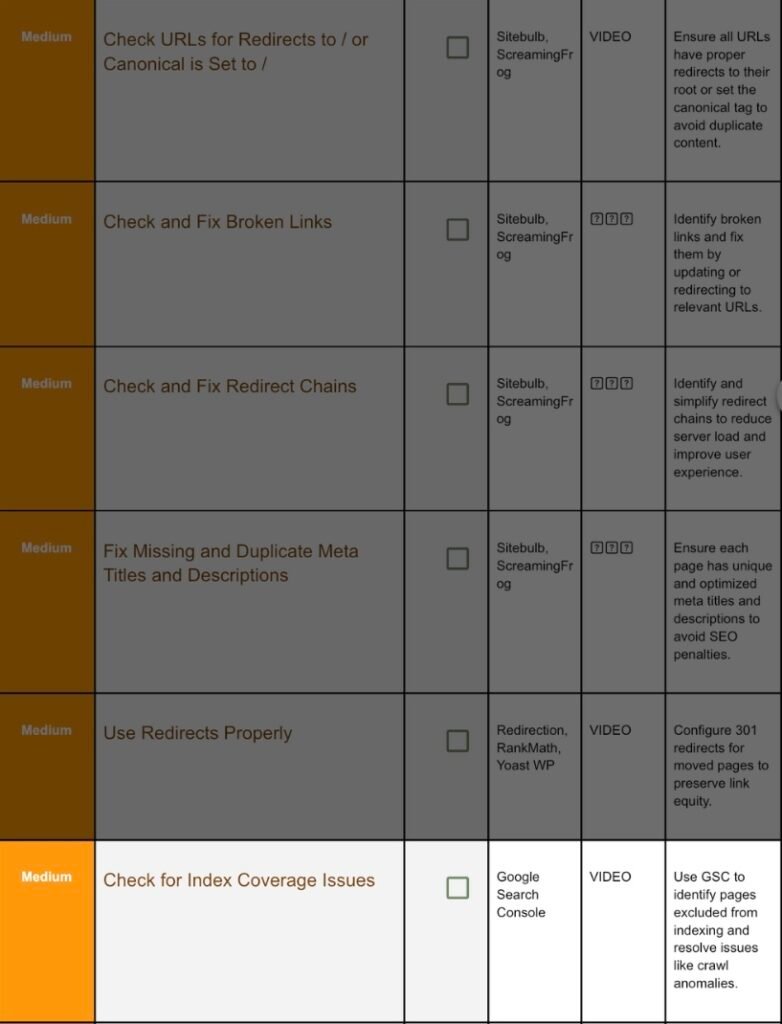
Step 11.1 Open GSC Report:
Left menu → Pages (was Coverage). Examine statuses:
Status | Meaning | Common Fix |
Crawled – currently not indexed | Thin/duplicate | Beef up content or canonicalize. |
Discovered – currently not indexed | Large queue | Improve internal links; reduce spider traps. |
Alternate page with proper canonical | OK | Nothing. |
Step 11.2 Request Re‑index:
After fix, URL Inspection → Request indexing. Track status in 24–48 h.
12. Check For Manual Penalities:
Step 12.1 Find Manual Actions:
GSC → Security & Manual Actions → Manual actions.
Green check? Safe. If not:
Penalty Type | Fix |
Thin content | Add depth, merge pages, or noindex. |
User‑generated spam | Clean comments/forums; enable moderation. |
Unnatural links | Disavow paid links; reach out for removals. |
After changes, click Request Review → write honest summary of fixes → Submit (response 3–14 days).
13. Keep Pages Within 3 Click:

Step 13.1 Visualise with Sitebulb:
Crawl → Site Structure → Crawl Depth.
Export heatmap; red nodes = > 3 depth.
Step 13.2 Reduce Depth:
- Add category links in top nav.
- Place footer links to cornerstone pages.
- Generate HTML sitemap.
Re‑crawl, confirm critical pages depth ≤ 3.
14. Use “No Tag” And No Index Tag:
Step 14.1 Yoast Toggle:
Open page → Yoast Advanced tab:
- Allow search engines to show this Page in search results? → No = noindex.
- Should search engines follow links? → No = nofollow.
Apply to: admin pages, thank‑you pages, thin tag archives.
15. Select Pages You Don’t Want To Index:

Step 15.1 Besides Yoast toggles, bulk ways:
- Bulk edit posts list → set Yoast SEO → Noindex.
- robots.txt:
Disallow: /wp-login.php
GSC → Removals → Temporary remove outdated URLs.
Action Plan

Weekly 30‑Minute Maintenance Calendar
Day
Task
Tool
Monday
GSC Pages report glance
GSC
Tuesday
Crawl 200 URLs for new 404s
Screaming Frog
Wednesday
Check HttpStatus for mixed‑content regressions
Httpstatus.io
Thursday
Review manual pending redirects
Redirection plugin
Friday
Preview 5 random pages mobile + desktop for design or meta issues
Browser
Saturday
Database & backups (WP‑DB Manager)
Host panel
Sunday
Rest!
FAQs And Troubleshooting

Q: My Yoast noindex tag isn’t respected—page still shows in Google.
A: Wait 2‑4 days after requesting re‑index. Also make sure robots.txt does not block the page; Google must crawl it to see the noindex.
Q: How often should I regenerate the sitemap?
A: Yoast does it automatically whenever you publish or delete a post—no manual triggers needed.
Q: Redirect chains keep returning after I fix them.
A: Many page builders store absolute URLs; update those internal links, then purge all caches.
Q: I see “Canonical points to itself” warnings—bad?
A: Self‑referencing canonicals are normal and safe.
High‑Five! 🎉
You now have a roadmap covering HTTPS, canonicalisation, link hygiene, index health, manual actions, and meta management.
Work through each job methodically, tick the box, and your site will run lean, secure, and penalty‑free for years to come.
Whenever you need a refresher, search this guide—every step is here. Happy auditing!
