Members' Preview
bloggers' KIT
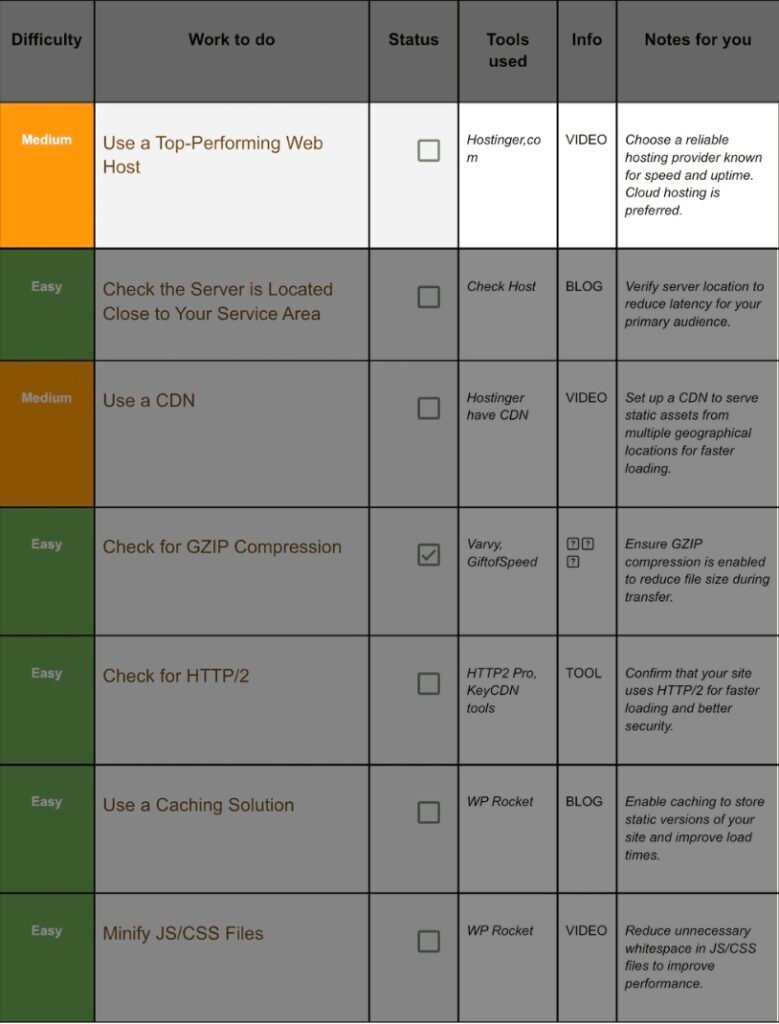
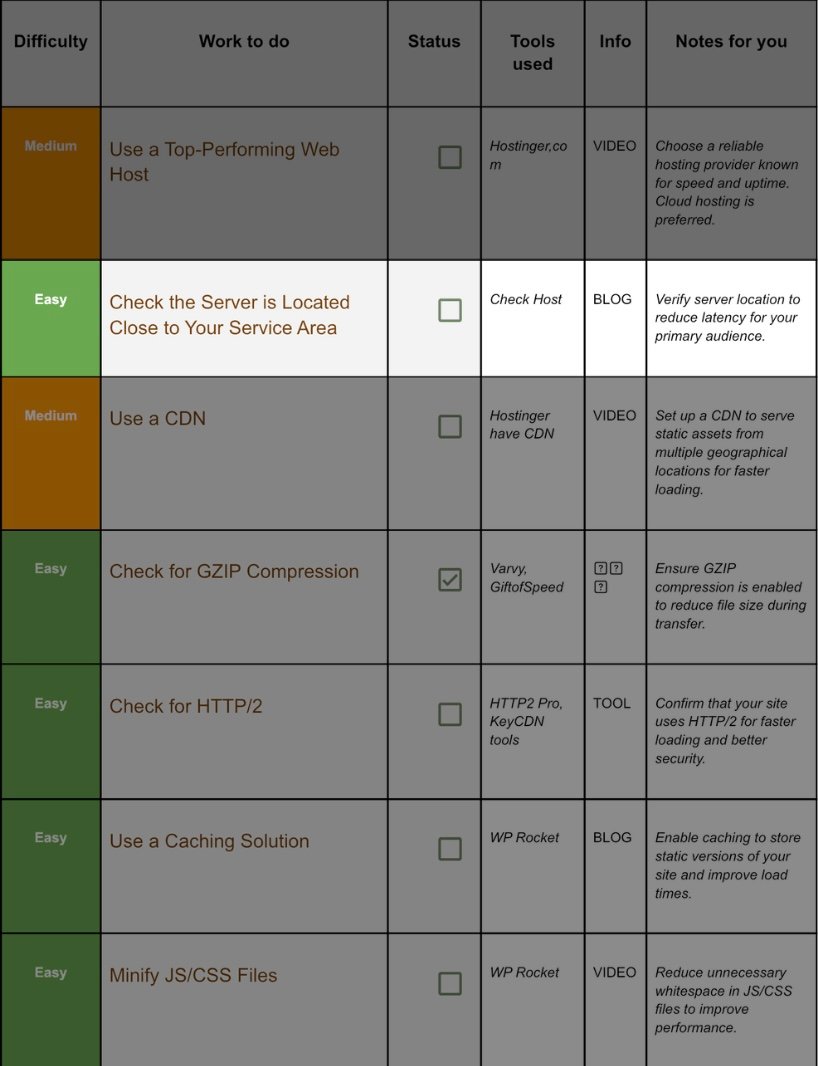
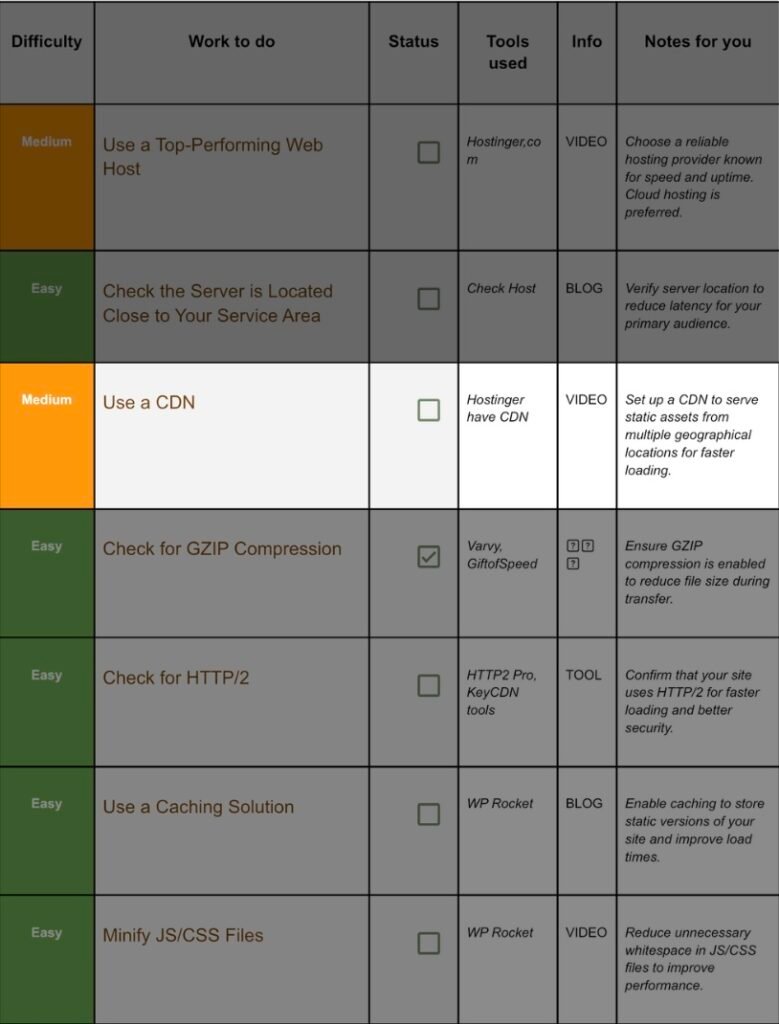
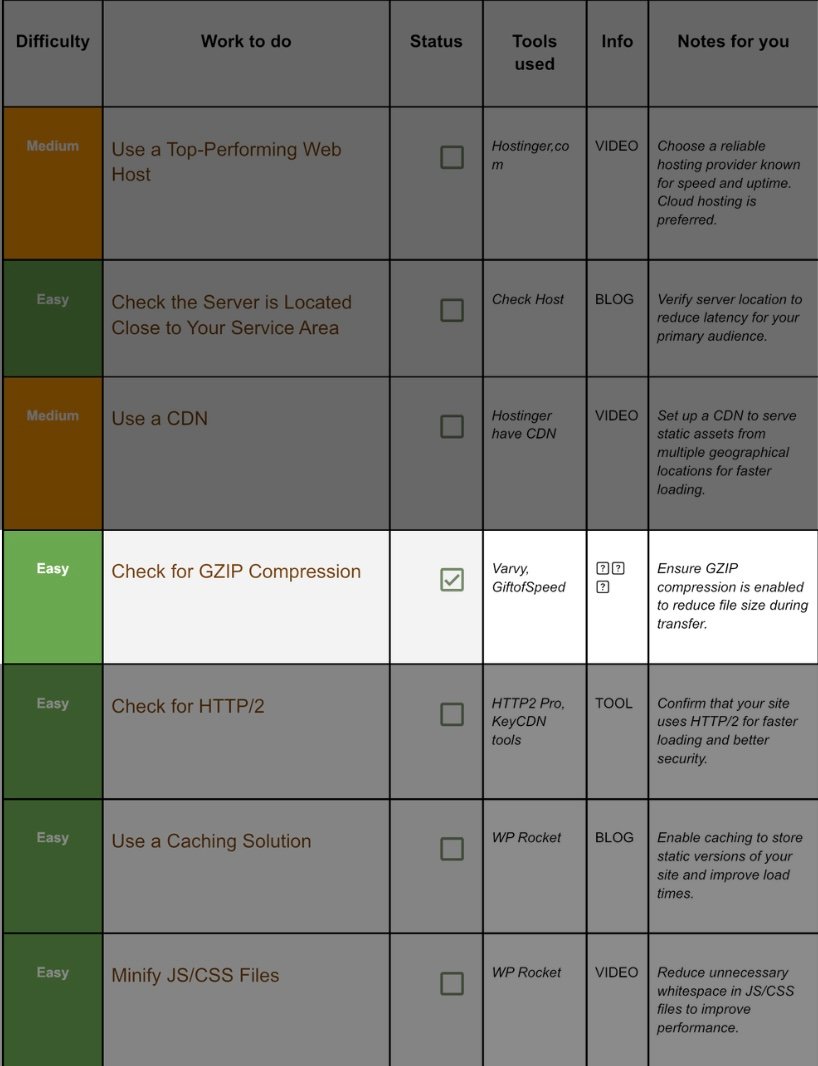
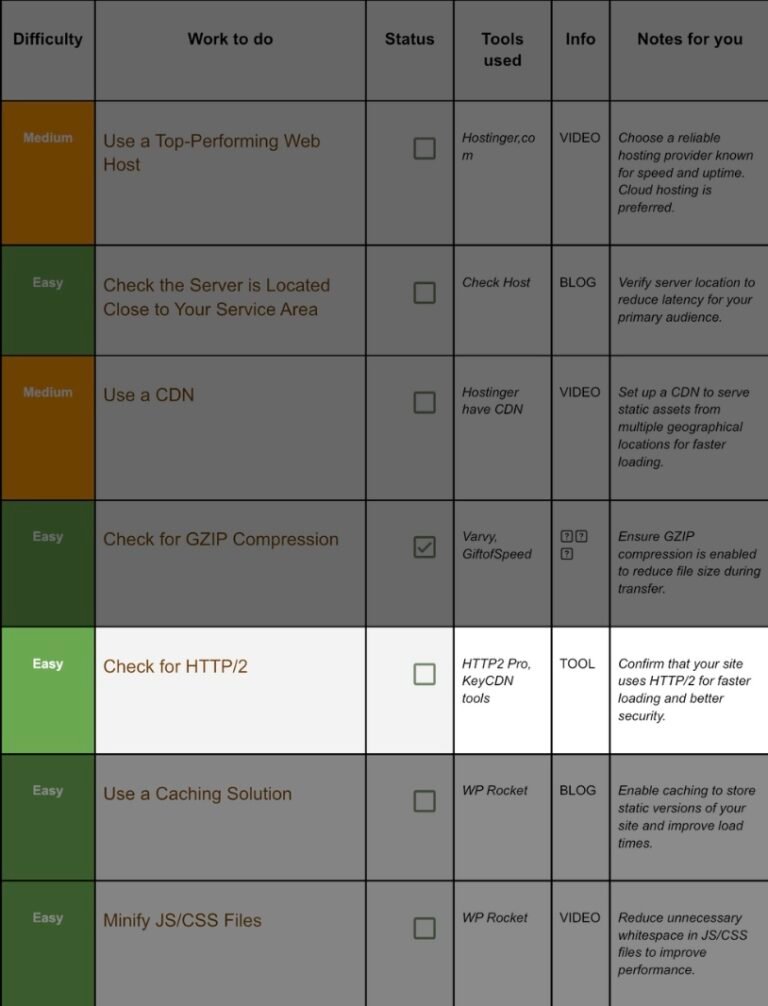
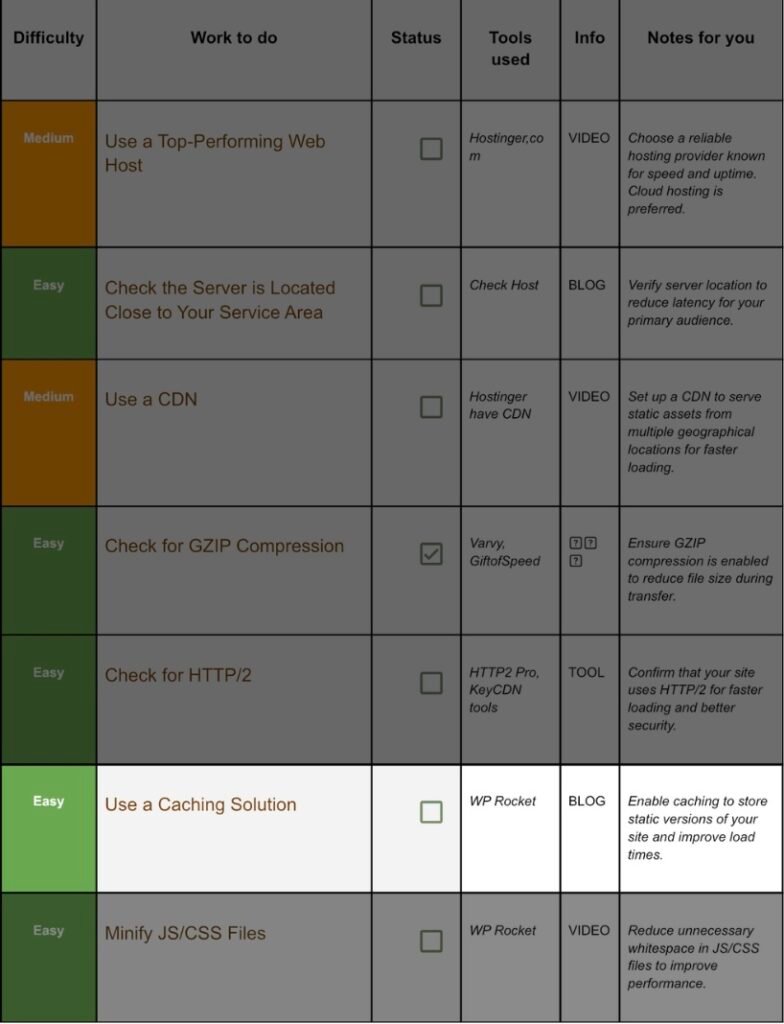
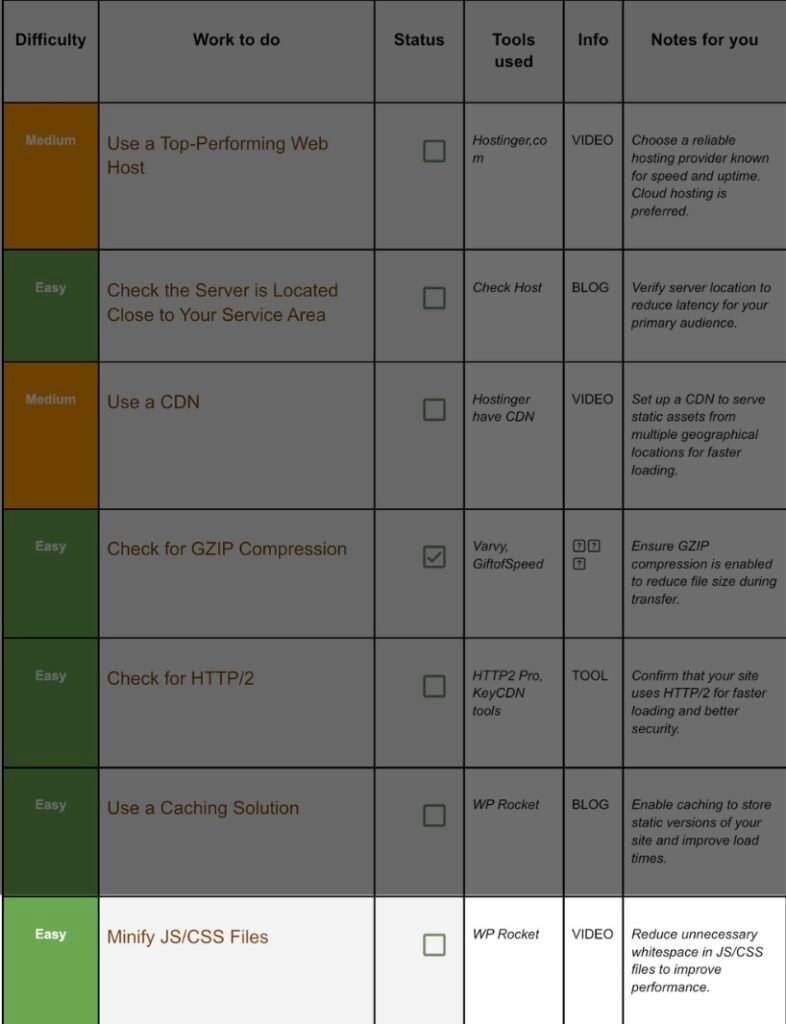
Performance Optimisation Tasks Guide [with Checklist]
Part 3: This is part 3 of 8-parts SEO Checklist. Go to now Previous or Next Part. In this checklist part you will learn about Performance Optimisation Tasks of blog website which will improve Performance of your blog. Download checklist now from button.
Disclaimer: In alignment with our business plan to minimize product costs for our customers, we may incorporate affiliate links.If a purchase or usage occurs through these links, we may receive compensation at no additional cost to the customer. Additionally, any discounts available through affiliate links are determined by the respective companies. If customer going to make a purchase, we encourage customers to verify any applicable discounts.
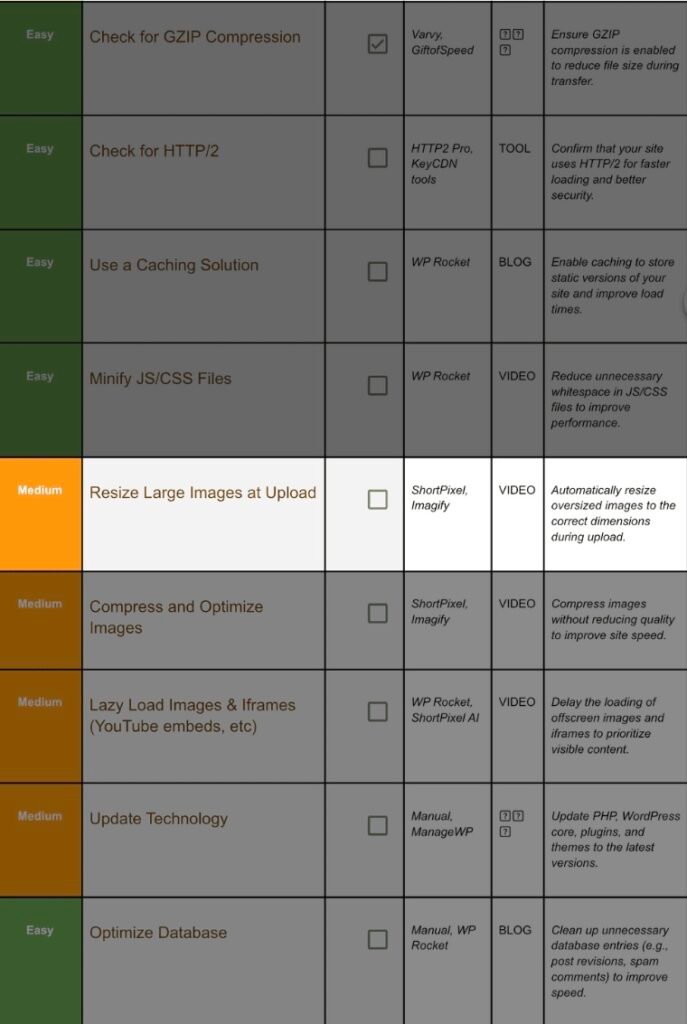
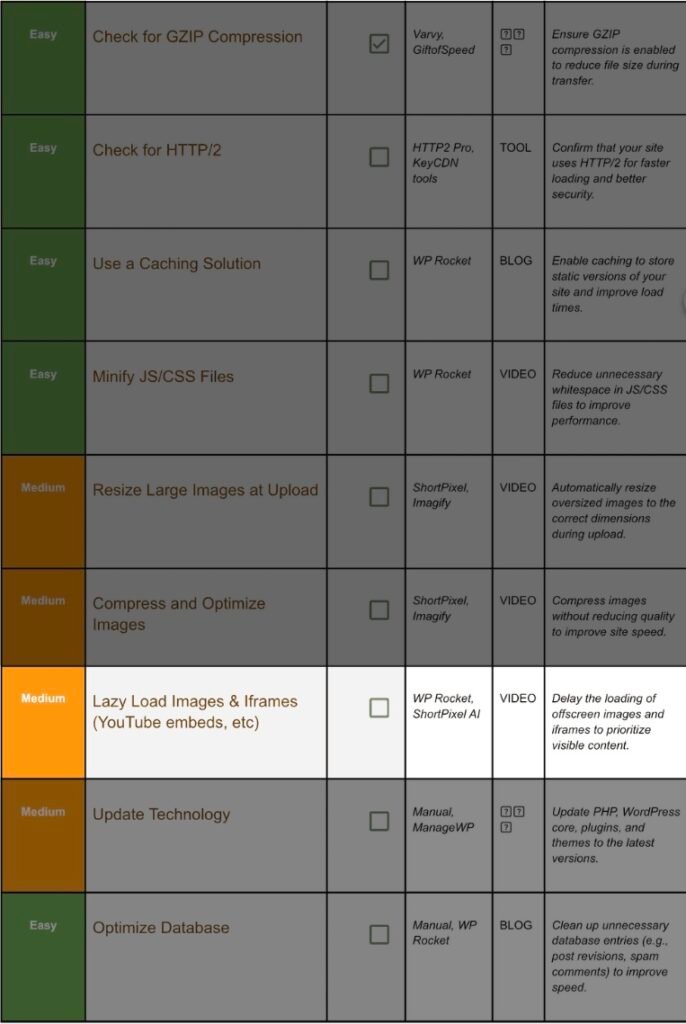
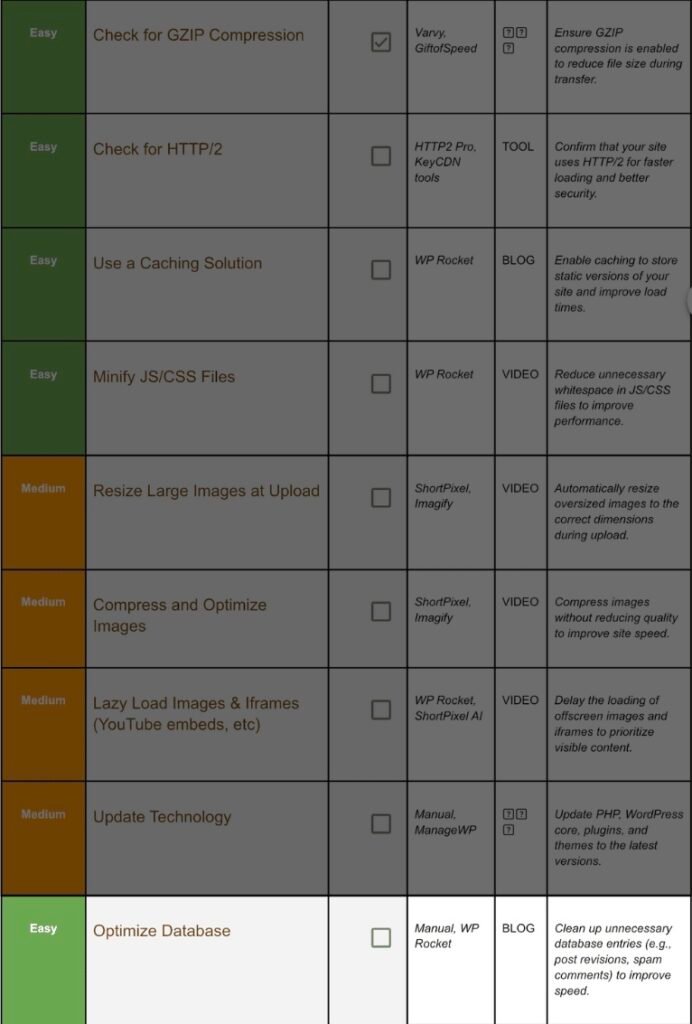
Performance Optimisation Tasks Guide
Template image: Click on it to download template
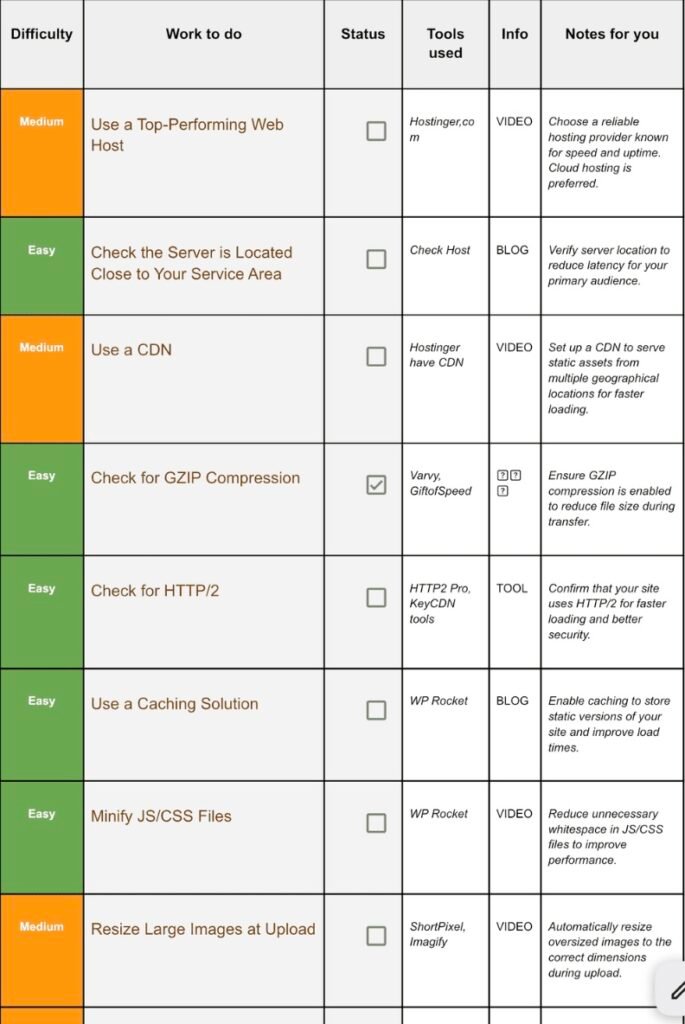
This SEO checklist is a long list of “Work to be done” on your blog or website to improve its SEO.
You can download SEO checklist from here then scroll down this page to find out how you can implement the Tasks given in the checklist.
Don’t try to do in 1 day🙂. The whole checklist’s task could take something like 3 months but it also depends on your team.
🌟Important: This below guide contains only Part 3 of the checklist, checklist have total 8 Parts. Click here to visit Previous or Next part of checklist.
Pro Tip: Collect all necessary resources (Bookmark it, download, buy or screenshot) before analysis, then start analysing ✅.
1. Use a Top Performing Web Host:
Step 1.1 Why Hosting Is Ground Zero:
No amount of caching or compression can fix a slow, overloaded server. Choose right once and you’re halfway done.
Step 1.2 Minimum Specs for 2025:
Feature | Why It Matters | What to Look For |
NVMe SSD | 6× faster read/write than old SATA disks | Listed in plan details |
HTTP/2 & HTTP/3 | Parallel downloads in one connection | Enabled by default |
Global datacentres | Pick a region near users | India / Singapore / US / EU |
Auto backups | Disaster recovery | Daily or better |
99.9 % uptime guarantee | Credible SLA | Credits if broken |
Step 1.3 One‑Minute Hostinger Shopping List:
- Plan: Cloud Startup (skip shared hosting if speed matters).
- Region: choose the datacentre closest to your main audience.
- Auto‑installer: WordPress + latest PHP (8.2+).
- Add‑ons to ignore: extra email, “priority support” upsells—skip for now.
- Checkout: pay for 12–24 months up‑front; shorter cycles cost more.
Step 1.4 Post‑Purchase To‑Dos:
- Record nameservers → change them in your domain registrar.
- In Hostinger hPanel → Performance toggle CDN to On (we’ll configure in Job 3).
- Set strong SFTP password and download the backup ZIP to your local PC.
2. Check The Server Us Located Close To Your Area:
Step 2.1 Test with Check‑Host:
- Visit check-host.net.
- Enter your domain → choose TCP Ping → Check.
- Review the latency column:
- < 100 ms = excellent
- 100–300 ms = acceptable if global audience
- 300 ms = move server or add edge caching
Step 2.2 Fixes if Latency Is High:
- Wrong region selected? Ask host to migrate you—usually free.
- Traffic split across continents? Keep origin where you are, then enable CDN (next task).
3. Use A CDN:
Step 3.1 Enable Hostinger’s Built‑in CDN:
- Hostinger hPanel → Websites → Manage.
- In sidebar click CDN.
- Toggle Enable → confirm.
- Wait 10–15 minutes for propagation.
Step 3.2 Verify CDN Works:
Paste an image URL into cdnplanet.com/tools/cdnfinder. The tool should list Hostinger CDN nodes. If not, flush DNS cache or wait a bit longer.
Step 3.3 Advanced Tweaks (Optional):
- Browser Cache TTL: set 30 days for images.
- Strip Cookies from Static Assets: lowers request size.
- Image optimisation add‑on: some CDNs convert to WebP on the fly—free speed.
4. Check For Gzip Compression:
Step 4.1 Test with Varvy:
- Go to varvy.com/tools/gzip/.
- Enter https://yourdomain.com.
- Green “GZIP is enabled”? Great—done.
- If red, proceed below.
Step 4.2 Enable GZIP (Two Clicks):
Apache server
bash
CopyEdit
# .htaccess
AddOutputFilterByType DEFLATE text/html text/plain text/css text/javascript application/javascript application/json
Nginx server
nginx
CopyEdit
gzip on;
gzip_types text/plain text/css application/json application/javascript application/xml+rss;
Save, restart server, re‑test.
5. Check For Http 2 or Http 3:
Step 5.1 Test with KeyCDN Tools:
- tools.keycdn.com/http2-test → enter domain.
- Green badge “HTTP/2 enabled”? Great.
- Not enabled?
- Check SSL—HTTP/2 requires HTTPS.
- Ask host to switch you to LiteSpeed or Nginx with ALPN.
6. Turn ON Full Page Caching:
Step 6.1 Install WP Rocket:
- Buy/download from wp-rocket.me.
- WordPress Plugins → Add New → Upload .zip → Activate.
- Licence key auto‑detects.
Step 6.2 One‑Minute Setup:
WP Rocket turns most best‑practice settings on by default. Still, tick these:
- File Optimisation → Combine CSS
- File Optimisation → Delay JavaScript Execution
- Media → Enable LazyLoad (we will refine in Job 10)
- Preload → Activate Preload & Prefetch DNS Requests
Click Save. Clear cache, then test homepage in private window.
Step 6.3 Verify Cache Works:
- Load homepage → right‑click View Source.
- Scroll to bottom; you should see:
<!– This website is optimized with WP Rocket … –>
7. Minify Java Script And CSS Files:
Step 7.1 WP Rocket Steps:
- File Optimisation → CSS Files: tick Minify CSS.
- File Optimisation → JavaScript Files: tick Minify JS.
- Combine only if the theme uses few small files; otherwise leave separate to leverage HTTP/2 parallelism.
- Test pages; if layout looks broken, exclude specific files (WP Rocket gives a list to un‑tick).
Step 7.2 Pro Tip:
Use Chrome DevTools → Network → sort by Size. Look for CSS/JS still > 100 KB. Investigate plugins loading bloated assets; replace or disable them.
8. Resize Large Images Upload:
Step 8.1 Install ShortPixel Image Optimiser:
- WordPress Plugins → Add New → search ShortPixel → Install → Activate.
- Create free account; paste API key.
- Under Advanced tick Resize large images.
- Set Max width: 1600 px (safe for Retina).
- Save & Go to Bulk Optimise → start scan (wait until progress bar hits 100 %).
Step 8.2 Imagify Alternative:
Imagify is from WP Rocket’s makers; same idea, slightly friendlier UI. Pick whichever you prefer.
9. Compress And Optimise Images:
Step 9.1 ShortPixel Settings:
- Compression type: Lossy (best size reduction, imperceptible on photos).
- PNG to JPG: tick – unless you need transparency.
- WebP generation: tick + “Deliver WebP via <picture> tag.”
- Remove EXIF data: tick (strips camera metadata).
Step 9.2 Run Bulk Optimise:
Let ShortPixel chew through everything. 500 images? Grab coffee.
Step 9.3 Future‑Proof Rule:
Tell writers: Never upload images larger than 300 KB; the plugin will do the rest.
10. Lazy Load Images, Iframes:
Step 10.1 Enable in WP Rocket:
- Media → LazyLoad: tick Images, Iframes & Videos.
- Tick Replace YouTube iframe with preview image – massive data saver.
- Exclude logo/avatar (first visible image) to avoid layout shift.
Step 10.2 ShortPixel AI Alternative:
ShortPixel AI serves images via their CDN + lazy‑load at the edge. If you already pay for it, turn off WP Rocket’s image optimisation to avoid conflicts.
11. Upto date Technology:
Step 11.1 Why Updates Matter:
- Security patches close injection holes.
- Speed gains: PHP 8.2 is 15–20 % faster than 7.4.
- New browser APIs require latest WP core.
Step 11.2 Safe Update Workflow with ManageWP:
- Sign up at managewp.com → add your site.
- Click Backups → enable daily.
- Dashboard → Updates:
- PHP: open Hostinger hPanel → PHP Configuration → choose latest stable.
- WordPress core: click Update.
- Plugins/Themes: update all, except abandonware (no update in 2 years).
- Use Safe Updates feature: ManageWP takes a snapshot, applies updates, compares screenshots, and rolls back if layout breaks.
12. Clean And Optimise The Database:
Step 12.1 How Clutter Slows You Down:
Every post revision, trashed comment, or expired transients adds rows. Queries grow heavier; page generation slows.
Step 12.2 WP Rocket One‑Click Clean:
- WP Rocket → Database.
- Tick everything except Draft posts if you keep working drafts.
- Click Optimise.
- Schedule automatic cleanup weekly.
Step 12.3 Manual phpMyAdmin (Advanced):
If WP Rocket fails:
- Hostinger hPanel → phpMyAdmin.
- Select your DB → export backup first.
- Click wp_posts → Search → post_type = revision → Delete.
- Run OPTIMIZE TABLE on wp_posts, wp_options, wp_comments.
Action Plan

Weekly 20‑Minute Maintenance Routine
Monday
Wednesday
Friday
ManageWP → Safe Updateplugins/themes
GTmetrix retest homepage & a blog post
ShortPixel process any new media
Clear WP Rocket cache
Check‑Host latency (spot routing issues)
Database cleanup (WP Rocket scheduled)
Glance at WP‑Health status
Review CDN analytics
Verify backups complete
Set calendar reminders; consistency beats heroics.
FAQs And Troubleshooting

Q 1: My layout broke after minifying CSS.
Untick Combine CSS; some builders need files separate. Or exclude the culprit file under Excluded CSS Files.
Q 2: Image previews look blurry with LazyLoad.
Increase ShortPixel thumbnail quality or disable “Replace YouTube iframe with preview” for that post.
Q 3: HTTP/2 test fails even though host says it’s on.
Ensure you accessed https:// (not http://). Plain HTTP can’t use HTTP/2.
Q 4: ShortPixel quota finished.
Switch to Lossless, or buy one‑time packs — they roll over forever.
Q 5: Database cleanup deleted something I need.
Restore last night’s automatic backup from Hostinger or ManageWP.
Final Pep Talk
You now have a concrete, repeatable system that covers:
- Server & network speed
- Code & asset optimisation
- Media resizing and compression
- Database & software hygiene
Finish the 12 tasks once, follow the 20‑minute weekly routine, and enjoy a site that simply feels light, secure, and ready for any traffic surge life throws at you.
Happy optimising—and remember: small, consistent 1 % improvements compound into massive wins over time.
